To set up the operating system Windows for yourself, you can not only change the background screen saver, welcome screen or appearance labels. Also available in Windows is the ability mouse pointer changes. This article will discuss ways to change the mouse cursor in Windows 7, 8.
Standard Windows cursors are stored in the Cursors folder. In this folder you can find many files with the extension cur And ani, the first one is normal and the second one is animated. A set of several of these files constitutes the schema that produces a specific pointer style.
Change the appearance of the mouse pointer in Windows
In order to change the appearance of the cursor, you need to go to the mouse settings. To do this, we run Control Panel, in the viewing options, select Small icons. Click on the label Mouse. 
In the window that opens, select the Pointers tab, where you can configure the external display of the cursor. The current scheme is displayed in the upper part of the window. Click on the scheme name to see the full list of available schemes. Select the scheme you like, then click on the field Settings. It provides information on all states of the mouse pointer. 
Even if you don’t find the most suitable among the standard schemes, you can always customize it yourself. To do this, in the Settings field, click on Status, or click on Overview. Next, from the proposed cursors, select one you like and click on Open.
There are functions for setting the shadow, as well as allowing or preventing the cursor from changing the shape when replacing the Windows theme. In order to change these functions, uncheck or check the boxes next to the corresponding items.
If standard schemes are not enough, then you can find them in large numbers on the Internet. Look for files with the extension ani And cur. Download and copy these files to a folder Cursors, then you can use them to change the appearance of the mouse pointer in Windows. If you want to save the generated cursor view, then click on Save As , enter a name, and then click on OK. 
After that, click on OK in the mouse properties window and the cursor shape will immediately change to a new one.
Downloading and Installing New Cursors on Windows
If standard cursors are already boring, or they just don’t suit you in some way, then you can install new cursors on Windows 7, 8. To do this, you can use several methods:

How to enable cursor change settings
In the event that the cursor on Windows does not change in the settings, then most likely this feature is disabled by the administrator. You can return this function in the following way. Open the Group Policy Editor. In the Run window, enter gpedit.msc and press Enter. Find the Personalization section and click on it. A list of commands appears in the right window, among which we find Prevent changing mouse pointers and double-click on it with the left mouse button. 
A window will open in which you need to check the box next to Disable or Not configured. After that, click on OK. Now the function of changing the shape of the mouse pointer in Windows 7, 8 is available. 
Changing the appearance of the mouse cursor can not only transform your Windows theme but also to make navigation more convenient.
And he only installed the one downloaded from the official Microsoft website, so as not to bother with changing the explorer interface. When I changed the pointer (increased it), it became more convenient to work. It feels like I put on weight by 1.5 or even 2 times. There are fewer unnecessary movements. It was not even comfortable for me to sit hunched over and I straightened up. In general, it became more fun. So I recommend it to everyone.
Let's move on Cursors > Cursors for Windows
Choose any pointer

Let's try the cursor located in the center in the picture above (Stealth). Point to it and click " More»


On the tab Pointers in section Scheme from the drop-down list, select the newly installed cursor scheme

Click Apply

I got an offer to replace the original circuit. pressed Yes

The pointer icon has changed

It was automatic installation cursor.
Manually this is done in the following way.
In the same window where we selected the installed scheme on the Pointers tab in the Settings section, select Basic Mode and click Overview…

In the unpacked archive with cursors, for example, select AppStarting.ani

It turns out the following

In the same way, change all types of arrows and click Apply

If you want to set a different cursor scheme and then return to this one again, it (the scheme) must be saved. Click Save as… in the window that appears, specify the scheme name and click OK

Now you can always return to the created pointer scheme

If you want to return the cursor to the standard one in Windows, select any type and click Default

Also on the Pointers tab, you can Disable pointer shadow uncheck the corresponding box and prevent themes from changing mouse cursors.
And the most important thing. If you delete or move the folder with pointers that you installed manually, then naturally everything will stop working. and when you try to change the cursor, the following message may appear
The modern Windows 10 OS allows you to customize almost any graphic element: from the Taskbar and Windows Explorer windows to icons and the mouse cursor. Today we will consider setting up the latter: how to change it beyond recognition using various tools (both built-in and third-party).
Replacing the mouse cursor on Windows 10
Sometimes we want something new in the computer: change the interface or use a new background on the "Desktop". In addition to these eye-pleasing changes, we can adjust the computer mouse pointer, with which we perform the vast majority of actions on the PC. You can make changes to the appearance of the device as Windows tools, and through third-party utilities.
Using system tools
With built-in tools, every Windows 10 client can change the look of their mouse pointer. As you know, he can change his shape in the process of working at a computer, depending on the situation. For example, a blue circle or an hourglass icon appears when the system is waiting for a window to load. In a special window, you can configure not only the main pointer, but also icons for all its states separately.
So, how to open this special window? How to customize the pointer in it? Take the following detailed instructions into service:
- Using the Start menu, launch the system partition for user settings called Control Panel. It will be in the list under the letter "P" or in the "Frequently used" block if you often opened it. Find the "Control Panel" section in the "Start" menu
- When the panel window opens, you will see a field for entering search queries in the upper right corner. Type the query "Mouse" there, and in the search results that immediately appear, select the link "Change the appearance of the mouse pointer."
 In the "Mouse" section, click on the link "Change the appearance of the mouse pointer"
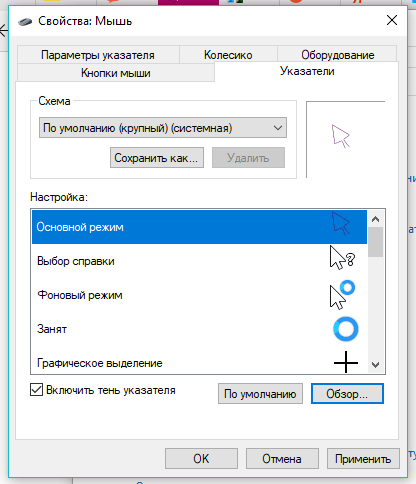
 - Another window will open, but smaller. It will be called "Properties: Mouse".
 After clicking on the link “Change the appearance of the mouse pointer”, the “Properties: Mouse” window will appear
 - Left-click on the "Scheme" drop-down menu to see a list of themes available in the this moment.
 Choose your favorite theme for the mouse cursor from the "Scheme" menu
 - Decide which design you like best, for example, we will give preference to a scheme called "Black (large) (system)".
 The scheme "Black (large) (system)" will set a large dark cursor
 - The name of the cursor will immediately indicate its size and color. If you want a big cursor, choose items with the words "huge" or "large". In order to choose an index that suits you, we advise you to look through all the available schemes. This way you won't miss anything.
- Optionally, you can turn on the shadow effect on the cursor. To do this, check the box next to the corresponding item below the list.
- The cursor can also be selected using the Browse button. Left click on it. In the open Windows Explorer»Choose any you like. You can preview it in the lower left corner of the explorer.
 Select the type of cursor you like in the "Overview" window
 - For example, choose aero_link.cur. It will be in the form of a palm. Click on "Open".
 Select, for example, the aero_link.cur cursor. in the form of a palm
 - If you do not like the selected icon, you can return to the previous standard using the "Default" button, which is located next to the "Browse" key.
- In the "Properties" window, now click first on "Apply", and then on the adjacent OK button to close the window.
Video: how to replace the cursor using Windows
With the help of special programs
For people who want to quickly install a beautiful new mouse cursor, special utilities have been developed. In just a couple of clicks, they put the various cursors available in their database. For example, the CursorFX program was created for such purposes. Today we will consider setting a pointer using its example.
The advantage of this software is that it has an interface in Russian. It is easy to understand even for a beginner. In addition, it has a large base of original pointers and various effects for them, including sound ones. Where to download the utility and how to use it?
- In any browser, go to the official website of the developer of the Stardock utility.
 Click the Try it Free button
 - Click on the blue Try it Free button to download only the free version of the program.
- Enter the address of the current Email for which you know the password. An email will be sent to it with a download link. We now click on the green Download button and follow the link that came to the specified mailbox.
- Download the installer and open it. We install the program. The procedure will not take much time.
- We launch the software and get into the main CursorFX window “Control Panel”. There are several tabs available here.
 The CursorFX window is divided into several convenient tabs
 - In the first block "My cursors" you choose a topic for the index. There are quite a few of them here. In addition, they are very unusual. For example, let's make a choice in favor of Drop Plus - an icon in the form of a large drop of water. We immediately click on the "Apply" button, which is located in the lower right corner of the window.
 In the first tab "My Cursors" select the pointer icon itself
 - In the second "Effects" block, add visual effects for certain actions performed by the mouse: pressing and releasing buttons, double clicking, etc. For example, click on "Left double click" in the left column and select any effect in the right column. After all the steps, click on "Apply".
 Apply visual effects to every mouse action
 - In the "Trace" block, define the type of trace that the cursor will leave behind. For example, let's put Smoke Trail. Double click on it to apply.
 In the third section, optionally set any trail you like, which will be left by the cursor
 - The Sounds block reveals other cursor features: sound. Again, for each action, you can select a specific sound. The selection procedure is the same as in the "Effects" tab.
 In the Sounds tab, apply the individual available sounds to each mouse action
 - In the "More Cursors" section, you can go to a page on the Internet, where there are many other topics for the index freely available.
 Using the "More cursors" tab, you can open a database of additional topics for the index
 - Under Options, the Windows client can adjust brightness, transparency, contrast, size, and more.
 In the "Options" tab, you can change many settings, including brightness, contrast, transparency, pointer size, and more.
Video: how to use the CursorFX program
How to change cursor size and color on Windows 10
If you wish, you can increase or decrease the size of your cursor in another way: in the " Windows Settings". There is also an option to choose a different cursor color. However, there will be only three options: black, white or black and white. Windows, unfortunately, does not offer colored and bright versions of pointers. How to open the desired settings window?
- First, click on the "Start" button to open the menu of the same name. In Windows 10, the Windows Settings window is called up very simply: for this, an icon in the form of a gear was placed above the device's shutdown button. If you hover over it with the mouse, the name of the "Settings" section will appear. We click on this icon only once.
 Click the gear icon to open Windows Settings
 - In the launched large window with a list of several sections arranged in the form of cells, select the block " Special abilities».
 Select "Ease of Access" in the "Windows Settings" window
 - You will immediately be taken to the first tab "Narrator".
 After opening the Accessibility section, the Narrator tab is launched
 - We immediately go to the penultimate block called "Mouse".
 Set the color and size options to your liking
 - Here you will see two options that you want to change: color and size. Mark the tiles you need. You will notice that the changes take effect immediately without any savings. Now you can close the window.
How to create your own cursor
If your imagination goes far beyond the standard Windows icons and you want a really original mouse cursor that will be pleasant to work with, create your own pointer. Here you can either upload icons already created before you, or draw your own using editors. Consider all two scenarios.
Downloading a new icon from the Internet
Before downloading a particular file on the Internet, you need to know its format. For static images, a file with the cur extension is used. If you download a whole set of icons to set it as a scheme (see the "Using system tools" section of this article), that is, set for each situation (for example, waiting for loading) an icon similar in theme to the main index, then the icons will be loaded in inf format.
- Download the archive with icons you like on the Internet. To quickly find a site for downloading, use the search engine "Yandex" or Google. At the same time, be careful: do not download files from suspicious resources.
- Open the archive you downloaded. For example, we downloaded a set of cursors called UltimateVi. It has a list of files, each of which is responsible for a separate cursor. Now let's look at how to install the downloaded cursor.
 The UltimateVi archive will have files for each cursor icon
 - Extract the folder with new pointers. To do this click on it. right click mice and large context menu select "Extract without confirmation". The folder will appear in the same download section that was installed in the browser.
 Select "Extract without confirmation" from the context menu
 - Now we need to launch the folder in Windows Explorer where you have extracted the archive. There will be one different file called install.inf. It is he who will help us include the UltimateVi theme in the list of schemes. We click on it with the right button and select the second item "Install" in the large list of options.
 Select "Install" from the context menu of the install.inf file
 - We click on "Open" in a small window with a security warning.
 Click on "Open" to force the file to run
 - Now click on "Yes", thus allowing the file to make changes on the device.
 Click "Yes" to allow the file to make changes on the device
 - Wait while the system installs the theme.
- Bring up the Mouse Properties window again using the instructions in the Using System Tools section of this article.
 Select Ultimate Vi from the Scheme drop-down menu
 - Click on the "Scheme" drop-down menu. In this list, the Ultimate Vi theme will be almost in the first place. We click on it.
- It remains only to click on "Apply", and then on OK to close the window. Now you can enjoy the new design of your pointer.
 Apply the Ultimate Vi Theme with the Applicable Button
Video: how to download a new pointer from the Internet and install it
Create your icon in Paint
You don't have to be an artist to draw your mouse cursor with this built-in Windows image editor. His tools allow you to make straight lines and use any color. This method is for you if you don't like the black and white colors of the classic mouse cursor, or if you just find them boring.
The method is not easy, as it consists of several stages, but it will help you create an original icon, without first installing programs on your computer (to edit the image, we will use services that work online, that is, you must have an Internet connection).
- Using the start menu, run graphics editor paint. It will be in the list under the Latin letter P or in the "Frequently Used" section if you have called it often.
 Find Paint in the Start Menu
 - Set the background size to 128 x 128 pixels. To zoom out, use the arrows along the edges of the page. If you want a big beautiful cursor, make the format larger than the specified one: there are no size restrictions here. However, do not forget that if you make a drawing on the entire sheet, the arrow will be full screen. Draw a cursor on a white sheet that you want to use in the future, for example, a straight red arrow without a filled space inside.
 Reduce the size of the sheet and draw the future cursor using any Paint tool
 - Click on "File" and in the menu, hover over the fourth item "Save As". Now we make a choice in favor of the first option with the png extension.
 Choose png format to save
 - We print the desired cursor name so as not to lose the file among other images on the PC. We save it to a folder to which you have quick access. Can be placed directly on the "Desktop".
 Name the file and choose a folder to save
 - Now we need to solve the problem with the white background. If you do not delete it, the mouse cursor will be in the form of an arrow on a white square. Naturally, this cannot suit you, so we make a transparent background, but with the help of another service, since Paint does not have such a function. Go to the image editor website. It is very easy and convenient to work in it and, in addition, it has wide functionality.
- Click on "Upload photo from computer". We select in the “Windows Explorer” the file that we just created using Paint.
 Click on "Upload photo from computer"
 - On the Layers tile, located on the right side of the screen, there will be one item called Background. In its right corner there will be an icon in the form of a lock. Click on it quickly twice to remove the blockage.
 Double click on the lock icon
 - In the Tool panel, select the Magic Wand. We click on the white background on the image and press the Delete button on the keyboard. Repeat the procedure for the white background inside the arrow.
 Select Magic Wand as Tool
 - As a result, instead of a white background, a background with a checkerboard pattern will appear. This will mean that it is transparent.
 The chessboard on the background means that it is transparent
 - Click "File" and then the fifth option "Save".
 Click on "Save" from the "File" menu
 - The "Format" parameter will already contain the png extension we need. We click on "Yes". The file will be saved in the Downloads folder on your PC.
 Click on "Save" to save the cursor drawing on a transparent background
 - The next step is to convert the file. We need to install another extension for it in order to set it as a result as a cursor. How to do it? It is necessary to use any online service for conversion. For example, take this site called Convertio. It is reliable and quickly converts almost all kinds of files. Click on the red "From Computer" button.
 Click on the red "From computer" button on the main page of Convertio
 - In Windows Explorer, select the image you just edited. We click on the "Open" button.
 Select the previously edited picture in the Windows Explorer window
 - Click on the drop-down menu "B".
 Open the "B" drop down menu
 - First, hover over the "Image" item, and then over the cur file type.
 Select the "Image" section and then cur in the list
 - Now click on the "Convert" button. Wait for the file you uploaded to finish processing.
 Click the "Convert" button to start the conversion process
 - After the procedure is completed, a green “Download” button will appear in the line. We click on it.
 Click on the "Download" button to download the file with the desired extension
 - The cur format file is already on your computer. Most of the procedure has been completed. The only thing left is to set the cursor using the "Properties: Mouse" window. Instructions for running this little block to customize the cursor are in the "Using System Tools" section of this article.
- We click on the already familiar "Browse" button. Switch to the folder where the converted file was downloaded. Looking for it on the list.
 Open the Red Cursor file using the browse button in the Mouse Properties window
 - The final action is the "Apply" button. You will see that the cursor has changed: now your own drawing is in place of the usual one.
 Click on the "Apply" button so that instead of the usual cursor, the pointer you draw appears
Creating a Cursor with ArtCursors
You can draw your mouse pointer not only with Paint, but also with third-party utilities from various developers. Use advantage special programs in that you won't need to convert the png image file separately. The utility will create a drawing already in the desired cur format.
Let's take ArtCursors as an example. Despite the fact that its interface is in English, it is easy to understand. Its disadvantage is that it is paid. However, at the beginning of use, a trial period for a month is offered. So, how and where to download it and then work in it?
- Download the installer of this cursor editor only from . Click on the green Download button.
 Click the Download button to download the installer
 - Open the archive you just downloaded and double-click the last setup.exe file in it.
 Double-click setup.exe
 - We follow simple step by step instructions to install the program in a special window. The procedure itself will not take much time.
- This will open the editor window itself. First, you will be given two options to choose from: use the program for free for a month, or register and pay the cost of the paid version. Click on OK to select the first option.
 Click on OK to start using the program during the trial period
 - In the next window, decide on the size of the icon and left-click on OK.
 Select the desired cursor size from the available options
 - Draw the desired cursor in the editor, for example, a purple arrow. We used the Line tool in this case to keep the drawing straight. At the same time, we had the transparent background mode turned on (the icon in the form of a green cube).
 Draw your future cursor in the editor window
 - When the drawing is complete, click on the section in the top File panel, and then click on Save as.
 From the File menu, select Save as
 - Give the image a name and click on the "Save" button. You can use any folder on your PC to store the file. We saved to the "Desktop".
 Apply your changes
Video: how to make your own cursor in ArtCursors
Creating an animated cursor
What is meant by "animated cursor"? This is a mouse pointer icon that constantly changes its appearance every second, that is, one picture is immediately replaced by another, and so on in a circle. Animation can be either short or long depending on the number of images in it. You can easily create an animated mouse pointer yourself. For these purposes, the program that we used in the previous section of the article to create a regular static cursor is suitable. Let's take a closer look at the steps to create an original animation:
- Launch the ArtCursors utility using its desktop icon. Click OK to continue using the free trial.
- In the program window, click on the icon in the form of a blue sheet of paper with a yellow circle drawn inside. It will be called New animated cursor.
 Click on the icon in the form of a sheet of paper with a drawn yellow circle
 - Select the cursor size you want. If you want a large pointer, check 128 x 128 or larger. Click OK.
 Choose the right size for the future animated mouse pointer
 - Draw the cursor you need, in particular its first picture in the animation. For example, we made a green border in the form of an arrow and did not fill the inside.
 Draw the first image to animate
 - Now in the upper right corner, look for the icon in the form of a sheet of paper with a picture of a pink videotape. Click on it to create the next image for future animation.
 To create a second drawing, click on the pink videotape icon
 - In a small box, we indicate that we are creating only one frame (Frame) and select the Insert after current frame value. This will mean that the next image we create will animate after the first one, not before it. If you want to use the first picture as the basis for the second one, leave a checkmark next to the Use current frame option. We left it, as it was necessary for the implementation of our ideas.
 Select Insert after current frame and click on OK
 - Our animation idea was to first have a void inside the animated cursor, and then a background of the same color would appear. We filled the inside of the arrow with green paint. You can watch the animation right in the process of creation. To do this, simply click on the button with a green arrow (similar to the Play button in a regular player) located on the toolbar at the top. The animation will be shown in the lower right corner of the window.
 Make a second drawing for animation
 - When you're done with the animation, click the File option and then Save as.
 Click on Save as to save animation to PC
 - Name your animation. In the menu "File type" will already be desired resolution. Select a storage location, for example, "Desktop" and click on "Save".
 Choose a location to store the file and click "Save"
 - In the "Properties: Mouse" window, using the "Browse" button, set the animated pointer that we just created.
 Select the file you just saved in the Mouse Properties window using the Browse button
Microangelo: Creating Windows Icons and Animated Mouse Cursors
You can draw an animated mouse pointer not only in ArtCursors, but also in other applications, for example, Mircoangelo from the developer of the same name. In it, you can make not only new cursors, but also different types operating room icons Windows systems. The user of this software has several modes at his disposal. With Animator, for example, animated icons are created, including for the mouse pointer.
What features does this program have?
- changes drawings for each parameter: color, size, tint, effects, etc.;
- offers special templates for editing;
- allows you to rotate images, as well as upload third-party images.
 You can edit existing templates in Micrangelo
 The application is available for download on the official resource of the developer.
IconLover: turn ready-made pictures into an animated cursor
The IconLover utility is suitable for creating icons (catalogues, programs, etc.) and cursors, including animated ones. Its advantage is that it can turn ready-made pictures into an icon and a pointer.
What else can this utility do?
- import and export files of various formats, including gif, png, bmp and more;
- make checkerboard and gradient fills in animation layers;
- create small and large icons;
- draw translucent icons for icons and cursors;
- use various effects: toning, shadow, smoothing, transparency and more;
- rotate, shift and reflect the picture.
 In IconLover, you can create both icons for catalogs and animated cursors
 You can download this useful utility for creative people from the official website.
Real World Cursor Editor: A simplified editor with many features and languages
The utility is a free application for creating static and animated mouse pointers. In addition to a large number of tools for creating drawings, the utility boasts the following features:
- simplified function of applying various effects to separate animation layers (blur, shadow, etc.);
- the option to import and export the created moving cursors as gif and png files, for example, for publishing on the Internet;
- uploading multiple images to create animation;
- optimization of animated cursor with repeating layers;
- additional languages (if desired, you can download to make it more convenient and faster to work in the editor);
- creation of signs in 3D format.
 Real World Cursor Editor allows you to create both animated and static mouse cursors
 The program is available for download on the official page of the RealWorld Graphics developer.
Windows features allow you to bring something new to the interface, for example, make a new cursor, unlike the standard one. You have the right to use third party utilities to create your own original cursor, such as the ArtCursors application, or simply to install ready-made themes, such as CursorFX.
The other day, sitting at a laptop, I realized that I needed to add a little variety, otherwise everything was already boring. Changed wallpaper :). But this seemed to me not enough and I began to look for something else to transform it. Since I do not like all sorts of programs that change the appearance operating system, then I decided to just change the mouse cursor, set myself black, as in Mac OS. This is my current cursor:
Beautiful, is not it? I like it more than the standard Windows white cursor that I've grown tired of. I changed not only the appearance of the main pointer, but also the background mode, the appearance when hovering over a link, etc.
Now I will show and tell you how I changed it all. I think you will come in handy and you will also bring a little freshness to your computer.
First we need to decide which set of pointers you want to change your cursor to. You need to download a set of pointers that you like. This is usually an archive that contains files with the extension .cur. These are the cursors.
Download the cursor set first. You can just type in Google, for example, the query “cursors for windows 7”, I checked there :). Or here is a link to an archive with pointers that I have installed - .
We need the files that are in the archive (and in my archive also in the Cursors folder) copy to folder C:\Windows\Cursors.
Copied? Great, let's continue.
We go to Start, Control panels. View switch to Large icons and choose Mouse.
A window will open in which we go to the tab "Pointers". We select the pointer we need, for example, first “Main Index” and press the button Overview… The folder C:\Windows\Cursors will open immediately (to which we have already copied our new pointers). Highlight the desired pointer and press the button Open.
You will see that one pointer has changed. Do this for all other pointers, or just the ones you want to change.
Almost done! It remains only to press the button Apply And Ok.
That's it, new and beautiful cursors installed! It has become more pleasant to work :). Good luck!
To improve the appearance of the OS, a large number of software. Various packages of visual components make it possible to change the interface, repeating more new version systems. There are programs that do not completely change the interface, but only its individual components - the transparency of windows, the appearance of the Start button, or the display of the mouse cursor.
How to change the mouse pointer?
This change will make the look of your operating system more personalized and spice it up a bit. If you are using Windows 7, you can replace the familiar appearance of the cursor in two ways: through personalizing your computer or through the control panel.
Change the mouse pointer through personalization
On the desktop, right-click to open the dialog box and select "Personalization". In the section on the left, we are interested in "Changing Mouse Pointers". Let's move on to this section.

This tab contains all the schemes that are installed on your computer. Choose a new pointer display from the options and confirm the changes. The cursor will immediately change to the new one you just selected. If you want to undo the changes, select the default theme - Windows Aero. Experiment with all the cursors that are included with Windows 7. You can try large black mouse cursors instead of the usual white ones.
Change the cursor through the control panel for Windows 7
Everything is simple here. Go to Start → Control Panel → Mouse and perform the manipulations described above.
To be honest, the standard set of pointers is very gray and miserable, there is nothing interesting there. Your best bet is to download a set of custom mouse pointers and use them. You can download them by typing in any search engine inquiry " windows cursors 7". Note that .ani cursors are animated, while .cur cursors are dead. After you find and download the set you like (archive with the .cur extension), unpack and copy it to a folder with standard set C:WindowsCursors.


On the "Pointers" tab in the settings list, select "Main Mode" and click the "Browse" button. The C:WindowsCursors folder opens into which you previously copied the new cursors. Select the pointer you like and click the "Open" button.

By watching how the pointers change, you can change the display of all or just the ones you like. After all the manipulations, you must save the new scheme. Click "Save As", write the name of the scheme and click "OK".