Whenever something goes wrong with your computer or laptop, there are a number of troubleshooting tools you can run to try and fix the problem. Windows 10/8/7 has several built-in commands that you can use to check and repair corrupted system files that cause problems when modified over time. One way to troubleshoot Windows problems is to scan your system and repair system files. It can help in all types of problems such as slow system, blue screen of death, sudden power failures and system crashes.
Let's take a look at how to run System File Checker in Windows using CMD command line And PowerShell, such teams as sfc /scannow and tools DISM. I would like to note that for the Anniversary update Update Windows 10, it will be better to use methods with PowerShell.
Check and Restore system files via CMD
System File Checker scans your computer for any damage or changes to system files which could otherwise interfere with the normal operation of your PC. From there it replaces the file correct version to ensure smooth operation. Using the command line, you can try to scan and restore system files of later operating systems like Windows 10/8/7 / Vista. Let's look at two teams sfc /scannow and DISM using CMD.
1.
- Run Command Prompt (CMD) as an administrator. Click "search" and simply write "cmd" or "command line", then follow it right click mouse and run as administrator.
- Specify the command sfc /scannow and wait for the process to complete.
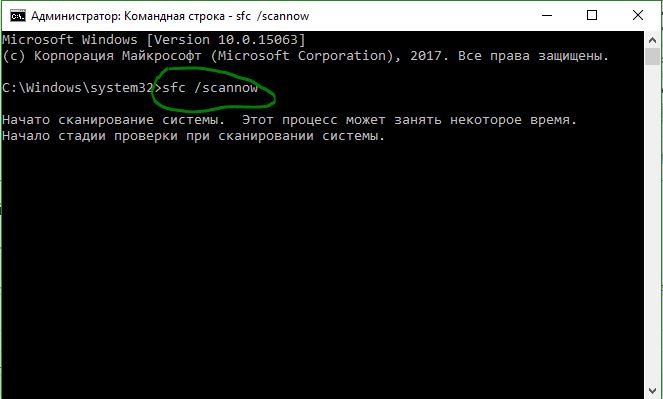
Note: After scanning your system, one of three results will be returned:
- There will be no system file errors.
- There will be system file errors and Windows will repair them automatically.
- Windows has detected errors but cannot repair some of them.
If option 3 shows you that an error has been detected and the system cannot recover, then repeat the procedure. I advise you to disable encryption and if they are available at the time of checking. Nothing worked out? Let's move lower.

2. (DISM)
If the above doesn't work in safe mode, there is one last method check for corruption in system files and fix them. We use the Deployment Image and Service Management (DISM) tool. The team works with Windows 8/8.1/10 systems. Open it back and use the following command:
The process may take a long time and the percentage scale may freeze. When finished, restart your computer and start it back sfc /scannow to make sure there are no errors or the error has disappeared.

Check and Restore system files viaPowerShell
We will use Windows PowerShell to show how to use the Maintenance and Management Service DISM to scan and fix damaged system files in Windows 10. This method will be more effective for updating Anniversary windows 10 than the command line.
1. Using the System File Checker (SFC) tool
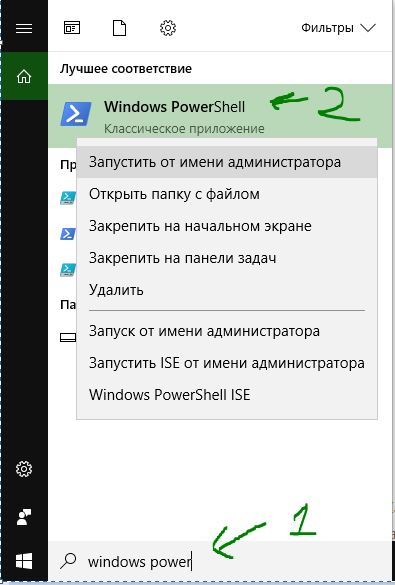
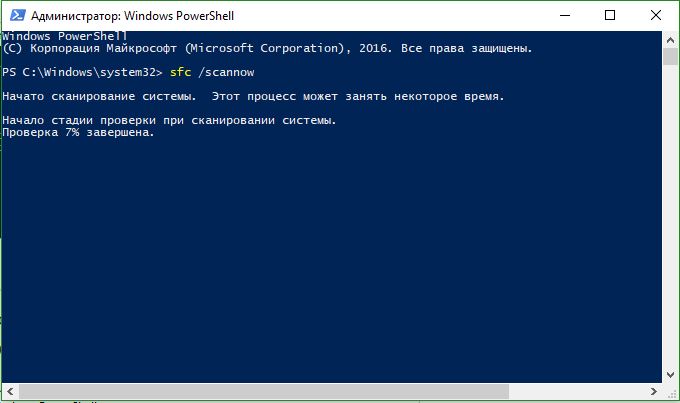
- Run PowerShell on behalf of the administrator. Click "search" and type windows powershell, then right-click and select as admin.
- Enter the command in the PowerShell window sfc /scannow. If the scan finds any problems, Windows will try to fix them. If Windows can't fix them, it will warn you that further investigation and action is needed. Move below if errors are found.
2. Using the Deployment Image and Service Management tool (DISM)
The DISM scan detects corrupted system files and Windows will try to fix them and give you a progress report at the end. If Windows is unable to find the files needed to repair damaged system files, you will also be provided with information on what to do next, with a link to Microsoft's website and troubleshooting options. Enter the below command into the PowerShell window.
DISM /ONLINE /CLEANUP-IMAGE /RESTOREHEALTH
If DISM fixed everything or did not reveal any errors, then restart your laptop or computer and run it back to check sfc /scannow.

It has long ceased to be a secret that operating systems from Microsoft, especially Windows 10, suffer from various problems and errors. In general, this practice is normal, since in programming it is impossible to create code that will be protected from all “threats”. However, in Windows, errors tend to accumulate, and when their mass reaches a critical point, a collapse can easily occur. Therefore, it is advisable to periodically scan operating system for minor errors and correct them in a timely manner.
How to check your hard drive for errors using standard Windows 10 tools
Oddly enough, the most important check of a computer should begin not with the operating system, but with the hardware, more specifically the hard drive. The hard drive is the most important part of the computer for Windows performance.. Minor breakdowns and errors on the surface are a common occurrence, but when there are system files on sectors with errors, the OS may stop functioning. It is very important to prevent problems from occurring and bad sectors: the former will lead to the crash of the operating system, and the latter can irreversibly damage even personal information. To analyze the surface of the hard drive, the Check Disk utility built into the system is used. Like a lot Windows programs, the application runs through a command line terminal (CL), which is called as an administrator:
It is important to remember that while the Check disk program is running, you cannot close the terminal, otherwise the program will stop. And not only may the errors not be corrected, but due to the program being disabled, new problems may appear on the surface.
Video: how to work with the Check Disk utility
How to scan Windows system files
System file integrity scanning can also be done using Windows tools. For this there is special utility System File Check. It also works through a command line terminal, and its main task is to analyze Windows files for integrity and recovery, in case they were changed by viruses or hard drive errors:

How to check Windows 10 storage for errors
The SFC program can repair damaged system files only in cases where the Windows storage is not damaged. However, if the problems have reached the installation components of the system, then it is necessary to restore them too.
 If the repository is corrupted, sfc /scannow will not work as expected
 To restore the storage, use the DISM.exe (Deployment Image Servicing and Management) utility. Starting with Windows 7, the program is included in standard set system components and is called through the CS:

During the test, the “slider” may get stuck at 20% for a long time, but you cannot turn off the PC or close the console while the program is running.
After the process is completed, you can again use the SFC utility to restore system files, if this was previously impossible due to damaged storage.
Video: checking Windows with SFC and DISM system utilities
Checking Windows Integrity via PowerShell Terminal
Another option for restoring storage is special team in the PowerShell console interface.
Windows PowerShell is a new console in Windows 10, which is designed to complement and subsequently replace the outdated command line terminal. Among other things, you can use PowerShell to manage standard applications operating system, “Store” and much more. Restoring storage files is also included in the list of functions of the new management terminal:
- In the system search, enter PowerShell, after which the result with the signature “Classic application” is opened as an administrator.
 Through Windows search run PowerShell as administrator
 - In the console we register and run the command Repair-WindowsImage -Online -RestoreHealth. To perform it correctly it is necessary active connection to the Internet.
 In the console we register and run the command Repair-WindowsImage -Online -RestoreHealth
 - We wait until the task is completed, then we reboot the PC.
 The storage recovery process may take some time
Third-party programs for checking the system for errors
In addition to built-in tools for correcting errors and shortcomings of the system, there are specialized programs and utilities from third-party developers. Most of them work on the click to all repair principle - a function to simplify the interaction between the program and the user. Such programs can solve a lot of system problems, but you should be careful when choosing them, as they can also create problems. Excessive tampering with the registry or services can have a detrimental effect on Windows performance.
Windows Repair Toolbox is a comprehensive utility for maintaining the operating system with a huge amount opportunities. The functionality of the program is almost unlimited, since it uses other specialized applications. They are available for download and installation right inside the Windows Repair Toolbox interface.
 Windows Repair Toolbox is a comprehensive utility for operating system maintenance
 Unfortunately, the program does not have a Russian interface, but the names of the graphs and applications are very easy to navigate. In addition to standard searches for system errors, registry and hard drive problems, the application's capabilities also include:
- removal of malware;
- test for opening file types and device capabilities;
- uninstalling programs;
- creating backups and more.
Anvisoft PC PLUS is free program, which was created according to the Microsoft Fix It principle. Only, unlike its “relative”, Anvisoft PC PLUS works successfully on later versions of Windows.
The program performs various tasks, mainly fixing system errors, completing libraries, and can even fix some of the BSoD errors ( blue screen death).
 Anvisoft PC PLUS is a program for fixing operating system errors
 The principle of operation of the program is very simple: you need to select the category of the problem and run the fix tool. Within a short period of time, the application will generate a list possible problems and will create a scenario for solving them. The user only needs to put the process into action.
Preventing the occurrence of serious errors is an important component of the longevity of the operating system and the computer as a whole. It’s better to spend an hour every one or two months than to waste days on end reinstalling the operating system and earning money for new components.
As the owner of a computer with Windows 10, you have repeatedly witnessed that the “ten”, although it is constantly being improved, is a rather crude operating system, and a lot of problems arise in it. Developers solve only the most common problems by introducing fixes into service packs or releasing emergency patches (fixes) to get rid of a specific error. So, for example, it happened with When special cases arose relating only to a computer with a certain hardware or software, Microsoft offers an integrated troubleshooting tool.
Launching the Problem Determination Tool
Diagnostics of a computer with Windows 10 begins with launching a tool that contains a lot of tools designed to find and correct errors that have arisen on a PC.
Note that Windows 10 includes about 20 tools designed to identify problems and then fix them.
The tools are launched through the “Control Panel”.
- Go to the “Control Panel”.
- Switch the element visualization type to “Categories”.
- We launch the “Troubleshooting” applet to open a window with a list of applications for troubleshooting your computer and fixing them.
The principle of operation of any component is as follows: it checks the current system settings and compares them with the default settings. If inconsistencies are detected, the user is notified about this and is asked to return Windows settings 10 to its original state or somehow change it automatically to resolve the problem. This is how Microsoft diagnoses and fixes problems with running software.
Composition of problem identification tools
The conflict resolution tools are divided into several categories, many of which also include subcategories.

- Programs – This tool can be used to run applications that are experiencing incompatibility issues when launching.

After starting the search for problems, the utility will scan the system and display a list of applications installed on it. In the window, you need to select the problematic program and click “Next” to run diagnostics to identify the source of the conflict.

- Hardware and sound – using the tools located in this category, the equipment used on a computer with Windows 10 is diagnosed.

The funds include:
- device configuration – detection of difficulties in operation or during the configuration process of a specific hardware component computer;
- sound – used when problems occur during playback/recording of sound or conversations on Skype and similar programs for Windows 10;
- network – diagnostics of operation and configuration of networks, including wireless, and network devices;
- printer – getting rid of conflicts that arise during the printing process;
- Windows Media – search for reasons that cause problems with playing videos and DVDs;
- video playback – identifying reasons that prevent video files from being played;
- background transfer service - diagnose problems that prevent files from downloading in the background;
- Apps from the store - identifying factors that prevent apps from the Windows Store from functioning properly.
As you can see, the set of tools for identifying problems and returning your computer to normal operation in Windows 10 is large. Another question is their effectiveness. But here the entire responsibility lies on the shoulders of developers with more than 20 years of experience in creating operating systems.
In any case, these tools have more than once saved beginners from performing full reset or completely reinstall it.
For ease of search required application All tools can be displayed in one window without sorting by category. The “View all categories” button is responsible for this.

Working with tools
To use diagnostic tools, absolutely nothing is required from the user. The operation of each element is accompanied by the launch of a wizard window with tips, a couple of buttons and the presence of switches (checkbox, checkbox).

The only thing you should do after identifying the problem is to apply the recommended fix for it.

Be careful, the application will require administrator privileges to change some settings. Such functions are distinguished by the presence of a blue and yellow shield icon.

New features
Windows 10 has new features for identifying and correcting problems in its functioning, which make it possible to detect a problem before the computer starts (in preboot mode).
To open a menu with a list of available tools, restart the computer while holding down the Shift key. After the reboot, on the action selection screen, click “Troubleshooting”.

There are two options available here: returning the PC to its original state ( Windows reset 10) and additional parameters.
In the additional parameters there are tools that allow you to restore Windows 10 functionality by:
- rollback to the previous state;
- using a system image;
- return to the previous build;
- launching tools for restoring downloads of the “tens”;
- using command line features.

As you can see, Windows 10 is distinguished not only by the presence of errors and problems, but also by a set of tools for eliminating them and returning the computer to a working state, sometimes without requiring virtually any activity or knowledge from the user.
(Visited 26,077 times, 1 visits today)
Unfortunately due to problems with hard drive not insured either old computer, nor new. Errors when reading and writing can appear on any of them with equal probability. The Windows 10 operating system has a couple of built-in tools that allow you to check your disk for errors and successfully fix them in most cases.
Method 1. Open the list of local disks on your computer and right-click on the one that has read or write errors. IN context menu you need to select the “Properties” item.
In the window that appears, select the “Service” tab and click the “Check” button. operating room Windows system 10 may issue a warning like this:
We ignore it and click the “Check disk” button. This will start scanning the hard drive partitions, searching for and eliminating errors.
If errors or problematic or damaged sectors are found during the scan, then upon completion of the process you will receive additional information about them.
Method 2. The second option is to use a console utility chkdsk, which since Windows 2000 has been standard program, checking hard drive HDD, or removable storage device (flash drive or memory card) for file system errors. To use its functionality, you need. After that, enter the command:
Chkdsk X: /F /R
Here X: is the drive letter, and the keys /F And /R tell the application that it needs to look for errors, damaged sectors, and if any are found, fix them without fail. For the logical partition C:\ on which the system is installed, the command will look like this:
If you want to scan the partition on which Windows 10 is installed for errors, then when you start the process you will see this message:
You shouldn’t be afraid of this - just press “Y”. The scan will start hard drive for errors:
It can take from 10 minutes to a couple of hours - it all depends on the volume. At the end, you will receive a detailed report on the problems found on the HDD.
If bad sectors will be a lot, then you should think about urgently replacing the hard drive with a new one. Otherwise, you risk losing all available information if it crumbles.
If you encounter errors in applications or operating system (especially in tasks related to writing or reading information on the disk), then there is a high probability that there are various annoying errors on the disk. They may occur due to improper shutdown (system crash or sudden power outage), physical damage to the disk (shocks, drops, vibration, etc.), improper operation, or too long a period of use. In this case, it is recommended to check the disk for errors. The check may not fix the problem itself, but it will help you navigate the diagnosis of the problem and move in the right direction in trying to return your computer to working condition.
Note: All actions in this instruction are performed on behalf of the Administrator. If your account does not have the appropriate rights, you will need a password for the Administrator profile.
How to check a disk for errors in Windows 10 via Command Line
You need to run the utility chkdsk. It can check the disk for errors and fix them if necessary. The same procedure starts automatically along with Windows if the system itself detects problems with the partition. You can initiate the scan manually if necessary.
Please note: team chkdsk Only supports drives formatted in NTFS or FAT32 format. ReFS does not need to be checked at all, since it file system has its own integrity checking mechanisms.
Please note again: If the system is currently using a disk that is being scanned, errors will not be corrected. In this case, Windows will prompt you to schedule an automatic fix after the next reboot.
If Windows finds errors but can't fix them, try using the Check Disk command offline. In this case, the system disables access to the disk for other programs and tries to correct its operation. After the procedure is completed, the disk is activated again and applications will be able to read and write information to it. To check offline on the command line you need to use the command chkdskX:/f/OfflineScanAndFix. In this case X: is the disk that needs to be checked.
To display additional arguments for chkdsk(more steps), enter chkdsk /? . Command line will display a list of available commands.
How to run disk diagnostics in Windows 10
Another option is to use a storage diagnostic utility. In the command line running as Administrator, enter the following command:
stordiag.exe -collectEtw -checkfsconsistency -out X:\XXXX.
Instead of X:\XXXX Enter the location where the system will save the scan results. Please note that after this Windows commands will check all connected drives, so the process may take a little longer. Just be patient and wait for the message that the drive diagnostics have completed successfully.
It must be said that this method only collects information about the state and is unlikely to help to the average user fix disk problems. However, for a specialist, the collected information can provide a lot of useful information. The diagnostic utility collects information about the results of the test chkdsk and any errors detected, registry files associated with the drives, and the Windows Event Viewer log.
How to Check Hard Drive Errors Using PowerShell
In a more modern PowerShell utility a separate command is used to run disk error checking.

When checking a disk for errors, you may need a command that will disable communication between the drive and applications (offline mode), which is why programs will not be able to write information to it. The team is responsible for this procedure Repair-Volume-DriveLetterC-OfflineScanAndFix. Again, instead WITH you must enter the letter of the drive you need.
Checking disk errors in Windows 10 through Explorer
If Command Prompt and PowerShell are not suitable for you, you can use more in a simple way check the disk for errors. IN Windows Explorer All the necessary mechanisms are already built in with a friendly user interface.

How to check a disk for errors through the Control Panel
In the classic panel Windows management more for a long time You'll find options and tools that aren't found in the more modern Settings app. Checking the disk status is one of them.

If, after checking and correcting errors, you continue to observe problems with your computer, then it makes sense to think about troubleshooting elsewhere, or try to replace the media with another one.