How to open PowerShell from the Win + X menu
This method is very convenient in Windows 10. Starting from Windows 8, Microsoft introduced the “Power Users” menu, which contains many useful elements such as “Control Panel”, “ Network connections", etc. Of course, Windows 10 also has such a menu. It contains a PowerShell element and a PowerShell (administrator), the latter is exactly what we need.
To access this menu in Windows 10, press Win + X on your keyboard or click right click mouse on the Start menu.
In the menu that opens, select PowerShell (administrator).
Opening PowerShell using Search in Windows 10.
In Windows 10, you can use the search icon on the taskbar. Click on the search icon and Type PowerShell, press CTRL + SHIFT + ENTER to run PowerShell as administrator.
This also works in the start menu, just start typing PowerShell, then right-click on the view that appears Windows PowerShell and select Run as Administrator.

Launch an instance of PowerShell from Windows 10 Explorer

You can launch PowerShell from Explorer. You may wonder why you need this. Let me show you a sample scenario.
Whenever you press and hold the SHIFT key and then right-click on a folder in Explorer, you will get an item in the context menu "Open PowerShell window here". This is very convenient, you just open a PowerShell window at the desired path.
Unlike Linux, in which applications are traditionally installed from external repositories, into the OS Windows installation most desktop programs run from EXE or MSI-file, less often using a web installer that downloads an executable file to the PC. According to adherents Linux, this method has a number of disadvantages, so, firstly, the desired program you have to manually search the Internet, and secondly, there is always a risk of downloading an outdated or virus-infected version.
And indeed, the installation software from trusted repositories reduces risk "pick up" The virus helps save time spent searching for the necessary software, and in general, significantly simplifies the procedure for installing and updating software packages. However, the ability to install applications from external repositories is also present in Windows, it’s just that this function has not received wide recognition. Yes, in the tenth Windows versions there is a special module that allows you to download and install applications from an online or local source using the command line PowerShell .
To view the list of available comadlets, run PowerShell as administrator and run the command Get-Command -Module PackageManagement .

The current version of the module has 13 command belts. Here they are:
Get-Package- displays a list of installed programs and components.
Get-PackageProvider- Using this command you can get a list of supported software providers.
- the command searches for programs in the source.
Get-PackageSource- obtaining a list of sources.
Install-Package- the command installs the program on the computer.
Uninstall-Package- deleting the program.
Register-PackageSource
- adding a software source for a supported provider.
Save-Package- saving the application distribution without installation on the computer.
Set-PackageSource- setting the provider as a source of packages.
Unregister-PackageSource
- removing the supplier from the list of package sources.
Now let's see how to use all this. First, you need to find out which software providers are supported. Run PowerShell as administrator and run the following command:
Most likely, after running the command you will be prompted to install the provider nuget. Nuget, as well as PSGallery and a number of other providers are more focused on system administrators, but for ordinary users it is more suitable, however, it is worth installing so that in the future the system will no longer offer it.

Therefore we introduce y , press enter and get a list of available providers. Now let's connect the provider by executing the command below and confirming the installation by entering y :
Please also note the warning that the provider is not marked as reliable.

This means that each time you install a package, you will be asked for confirmation. To disable it, you need to add the provider to the list of trusted ones by running the following command:
In this case, a folder should appear in the root of the system drive.

Now let’s make sure that the provider is installed and you can work with it:
Get-PackageSource
A positive result will be indicated by a flag true in a collumn InTrust. So, the provider is connected, now let's install some application on the computer. Naturally, for this we need to know whether it is in the database. There are two options - you can go to the official website of the supplier chocolatey.org/packages and enter its name into the search form.

Or search directly in the console PowerShell using the cmdlet . Find and install the browser Opera . We execute the search command, specifying as a parameter Name program name and vendor name as parameter Source :
Find-Package -Name *Opera* -Source Chocolatey
The application has been found in the database, let's install it, but before that we must allow, if this has not been done before, the execution of scripts PowerShell otherwise executable files programs may not download.

Politics is changed by such a team.
It's hard to find a person who wouldn't wait new Windows 10. Not only visual, but also functional changes were of interest. According to the developers, built-in applications make life easier for users and make it more comfortable. Problems with the store are possible in different cases, but mostly they are associated with updating to version 10. In some cases, not only the store is missing, but also the Edge browser.
You can perform the reinstallation in different ways. But they are all related to the utility PowerShell, since the Windows 10 Store uninstall button in the application settings section is usually not active. For this reason, this article also contains detailed information about launching and working in PowerShell Windows 10.
Running the PowerShell utility
Finding store information

Store setup

Removing the Windows 10 Store

Quick store installation method
Also for easy installation Windows Store 10, you can enter and execute the following code in PowerShell:
$manifest = (Get-AppxPackage Microsoft.WindowsStore).InstallLocation + "\AppxManifest.xml" ; Add-AppxPackage -DisableDevelopmentMode -Register $manifest
By mistake you may be running code from command line or applications " Execute" Don't forget that the code must be run from PowerShell, as described in detail earlier.
Easy installation of all removed packages
If you are only uninstalling a store, you can simplify the installation process by running the install all deleted packages Windows 10. Using the same code, it is easy to perform a mass installation of all previously removed applications, thereby reinstalling all the necessary ones at once.
Enter a code:
Get-AppxPackage -AllUsers| Foreach (Add-AppxPackage -DisableDevelopmentMode -Register “$($_.InstallLocation)\AppXManifest.xml”)
After this, all that remains is to press Enter. Windows 10 will take some time to restore everything.
- Sometimes cause execution failures Windows applications 10 may become different installed antiviruses. Pay attention to them if the reinstallation does not go as described earlier.
- It is better not to get carried away with installing or removing built-in programs, as this may cause stability problems.
- Also, if the information on your PC is important to you, it is recommended to create backups before taking this or that action.
- The correct action is also to create a checkpoint for recovery in case of unacceptable errors or problems that cannot be eliminated by simpler methods.
Video on the topic
How to open PowerShell from the Win + X menu
This method is very convenient in Windows 10. Starting from Windows 8, Microsoft introduced the “Power Users” menu, which contains many useful items such as “Control Panel”, “Network Connections”, etc. Of course, Windows 10 also has this is the menu. It contains a PowerShell element and a PowerShell (administrator), the latter is exactly what we need.

To access this menu on Windows 10, press the Win + X keyboard shortcuts on your keyboard.
In the menu that opens, click on the item PowerShell (administrator).
Opening PowerShell using Search in Windows 10.

In Windows 10, you can use the search icon on the taskbar. Click on the search icon and Type PowerShell, press CTRL + SHIFT + ENTER to run PowerShell as administrator.
This also works in the start menu, just start typing PowerShell, then right-click on the view that appears Windows PowerShell and select Run as Administrator.
Launch an instance of PowerShell from Windows 10 Explorer
You can launch PowerShell from Explorer. You may wonder why you need this. Let me show you a sample scenario.
For many users, this integral element of the Windows OS seems like a real mystery. When they open it, they see a list of incomprehensible symbols, which is impossible for the uninitiated to understand. But do not underestimate it, this is a program that has an important management function and can simplify work with a PC, no matter what it is.
Utility fully automated, to manage work processes, minimal human intervention will be required. All you need to do is give the right commands. But before doing this, you need to understand the main question: What is Windows PowerShell, what purposes does it serve and what functions does it perform.
Brief overview of the program
Essentially, this is an improved version of MS-DOS, the oldest disk operating system from Microsoft, released back in the mid-80s. last century. It contained applications with function of interpreters, far from perfect, were able to issue a few simple commands.
Developers have repeatedly tried to compensate for the shortcomings of MS-DOS with additional components for running scripts, such as MS Script Host, with languages like Jscript, but this only partially solved the problem. In 2003, development began on a program capable of replacing the old shell, called Monad, now known as PowerShell. Although he launched for the first time at the end of 2006 and included in the Windows XP OS, it was released in its completed form only after 10 years of continuous improvements, in 2016, when it received open source code. PowerShell is widely used in Windows 7, 8 and 10. 
Windows PowerShell - what is it?
It is impossible to answer this question in a nutshell; it is too complex and requires detailed consideration. It is an automation tool with extensible properties and open source code– a shell that contains a command line interface with a scripting language for executing the scripts contained in it. A set of scripts enclosed in system files has a PS1 extension, but for the convenience of users starts as normal BAT and CMD files.
Thus, PowerShell is nothing more than a scripting language created on the .NET platform to perform tasks related to managing files stored on the system drive, running processes and services. In addition, he is subordinate account management on the Internet and any settings, from system settings to settings for the functionality of individual applications. But PowerShell itself is only a shell; the main functions are performed by the accompanying elements that fill it. Next, we will try to understand PowerShell so that working with the utility becomes clear even to “dummies”.
Cmdlets
The most important ones are cmdlets, executable files containing own program , loaded into a computer to perform assigned tasks. They are the main component of Windows Power Shell, responsible for its functionality, and are a set of commands for running a script entered on the command line.
This is slightly different from queries entered into the browser search bar, but it has same principles. The shell contains a stored collection of hundreds of these commands that perform specific tasks. Cmdlets are formed according to the usual Verb + Noun principle, which reflects their purpose. 
Conveyor
The second most important element (command type) of PowerShell, which transfers the output data of some cmdlets into the input data of others, serves as an intermediary between them. The conveyor serves mainly for transfer and return not only cmdlets, but also any other objects. He is capable of performing more complex and responsible tasks. And the most important thing is that this does not require writing complex algorithms and scripts.
When creating the pipeline, Microsoft developers used the analogue used in Linux as a clear example, but did not copy it, but made it as much as possible convenient and functional. When compared, the only thing they have in common is the characteristic of their functions, expressed in a virtually continuous stream of data containing millions of characters. 
Scenarios
Scenarios - less value types commands in PowerShell, which are blocks of code saved in a separate file from the rest, but also support the PS1 extension. Their main advantage The advantage is that the saved codes do not need to be entered manually each time. It doesn't matter which one text editors they are written, either in Word or Paint, the main thing is to stick to the installed extension.
The shell itself has a scripting environment integrated into it, using which you can do even more simplify their writing. To create them, rules for text formatting are established: the “$” symbol is used before the name, the path to the saved file is enclosed in curly braces, and properties are accessed using “.” ahead. Scenarios supplemented with arguments using parentheses and comments with “#” symbols. 
Add-ons
In addition to the standard command types and 240 cmdlets contained in PowerShell, it includes many extras designed to further simplify work and expand functionality. List of the most important additions:

How to start PowerShell
An additional convenience of the program is that it is launched by PowerShell using different ways, differing in technical terms, but identical for all Windows versions, including Windows 10. Thanks to this, everyone chooses an individual approach, depending on the situation. There are several launch methods.
Using "Search"
To do this, you need to click on the corresponding icon located on taskbar, or use the key combination " Win +S" In the window that opens, type “powershell” in the search bar, and select “Classic offer” in the resulting result. You can also call context menu right click and use “Run as administrator”. 
Via the Start menu
Click on the “Start” button to open the list of applications, and in the sorted group entitled “W” select the folder with the program. Expand it and click on the application in the top line. Here, also as an option, you can call the context menu with the right mouse button and run “as administrator”. 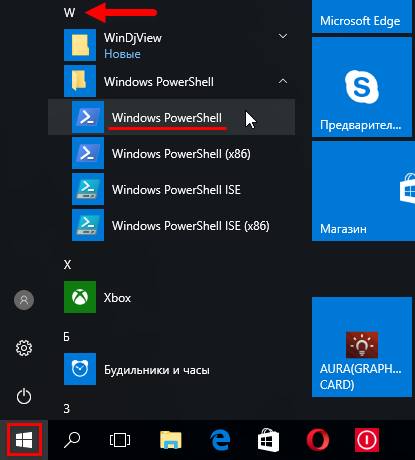
Using a keyboard shortcut
This method implies preliminary action, which consists in replacing the command line with the “Widows PowerShell” shell with the “Win Menu + X” function. After this, enter the corresponding menu using a keyboard shortcut, or through the context menu by right-clicking on the “Start” button, where you select the desired item in the list presented. 
Through the Run dialog
One of the simplest ways is to open the “ Execute" To call it, use the keyboard shortcut “Win + R” and enter a command with the name of the program in the “Open” line. To launch it, press the “Enter” key or the “Ok” button on the window panel. 
Using Task Manager
To open the manager, use the keyboard shortcut " Ctrl +Shift +Esc", in the window that opens, in the "File" tab, select the option " Start a new task" In the new window, opposite the “Open” line, enter “powershell” and press “Enter”. If you need to create a task on behalf of the administrator, check the corresponding option and confirm by pressing on the “Ok” button. 
Through "Explorer"
After opening it, you will need to specify the name of the folder or drive where the program will be launched. On "File" tab select the “Launch Windows PowerShell” option and click on the desired item. 
Via system folder
In the search bar enter address program: "C:\Windows\System32\WindowsPowerShell\v1.0". In the list that opens, select the “powershell.exe” folder and open it with a double left click. To make the process easier in the future, you can create shortcut file and attach it to any convenient location: On the taskbar, Start menu, or desktop. If necessary, the shell will be launched double click by icon. 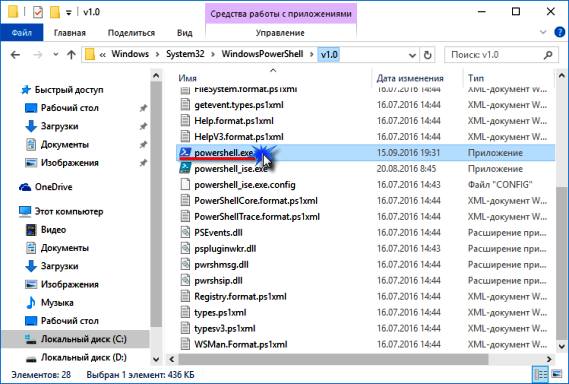
Procedure for using the utility
When you first get acquainted with PowerShell, it seems incomprehensible, like formulas in higher mathematics, but this is a deceptive impression. In fact, using the program is quite easy if you understand its basics: the principles of operation, the features of entering and executing commands. In that, different types are slightly different, but the principles and rules remain common to all.
In a simple example, the command specified as “Get-Help” is a kind of utility reference that provides general information when entered. If you need help with specific process, for example, about connected drives, you need to set the command - “Get-Help Get-PSDrive”, and so on for any question, changing only the name of the cmdlet. For any actions, for example, emptying the trash from file garbage, “Clear-RecycleBin” is usually used, which is used for more important tasks in PC maintenance and for writing scripts. But he is also responsible for such a simple process as emptying the system bins. First you need to specify the disk to be cleaned according to the principle: “Clear-RecycleBin C:” to confirm the action, enter the symbol “Y” and press “Enter”. 
Working with a conveyor
In operation, the conveyor is extremely simple and convenient, which makes it stand out among other types of teams. For example, if output the result Get-Process containing information about the active processes on the PC into the Soft-Object cmdlet, it will sort them by handles. Converting the resulting values to Where-Object, filtering will occur these processes by given parameter, for example, the smallest amount of page memory. And if this result is output to Select-Object, it will select only the first 10 processes, taking into account the number of descriptors.
Or another simple example used to obtain information about the heaviest files stored on the system disk: The Get-ChildItem command opens a directory for selecting an object, Sort-Object will sort the selected object, and Select-Object will indicate its desired properties. 
Working with the script
When creating algorithms, Windows PowerShell ISE is often used, a specially created mechanism, including for using scripts. In it, under the name "Untitled 1.ps1" is introduced code body. Let's look at a simple example: “WMID WebMoney” in the name, set conditionally “wmid”, save the file in the root of drive C. To start, you will need to enter the directory using the command “cd C:\” the file name should be in the following key: “.\ wmid". It is noteworthy that the scripts can also be launched from the OS command line, but for this you need change path to it: “powershell.exe C:\wmid.ps1”. It is important to remember that executing scripts is prohibited by default; to obtain permission for such actions, you must set the Set-ExecutionPolicy command. 
The Most Useful PowerShell Cmdlets
The shell contains their impressive catalog, represented by hundreds of commands. It is not possible to remember all these names and the properties attached to them. But this doesn’t need to be done; most of them are used extremely rarely, or even not applicable at all in practice. You should pay attention only to the most important, practical, and useful functions.
Most useful in use:
- Get-Help – reference book on the purpose of cmdlets and general shell properties;
- Update-Help - download and install updated help data;
- Get-Command – search engine for required commands, with auto-filling of the line;
- Get-Alias – reflects established aliases, in a general list or with specifics;
- Get-PSDrive – represents running drives and processes occurring on them;
- Install-WindowsFeature – role-based and component installer;
- Uninstall-WindowsFeature – role-based and component uninstaller;
- Get-History – responsible for returning team lists performed upon entry.
- $hversion – returns the utility version
Variables:
- Get-Variable – shows a list of all variables taking into account their values;
- New-Variable – used to configure newly created variables;
- Set-Variable – sets new values if they are not in the list;
- Clear-Variable – content uninstaller that saves the image;
- Remove-Variable is an uninstaller for cmdlets and their components.
Formatting:
- Format-List – extended reference book;
- Format-Table – displays a table of the results of individual commands;
- Format-Wide - an extended table of the results, with the properties of individual objects.
Internet:
- Enable-NetAdapter – to enable the adapter;
- Rename-NetAdapter – sets a new name and representation;
- Restart-NetAdapter – used to restart;
- Get-NetIPAddress – provides proxy server configuration information;
- Set-NetIPAddress – sets a new configuration for the proxy server;
- New-NetIPAddress – creates and configures a proxy server;
- Remove-NetIPAddress – proxy server uninstaller;
- New-NetRoute – used to make additional entries;
- Get-NetIPv4Protocol - provides data over the IPv4 protocol;
- Get-NetIPInterface - Reflects the properties and characteristics of the IP web interface.
Elements:
- Get-Item - receives items at a given path;
- Move-Item – to move items to other folders;
- New-Item – used for creation and design;
- Remove-Item – uninstaller of marked items;
- Get-Location - Shows current location.
Background jobs:
- Start-Job – launches;
- Stop-Job – stops work;
- Get-Job – opens a list;
- Receive-Job – provides information about the results;
- Remove-Job – uninstaller of background tasks.
Objects:
- Measure-Object – used to calculate numerical aggregation parameters;
- Select-Object – for selection indicating specific properties;
- Where-Object – reflects conditions regarding selection by value and properties.
Services and processes:
- Get-Process – shows information about active PC processes;
- Start-Process – launches on a PC;
- Stop-Process - stops the work of selected ones;
- Get-Service – provides information about active services;
- Restart-Service – performs a restart;
- Start-Service – used to connect the selected ones;
- Stop-Service – pauses the process;
- Set-Service – changes service properties and connection mode.
Computer and system:
- Restart-Computer – used to restart the OS;
- Checkpoint-Computer - to create a system recovery copy for a PC;
- Restore-Computer – responsible for launching the restored system;
- Remove-Computer - uninstalls a local PC from a domain name;
- Clear-EventLog – clears the list of log entries.
Content:

What is PowerShell ISE
This is a graphical shell of a scripting language, bundled with the utility in the form of its application, mainly for launching independent consoles. During startup, supported by Unicode and symbolic standards, with access to main program interface tabs. It was developed to create scripts, editing and managing them, with the function of tracking their location. In addition, it can work with text documents in any format and XML files, execute selected fragments of scripts, and thanks to the built-in editor, it can update the interface, expanding and complementing it.
Convenience of work is created by color syntax highlighting, which greatly facilitates testing to identify errors and inconsistencies in the codes. Using the environment, it can copy and change significant fragments of code, and run individual parts of scripts. It is noted that ISE is much superior to the consoles of Power Shell itself, and is quite capable of becoming its replacement. 
Uninstalling a program
Microsoft PowerShell is a system component, so in principle it cannot be removed. Of course, if you really want to, you can use and remove this system component, but this can lead to system inoperability, so Not recommended do it.
Although it is worth noting that sometimes it is necessary to remove Windows PowerShell 1.0 because operating system may not update due to this element. You can do it like this:
- Let's launch system search and enter appwiz.cpl.
- In the window choose– View installed updates.
- Are looking for required component in the list of updates, usually it is KB928439 and delete it.
Windows PowerShell, even with a big stretch, cannot be called a simple and accessible program; it is difficult to understand, and it will not be possible to master it in a short period of time. But given the fact that it was not created for programmers, but for novice users, it is not as incomprehensible as it might seem. Obvious advantage shell is its convenience and automated process, and all that is required is just to understand the intricacies.