Many users have already successfully migrated from OS X Lion and OS X Mountain Lion to the new OS X Mavericks operating system with Mac help App Store... However, there are Mac developers who prefer to do a clean install of the OS. In this case, the operating system is rolled onto the formatted partition hard the disk from which all data has been deleted. Or a new drive is used altogether.
It is believed that this method is the most reliable and promising in terms of the future stability of the OS. Apps and mods installed on and under OS X Mavericks will run with maximum stability. If you have chosen this method of installing a new operating system, we recommend that you first perform backup all important information.
Clean install of OS X Mavericks:
Step 1: Download OS X Mavericks from the Mac App Store, but don't install the OS.
Step 2: Using the guide on this page, create bootable USB stick with OS X Mavericks.
Step 3: After preparing the bootable media, restart your Mac while holding down the Option (ALT) button.
Step 4: When starting the machine, select Mac OS X Installer from the boot menu.
Step 5: Open Disk Utility and specify HDD which you want to format. Go to the Erase tab. From the Format drop-down menu, select Mac OS Extended (Journaled) and write the desired drive name.
Step 6: Click the Erase button to start formatting the drive.
Step 7: After completing the operation, close Disk Utility and select "Install Mac OS X" from the top menu.
Step 8: Specify the drive and start the OS X Mavericks installation.
After a clean install of OS X Mavericks, you can transfer apps and other important files from backup Time Machine or use an OS from scratch.
Installing the Mac OS X operating system on regular computers presents a number of intractable problems. The process of creating a hackintosh involves some preparation and often ends in failure.
My guess is that most people who want to switch to a Mac are hampered by the myths about the hackintosh - a computer that runs a Mac OS. Before proceeding directly to the description of installing Mac OS X on a PC, I will try to dispel some of the myths:
1. Mac OS X will be installed only on compatible processors and chipsets from intel, video cards only from NVidia. Most of the periphery will not work.
Once this was true, but progress does not stand alone in place, more and more patches and drivers are released, the amount of hardware compatible with Mac OS X is growing every day. Now Mac OS can easily be installed on a computer with a processor that at least supports SSE2, but preferably SSE3, for example, AMD or Intel. Many modern video cards support hardware acceleration, namely Quartz Extreme, Quartz 2d, Core Image, GL. I think now you understand that nothing supernatural is required from your computer.
2. Installing Mac OS X is difficult.
In fact, it's not more difficult than installing Windows XP, I think it's even easier if you choose the right kexts and fixes.
3. Mac OS X will not be able to "live" on the same physical disk with Windows.
Can! There are 2 options:
- Windows bootloader + chain0 (for example, this is on my computer)
- Acronis OS Selector
So let's get started.
Step 1. Preparation.
First, you need to check your computer for compliance with the requirements of Mac OS X.
Minimum random access memory (RAM) 256 MB, of course, the more the better.
Not quite an old video card for AGP or PCI-E, starting from GF4.
Step 2. Download the image installation disk.
You can download the image on any Torrent tracker. For example rutracker.org (registration required). Enter OS X Yosemite and a search will bring up many of the OS you want.
Step 3. Download the R-Drive Image program and start installing the OS on your PC. We need it to install it on a flash drive or OS disk.
In this video explains how to use the program, and explains how to install Mac OS in detail.
Step 4. Completing the installation.
After restarting your computer, there are two options:
2.boot0 error. We look at this video... Everything is explained in detail there.
P.S. The layout is switched by pressing Command + Space (ALT + Space)
If everything is done correctly, the desktop is loaded. Hooray! Works! Congratulations!
P.P.S. The administration of this site in no way coerces or offers you to install hack-assemblies of Mac OS X, we are against hacking software! When installing a jailbroken Mac OS X, you yourself are responsible under the laws of your country.
This manual / guide / etc is written for those who are too lazy to collect piece by piece this or that information about the installation of "poppy" on a PC, everything is clear and on the shelves.

To begin with, before, in fact, installing the system itself on a PC, you need to decide whether we need it or not, since the system itself is very specific in terms of installation and configuration, if you, of course, do not have an apple device. There is no point in explaining that deploying a system that was not originally planned for desktop PCs is difficult and you can kill everything from 2 to N hours, depending on the hardware compatibility.
Now, let's figure out what Hackintosh is: the word "hackintosh" is formed from the merger of the two words "Macintosh" and "Hack", which essentially means "hacked Mac", although there is nothing to do with "hacking".
In this guide, we will consider creating an installation flash drive from under Windows (since this is the most popular system among "novice hacking"), installing the system on a blank disk, expanding the kernel for your hardware and, in fact, installing and configuring the bootloader (it is at this point that many and there are problems)
CPU: Intel Core i5 4460 3.2 GHz (Haswell)
Memory: 16 GB Crucial Ballistix Sport
Graphics: MSI GeForce GTX 760 2048MB
Motherboard: Gigabyte GA-H81-S2V (UEFI Bios)
I would also like to draw your attention to the fact that this article deals with NVidia video cards and UEFI BIOS.
Well, let's go.
Step 1. Assessment and analysis of iron
Yes, despite the fact that Hackintosh runs in one way or another on almost any configuration, it always does it in different ways. Therefore, it is worth immediately analyzing our hardware.
Processors
So, let's start with the fact that on machines with AMD processors the system WILL NOT work(that dying state of agony, in which she will arrive, is very difficult to call "work"). Yes, in fact, you can put a custom kernel, reflash it, and so on, but it makes sense to reinvent the wheel out of sticks if one way or another it breaks anyway. The system gets up without problems on Intel processors, starting with Core i3 (we are talking specifically about macOS Sierra 10.12, previous releases can also get up on Core 2 Duo and Pentium processors). In my case, the stone fell out i5 4460 (4 cores, 4 threads, turbo boost up to 3.4 GHz).
ACHTUNG 2
Problems are observed on socket 2011-3 processors, in particular on the X99 chipset. Usually manifested by too much bells and whistles motherboard.
Video cards
List of Supported Intel Graphics Cores
Intel HD 3000
Intel HD 4000
Intel HD 4600 (laptops)
Intel HD 5000
Radeons (AMD) start up, but again with a bang. For example, new cards (RX-4 **), as well as the well-known R9 380 or R9 380x can simply display the download in a black screen.
List of Exactly Supported AMD Cards
Radeon HD 4000 series
Radeon HD 5000 series
Radeon HD 6000 series (preferably 6600 and 6800)
Radeon HD 7000 series (Preferably 7700, 7800, and 7900)
Radeon R9 200 series (R9 290 won't start)
Radeon R9 300 series (There may be problems with the R9 380. I have not personally tested it, but judging by the reviews on Reddit with these cards there is Problems)
In this manual, we will not consider the AMD graphics factory, since it all comes down to framebuffer patches and Device ID substitutions in the bootloader (which is individual for each). Read more about AMD cards here: tyk (English).
The situation is completely different with cards from NVidia. Almost everyone gets turned on, with the exception of some especially gifted ones. Problems are observed in the 10th episode, but, most likely, they will not be soon. On GTX cards, the graphics start up with a half-kick, the GT cards also keep up, although there are some exceptions.
List of NVidia working cards
Geforce 7000 series
Geforce 8000 series
Geforce 9000 series
Geforce 200 series
Geforce 400 series
Geforce 500 series
Geforce 600 series
Geforce 700 series
Geforce 900 series
I am more than sure that you will find your card on the list.
Network Controller
I don't think you need to chew on how you can identify your network card ...
Newby Guide
Open the Task Manager → the "performance" tab → Ethernet (Windows 10), there will be a network card in big black letters.

By the way, you can also look in the BIOS
One way or another, we will not dwell on this in detail. The network card will have to be started anyway, so I'll just provide a list of supported network cards.
Network cards
Intel Gigabit
5 Series - 82578LM / 82578LC / 82578DM / 82578DC
6 and 7 Series - 82579LM / 82579V
8 and 9 Series - I217LM / I217V / I218LM / I218V / I218LM2 / I218V2 / I218LM3
Realtek
RTL8111, 8168, 8101E, 8102E, 8131E, 8169, 8110SC, 8169SC
RTL8111 / 8168 B / C / D / E / F / G
RTL8101E / 8102E / 8102E / 8103E / 8103E / 8103E / 8401E / 8105E / 8402 / 8106E / 8106EUS
RTL8105 / 8111E / 8111F / 8136 / 8168E / 8168F
Atheros
AR8121, 8113, 8114, 8131, 8151, 8161, 8171, 8132,8151, 8152, 8162, 8172
AR816x, AR817x are supported
Broadcom
BCM5722, 5752, 5754, 5754M, 5755, 5755M, 5761, 5761e, 57780, 57781, 57785,5784M, 5787, 5787M, 5906, 5906M, 57788, 5784M
Marvell
88E8035, 88E8036, 88E8038, 88E8039, 88E8056, 88E8001
Killer
Memory
There are no restrictions. The system starts at two gigabytes. Recommended 4. Author recommends 8.
With iron, in fact, figured out. If you haven't changed your mind at this stage, let's move on.
Step 2. Make a bootable USB flash drive and deploy the installer to it
So, here we come to practice. Let me remind you that we do all this from under Windows. I say right away that we will not use images from the root tracker, which are so vehemently advised by people for whom all hackers "under 18" work. First, we need the BDU utility (BootDiskUtiliy).
A flash drive> 8 GB is required. Any.
1. Run the utility
2. Destination disk → select our USB flash drive
3. Format disk
Now we are waiting. The flash drive will be formatted in Apple HFS and split into two partitions, one of which will have the bootloader (CLOVER) installed, and the second will remain clean so that the installer can be deployed there.
After the performed manipulations, we get approximately the following picture:

Next, you need to expand the installer to the second section. We do this also through the BDU utility. However, the question here is where to get the image. There are two options: take a ready-made, already unpacked one, or get it yourself from Install Mac OS Sierra.app from the AppStore. Since the second method takes a lot of time, and it takes a very long time to search for this.app itself, we will use the first one. Craftsmen have already prepared ready-made HFS files for this utility, extracted them from .app for us. All we need is to download it (the image weighs almost 5 gigs, so you can just put it on download). Actually, download macOS 10.12 Sierra from here.
1. We take out the HFS Partition File (HFS +) from the archive, a file with the extension .hfs.
2. In the BDU "Destination disk" utility window, select Part 2 of our broken flash drive.
3. Open "Restore partiton".
4. Search for and select our * .hfs file. Please note that it must be no larger than the PART 2 section.
5. We are waiting for its unpacking.
That's it, the installer on the flash drive is unpacked and ready to go.
Now we need some files for your system. I have collected everything I need in this archive. Later I will explain what and why.
You will also need this kekst, download it too: tyk. We unpack the folder from the archive to the root of the section with Clover, and the kext into the folder that we unpacked. All is ready. The flash drive is done. Go ahead.
Step 3. Installing macOS Sierra on Intel-PC
We check that the USB flash drive is inserted into the 2.0 port. Reboot, go to BIOS. Let me remind you that our BIOS is UEFI. Disable virtualization (Intel Virtualization). We indicate our USB flash drive in the boot priority (BOOT). Make sure it will boot in UEFI mode. Save and apply the settings, reboot. We get to the Clover's menu.
Clover ("Clover") - hackintosh downloader, as well as its installer.
Press the down arrow until we get to the Options menu. Press Enter. All we need here is this line:

We write the following into it:
kext-dev-mode = 1 rootless = 0 -v npci = 0x2000 nv_disable = 1Let me explain what each of these arguments does:
kext-dev-mode = 1 - the required arg, without which the hack will not start. Allows to load kext into the system (Initially, FakeSMC.kext).
rootless = 0 - disables SIP (System Integrity Protection). Required arg.
-v - "Verbose mode". Instead of a pretty apple, we will see a "console" boot, so that we can identify the error, if any.
npci = 0x2000 (or 0x3000, depending on the PCI-e version) - optional. We warn of stopping the download during the PCI scan phase. It is possible not to prescribe.
nv_disable = 1 - optional. To avoid loading artifacts and other garbage, disable the graphical shell. We load in native graphics mode in Orthodox 144p resolution. It is possible not to prescribe.
Apply the arguments by pressing Enter. Choose Boot Mac OS Sierra from OS X Base System. And so, the darling download went. Let's analyze some errors right away: still waiting for root device - the IDE controller does not have time to connect.
Fix
Reconnect the USB flash drive to another 2.0 port, boot with the following arguments:
kext-dev-mode = 1 rootless = 0 cpus = 1 npci = 0x2000 -v UseKernelCache = No
Missing Bluetooth controller transport - the video card did not turn on, or FakeSMC.kext did not turn on. Check that there is FakeSMC.kext in the kexts / other folder. Blue tooth has nothing to do with it.
Fix
We load like this:
kext-dev-mode = 1 rootless = 0 -v npci = 0x2000
Or like this:
kext-dev-mode = 1 rootless = 0 -v -x npci = 0x2000
If such errors still remain, then try loading like this:
kext-dev-mode = 1 rootless = 0 -v npci = 0x3000 darkwake = 0 nv_disable = 1 cpus = 1In other cases, only Google will help, although these fixes should solve these problems.
We wait. At some points it may freeze. If it hangs for more than a minute - reboot. Should help in some cases.
And here we are, in fact, in the installer. Choose a language and click on the arrow. The language pack will be loaded (it may freeze for a minute). Now open Utilities> Disk Utility, we need to format the disk for macOS. Select the desired disk, click "Erase". For convenience, we call new disc Macintosh HD. We format, close the disk utility. Next, select the disk on which we will install the system (in our case, Macintosh HD), install.
Installation takes from 15 to 30 minutes, it all depends on the speed of writing to the disc. After installation, the system will offer us to set up an Internet connection - skip it, we will do it later. Making the user. Done, we are in the system. Rather, in its stump. Nothing works for us yet. If you reboot the machine, it will be impossible to get into the system (due to the lack of a bootloader).
Fix
If the computer nevertheless rebooted or crashed, then you can choose to boot from a USB flash drive, then select "Boot macOS Sierra from Macintosh HD" in the clover menu, remembering to register boot arguments in the options menu.
Step 4. Basic system configuration and installation of kexts
So, here we are in the system. As long as she knows little, we won't go online, the graphics don't work, and in general everything looks very bad. This needs to be corrected.
Let's figure out what kexts are.
Kext(Kernel Extension) - kernel extensions that run one or another equipment incompatible with the original poppy (For example, where in the aimak we will find a network card from Realtek or a sound card?). So we need them now.
First, we need the PostInstall folder, which you unpacked into the CLOVER section on bootable USB drive... From there, we need, first of all, the Kext Utility, which allows us to install kext into the system. We launch it, enter the password from the user, wait until we see the inscription "All done".
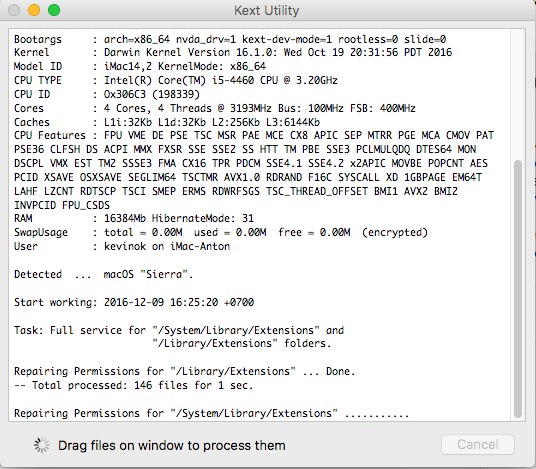
Install the kext on the network card (the Network folder, sorted it into folders for each network card), just drag it into the program window. We are waiting for the inscription "All done" to appear. Next, go to the CLOVER section of our flash drive, then to kexts, then to Other. Copy FakeSMC.kext from there to any place (Better in the same PostInstall), then install it in the same way as the kext on the network card. You will also need a kext for USB 3.0. It was in the Legacy_13.2_EHC1.kext.zip archive that you unpacked in PostInstall. Install it.
Done, we have turned on the Internet, USB and allowed the system to boot at all (FakeSMC.kext imitates the System Management Control chip, which is present only on Apple motherboards. Without this key, the system simply will not start).
Now let's install the bootloader. Go to the PostInstall folder → Clover_v2.3k_r3949. There is a * .pkg file, open it.

Click continue, read the bootloader info (I'm lying, click continue too). Next, in the lower left corner, click "Configure".
For UEFI boot, we set the following settings:

We'll talk about legacy loading later, since everything is a little more complicated there and you will have to patch DSDT.
Click "Install". Let's go through the bootloader installation process.
Done, the bootloader is installed.
Step 5. Configuring the bootloader
After installation, we get a clean, unconfigured Clover bootloader that needs to be tweaked a bit. Open Clover Configurator (in the future I do not recommend using this program for point-by-point editing of the bootloader config).
First, we need to get to the EFI partition with the bootloader. Click Mount EFI in the left menu. Next, click Check partition, a table of all partitions will appear. The partition we need should be on the same partition as Apple_HFS, it appears as EFI EFI. Click Mount partition. In the list, select the disk we need (for example, disk0s1). Please note that there is a bug when all sections are not visible. Scroll the mouse wheel, so you can scroll between the sections and select the one you want.
Next, click Open Partition. Will open the "folder" with the desired section. Go to EFI> CLOVER. Copy plist.config to the PostInstall folder for convenience. Also, just in case, copy it somewhere else, since the one we just copied will be edited. And one more for backup. Copy, open plist.config.
We see something like the following:

ACPI - We do not touch the fixes, we drop (DropOEM) our video card (DropOEM_DSM works when two DSDT patches are encountered. Therefore, we leave the original autopatch method with the bootloader, and disable ours, if one appears).
Go to the BOOT section.
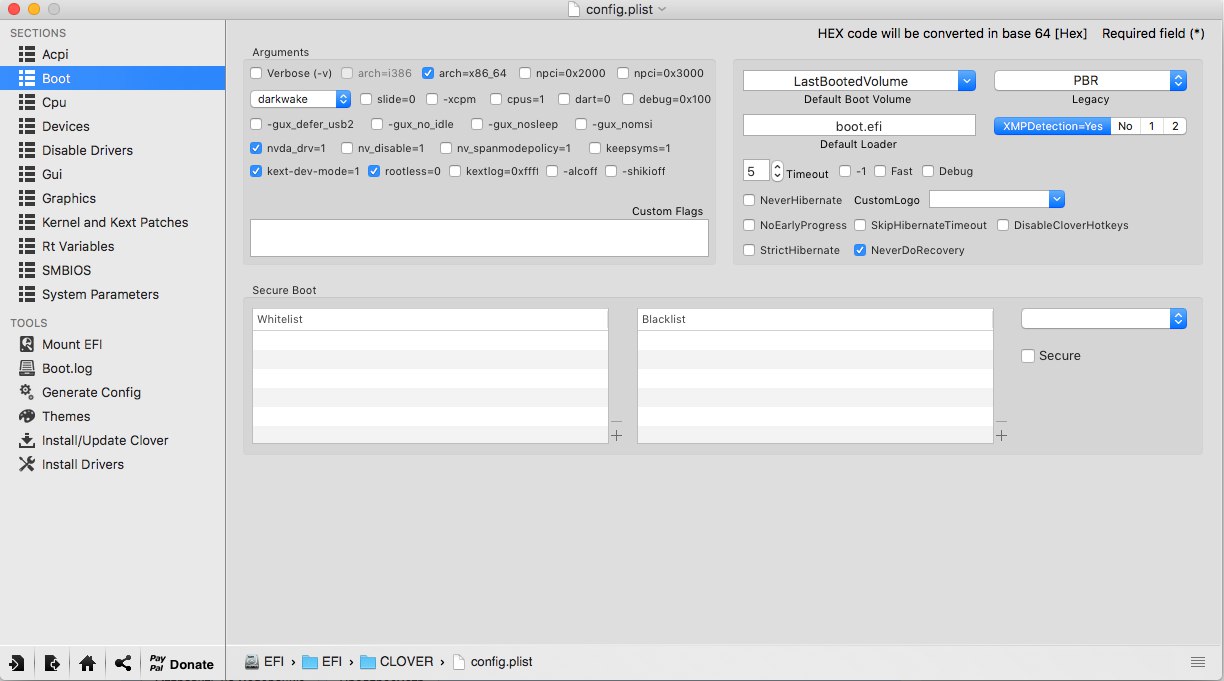
So, this is where we should dig. We set the arguments ourselves, depending on the system.
V (verbose) is the familiar "text" boot mode. It is better not to turn it on, but to prescribe it manually if necessary.
arch - architecture. In my case x86_64
npci is the key we already know. We expose if necessary. I recommend doing the first boot without it, but in Verbose mode.
darkwake - responsible for sleep and hibernation. Has 7 modes. If the dream does not start by changing the hibernatemode in the terminal, then I recommend using trial and error to find the desired darkwake mode.
cpus = 1 - run using only one kernel. I do not recommend choosing.
nvda_drv = 1 - activation of the NVidia web driver, which we will install a little later. Choose if you have nVidia.
nv_disable = 1 - Disable invisibility graphics and launch on the native mac driver. It is better not to choose, but to manually prescribe if necessary.
kext-dev-mode = 1 and rootless = 0 have already been explained earlier.
We pass to the right subsection.
Default Boot Volume - the partition from which the selection of the disk to boot will start by default. The default is LastBootedVolume (the last selected section).
Legacy - Legacy Boot for old Windows versions and Linux. It depends very much on the hardware and the construction of the BIOS, therefore several algorithms have been developed:
LegacyBiosDefault - for those UEFI BIOSes that have the LegacyBios protocol.
PBRTest, PBR - PBR Boot options, it's just overkill here. PBR works in my case.
XMPDetection = YES is an important parameter. Fixes the amount random access memory, slots, dies, frequency and number of channels.
DefaultLoader - if there are several loaders on the partition, select the default one. Must not be empty!
Timeout - time until automatic boot.
Fast is a parameter that skips selecting a partition and immediately proceeds to boot.
-1 (Timeout -1) - disable autoboot.
We skip the CPU section, the bootloader will pick up the necessary values by itself. Devices are also best skipped if you have nothing to fake. Disable Drivers - Disable unnecessary drivers at boot. GUI - customization appearance bootloader. I think there is nothing to explain here, there are no special parameters here. Screen resolution, language and menu theme. It's simple. Graphics - graphics settings and injections.
Do not touch the Inject NVidia parameter! There will be artifacts at launch. It is designed to run old GT cards
Kernel and Kext Patches - patches and kernel customization. Apple RTC is selected by default. Better not to touch. SMBIOS - the most juice, customization and fake "poppy".

To set up the factory information, click on the magic wand icon. Next, select iMac (if PC) or MacBook (if laptop).
ACHTUNG 3
You can also look among older configs, such as MacMini, or Mac Pro... Your task is to choose the poppy that is most similar to your iron.
Don't add anything to Memory and Slots. These are purely cosmetic parameters that the clover picks up at the boot stage. Incorrectly set parameters can cause conflicts.
WARNING: Nvidia graphics cards without edits of the policy-kext work only on the Mac models iMac13,1 and iMac14,2.
In AppleGraphicsControl.kext / Contents / PlugIns / AppleGraphicsDevicePolicy.kext / Contents / info.plist, fix Config1 to none here:

It should work now.
Done. We do not touch anything else, we have made the basic settings. We save our file. Now we copy it to the CLOVER folder of the EFI partition, log in, replace it. Let me remind you that before that you had to make a backup.
Now we are almost there. Now all that remains is to start the video card. The PostInstall folder contains the WebDriver * .pkg package. We open it, install it. Next, he invites us to reboot. We reboot.
Now let's make sure that we do not boot from a flash drive, but from hard drive in UEFI mode... Choose Boot macOS Sierra from Macintosh HD. We start.
Note
I recommend using the -v switch for the first start so that if something goes wrong, you can immediately identify the error. If the bootloader breaks and you cannot get into the system, then boot from the USB flash drive, prescribe the necessary keys in the options and boot the system into Verbose mode.
Done, here we are in the system. In the picture, I roughly showed how the axis will look after all the settings. Pay attention to how the system understood your Mac, as well as the frequency of the processor.

A sure sign that the nvidia driver is working will be its logo on the taskbar. I turned it off, by the way, since it gets in the way, but you can access the invisible control panel through "System Preferences ...". We can check the Internet through Safari. USB 3.0 is trite by plugging a USB flash drive into a 3.0 port.
Additionally
- Sound
With regard to sound, the situation is different. If you have an external sound card, then just download the drivers for it from the manufacturer's website (analog devices, such as mixing consoles, do not require drivers and start immediately). For built-in sound card use one of these kexts:
With regards to AppleHDA
The following conditions must be met for it to work:
- The presence of vanilla (pure) AppleHDA.kext in the system.
- The presence of the HDEF section in your DSDT (or fix clover FixHDA_8000-> True)
- Specify the layout in DSDT (or in the config.plist of the clover Devices-> Audio-> Inject-> 1,2,28 ... etc. Choose from those specified for your codec above)
- Remove EVERYTHING sound patches (if they were in your config.plist) from the KextsToPatch section
- Remove DummyHDA.kext (if used)
- If you used VoodooHDA.kext - delete it. Also delete AppleHDADisabler.kext and rebuild the cache.
- For Intel HDMI 4000/4600, useIntelHDMI-> True clover fix is required
Actually, that's all. Then we get macOS Sierra ready to work.
We remind you that this material is provided for informational purposes only. If you are going to reproduce the steps described below, we strongly advise you to carefully read the article to the end at least once. 3DNews editors are not responsible for any possible consequences.
⇡ Introduction
"Hackintosh" is an ironic name for Mac OS X, installed not on an Apple computer, but on a regular PC. This phenomenon became possible when the Cupertino-based company began migrating its machines from the PowerPC platform to x86 in 2005 and Macs began to be equipped with the same Intel processors and chipsets that are used in personal computers. Since its first modest victories, the so-called OSx86 project has gone from being the entertainment of a handful of enthusiasts to a mass movement with a growing user base. Today, when Apple officially released new version its operating system, Lion, it's time to tell everyone about Hackintosh to everyone who doesn't have a Mac, but who has an interest in Mac OS X and a desire to experiment.
The first questions that a person asks when he sees a Mac OS on a PC: "Is it difficult to install?" and "Is everything working fine?" The answer to both is negative. Installation has now been simplified to the extreme, so you can play with Mac OS X on almost any modern computer, but the full functionality is far from available to everyone - a fair share of users either won't get hardware graphics acceleration, or the network, sound, or something else will fall off. Hackintosh also big problems with sleep mode. All these difficulties can be overcome, but you will surely have to spend several sleepless nights. In general, the situation completely copies what was happening with desktop Linux distributions a few years ago. However, this is a very flattering comparison both for the hacking community and for Apple itself: despite the fact that Mac OS X has never been prepared for work with non-native hardware, things could be much worse. Yes, some pieces of hardware will never run under Mac OS, others will require dancing with a tambourine and a hare's foot. But at the same time, a huge park of components either works out of the box, or starts up after easy manipulations. And software for Mac OS in all cases is installed and works in the same way as on a real Mac. It turns out that he is not so scary, this Hackintosh.
For those who are not indifferent to the legal side of the phenomenon: of course, Mac OS X can be legally installed only on a computer under the Apple brand, and any other options violate the license agreement. Modification of OS components is also prohibited, not to mention the use of pirated distributions from "torrents". However, Apple does not persecute the OSx86 community in any way (although it is suing companies that make money from Hackintosh), and the means of protection against unauthorized use are in their infancy, and ways have long been found to overcome them. Mac OS X doesn't even require input license key or online activation. After all, hackers advertise this OS for free and secretly dream of getting a real Mac. And the most devoted red-eyed experimenters, who fundamentally prefer Hackintosh, are still lost as potential buyers.

If there is no difference, then why pay more? Or is there?
So, if a small offense does not bother you, and technical difficulties only cause a healthy excitement, let's try to install Mac OS X on a PC together. In this article, we will describe two easy ways Installing the previous but still popular version of the OS, Snow Leopard (10.6), and one method for the newer, Lion (10.7). It makes no sense to put Leopard (10.5), let alone Tiger (10.4). If you like the result, then these instructions will be the starting point for self-mastering "Hackintosh". The last section provides links to popular resources in the OSx86 community where you can learn from other users and find solutions to specific problems.
⇡ Preparation of "Hackintosh"
Actually, why can't Mac OS X just work on a PC and how to overcome these obstacles? Reason number one is that Macs do not use the good old BIOS as a layer between the OS and the firmware of the hardware, but EFI, and in order for the Mac OS to start, EFI is emulated at the level of a special "hacker" bootloader (by the way , we owe this achievement to a Russian hacker under the nickname Netkas). The most popular and booming bootloader today is Chameleon and its derivatives such as Chimera.
The second reason: Mac OS X has a kernel (from kernel extension, remember this term) called Dont Steal Mac OS X. It is required to decrypt applications that make up what the user looks like as an operating system (Dock, Finder, loginwindow, SystemUIServer and others), based on the keys from the SMC chip, which is only on real Macs. Well, if "there are no legs, then there are no cartoons." The FakeSMC cache comes to the rescue, which successfully emulates the SMC Device, for which, again, thanks to Netkas. A special bootloader and FakeSMC.kext are all you need to boot Mac OS X, if your computer is not much different from a real Mac in terms of hardware.
And this is precisely the third reason. For unsupported hardware, there are no drivers for Mac OS X, or there are built-in drivers, but the system cannot use them because it does not recognize hardware with unfamiliar identifiers.
Hardware requirements for Hackintosh are the same - you need a processor with support for SSE2 instructions, best of all - Intel Core 2 Duo or later. AMD users will have to replace the OS kernel with a "hacked" version, as a result, there will be problems with updating the system from the Apple server. The same goes for Atom netbooks. It is highly desirable to support the AHCI mode from the SATA controller. Mac OS X Lion requires 2GB of RAM, Snow Leopard only needs one. The first rule of hardware selection: the more the computer looks like a real "Mac", the fewer problems. The second rule: the newest and most advanced devices may not work no matter what the effort. hardware support depends primarily on the Mac OS itself (drivers of "heavy" hardware for the "Hackintosh" are not written), and Apple has nowhere to rush. The site wiki.osx86project.org, which contains HLC (Hardware Compatibility Lists) for different versions Mac OS X.
For installation, it is best to use a separate SATA drive, and turn off the Windows disk, out of harm's way. If you are not afraid to experiment on one HDD with a working operating system, then you will have to create a new partition on it using some disk utility (10 GB is enough for a clean Mac OS X). Just keep in mind that during the installation process, the "Hackintosh" loader will be written to the HDD, and then you can only get into Windows through it. Nothing threatens the available data, but the backup will not harm either. The disk must be connected to the port of the south bridge of the motherboard, the SATA controller in the BIOS must be switched to AHCI mode. It is recommended to remove overclocking, remove all expansion cards except for the graphics adapter in the upper PCI-E slot, disconnect peripherals, in addition to the keyboard and mouse, reduce the amount of RAM to 4 GB (if more installed). If the installation with minimal functionality is successful, then all this can be returned step by step. Too many conditions? Then you can train on cats, that is, in a virtual machine. There are even ready-made images for various hypervisors on the Web, although their use will not bring experience in creating "Hackintosh".
We warn readers: although "Hackintosh" is a completely harmless entertainment that will not break your computer and is unlikely to spoil any data, all the manipulations described in the article are done at your own peril and risk. In addition, you need to be familiar with the computer and know what the bootloader, the OS kernel and the hard disk partitioning scheme are. Well, when you have mastered "Hackintosh" to perfection, in no case do not agree if friends ask you to install it on your PC, otherwise you, as an honest person, will have to get married to keep this miracle working.
⇡ Installing Snow Leopard from build iATKOS 10.6.3 v2
The simplest and most versatile option is to install Mac OS X from a specially modified distribution kit. Since the release of Snow Leopard, such hacker assemblies have given way to a more elegant solution - installation from a copy of a branded disk using a separate bootable CD, and this is described below. But the assembly is indispensable for users of CPUs from AMD or Intel Atom. the original Mac OS X kernel (which our English-speaking friends call vanilla kernel) supports only Intel processors with the Core architecture and older, and the assembly allows you to immediately select the "patched" version during the installation process. And after you get into the world of "Hackintosh" with the help of assembly and gain knowledge, you can do a clean install, the components of which you have complete control.
iATKOS 10.6.3 v2 is one of the last released builds, and despite the rather old OS version (Snow Leopard has already been updated to 10.6.8), all the "hacker" software on it is quite modern. After downloading the image (we will not tell you where it came from), write it to a disc. Boot from the iATKOS disk and wait for the hacker loader to run and the OS to start.


This process takes several minutes, but if it suddenly drags on beyond reasonable limits or generates an error message, it means that something went wrong.

In this case, you need to boot from the DVD again, but on the bootloader screen with the green chameleon, press F8, select the optical disk, enter "-x" from the keyboard and press Enter. This is the so-called safe mode, but if you are not lucky with it, then you need to boot with the "-v" argument, which will allow you to observe the boot log. At the moment where the process is stuck or the phrase Kernel Panic appears, you can take a photo of the screen and then, in a calm atmosphere, try to understand what is happening with the help of thematic sites, Google and the advice of experienced "hackers".
The appearance of a window with a choice of language indicates that the boot was successful and your system is able to start Mac OS X. We recommend that you choose the Shakespearean language whenever possible, since most instructions and analyzes of problems on the Internet are written in it.

Scroll through the pages of the installation program until a window appears with a choice of disk.


Open the Utilities section of the menu and launch Disk Utility. If you gave a blank disk for "Hackintosh", then using this program you need to "split" it (Partition tab). To install to a partition adjacent to Windows, the partition is simply formatted into file system HFS + (Erase tab). For reliability, it is better to choose the HFS + Journaled option, and the Case Sensitive option will not be needed by most users.

After the HDD is prepared for installation, you can close the disk utility and specify the partition in the installer window. And now the fundamental point is the choice of drivers and settings that allow Mac OS X to fully work on your hardware. The Customize button opens the list. All users are advised to look into the Bootloader branch and select the Chameleon v2 RC5 option over the default option. Owners AMD processors as well as Intel Atom must select a modified kernel under Patches, Modified Kernels.
Do not select any "drivers" for your graphics adapter in the Drivers, VGA section. It is better to check the box next to the Graphics Enabler option in the Bootloader Options section - in this case, the bootloader will try to activate hardware acceleration itself. Be that as it may, in 2D mode, the OS is loaded almost always, and if the Graphics Enabler method did not work, then you can try your luck with separate "drivers". By the way, these are not drivers, but only injectors that allow the drivers built into Mac OS X to work with unfamiliar video cards, which is why they are quoted.
Select the appropriate package for your network card in the Drivers, Network section - there is a good collection. For a laptop, the contents of the Drivers, Laptop Hardware section are useful. You can get some driver for CPU power saving functions from Drivers, Main Hardware, CPU Power Management section. The "native" kernel extension called AppleIntelCPUPowerManagement.kext, which carries this function, is prudently blocked in the assembly, because it is suitable only for Intel processors, and even then not for everyone, and in case of errors it prevents the system from booting.
Do not check Sleep Enabler in the Patches section - if you need hibernation, then after updating the OS, this extension will still have to be replaced.
The Language Translations section came to iATKOS from the official distribution kit and contains localization packages for the OS interface, including Russian.

It is advisable to write down a list of options that you have chosen, in case the freshly installed OS does not start and you have to look for the culprit. When the selection is made, you can click OK and then Install. Go!

At the end of the installation, the computer will go to reboot. You can eject the disk with iATKOS and boot from the hard drive onto which we have "rolled" Mac OS X. While the Chameleon boot loader counts down the seconds until the OS starts by default, you can press any key and see a list of partitions from which boot is available. If at the beginning there was already Windows on the hard drive, then it starts from the service partition called System Reserved, or directly from its root partition if the service partition is absent for some reason.

But we can't wait to see Mac OS, right? In this case, we just wait, and if the options were selected correctly during the installation, a registration window will appear on the screen, and if the Graphics Enabler option is triggered, a welcome video will also be shown.

What to do if the operating system gets stuck at the boot stage or gives an error message? The first tip in this case is to boot with a log view. To do this, you need to stop the bootloader while it is counting down the time until the OS starts, select the partition with it, enter the "-v" argument and press Enter. The messages on the screen will help you find the component that is causing the failure. Then you can try to boot into safe mode with the argument "-x", and if it succeeds, then it is likely that the problem is in some kind of cache - driver or device injector, which you marked in the Customize menu of the installation disk, and it needs to be replaced. How to work with kexts is described in a special section of the article.

⇡ Installing Snow Leopard from a branded distribution
Hackintosh can also be created using the native Snow Leopard skin, which you can even buy to calm your conscience. In this case, all the software that makes Mac OS X compatible with the PC is recorded on a separate disk. But this method is suitable only for owners of Intel's CPUs, since both the distribution disk and the copy of the OS that will be installed from it use the original kernel without AMD support. In addition, the unmodified Snow Leopard installer will not roll-over to an MBR-partitioned hard drive and only supports the GUID partitioning scheme. Therefore, the MBR disk will have to be repartitioned.
If there is already Windows there and you are not ready to say goodbye to the most popular operating system forever, then there is an unobvious solution: using Disk Utility, first partition the disk with the GUID, create your own partition for the "windows" and install Windows, and then into the second section - Snow Leopard. Keyword here - Disk Utiliy. This program, which, as you already know, runs from the Mac OS X installation disc, creates hybrid markup with synchronized GUIDs and MBRs. And the MBR is required to install Windows.
So, first we need an image boot disk iBoot and MultiBeast Driver Package - latest versions both are available at www.tonymacx86.com/viewforum.php?f=125 (registration required to download). Burn the iBoot ISO image to a disc and boot from it. When the window with the choice of the partition to boot appears, you need to replace the iBoot in the drive with the "native" distribution from Mac OS X, press F5, select DVD and press Enter.

The further procedure is completely similar to what is written about building iATKOS, only there are no "left" drivers in the Customize menu, but only standard Snow Leopard packages - interface localizations, fonts, etc.
But after the installation is complete, you will not be able to boot directly from the hard disk. a copy of the OS is pristine and no different from what is on the real "Mac". Therefore, you need to boot from the iBoot drive again and select the partition with Snow Leopad.

If an error occurs, you already know what to do: boot with the "-v" argument and run diagnostics, then try to start the OS in safe mode with the "-x" argument. Tonymacx86 also recommends the PCIRootUID = 1 argument, which can be combined with -x and -v.
If Mac OS X showed a registration window, then it's time to accustom it to a PC. You need to launch MultiBeast from the archive that we downloaded in advance, and scroll through all the installer pages up to the component selection menu. Here all users should check the EasyBeast Install item - which sets the installation of the minimum set of kexts. To enable support for a specific hardware, you should look into the individual branches of the list and select the necessary extensions. At the end of the procedure, the computer will be rebooted, and you can safely boot from the HDD.

In addition to cakes, the Chimera bootloader will be installed on the disk, and if Windows was previously installed, then it is loaded by selecting the appropriate partition.

⇡ Installing Lion
Here's the best part - the latest version of Mac OS X. So far, only Intel users can appreciate it. At the time of this writing, Apple has not yet released the Lion kernel sources, which means there are no modified kernels either. Most of the cakes written for Snow Leopard work with Lion.
To install Lion, we need a running Snow Leopard version no lower than 10.6.6, a free 5 GB hard disk partition to host the installer files, the Lion distribution (available for $ 29.99 in the App Store and you know where for free), the xMove utility and the familiar MultiBeast package.
The Install Mac OS X Lion program runs directly from under a running operating system, and as the partition for installation, you need to select the one from which Snow Leopard is running, which will not affect the OS in any way. After copying the files is complete, you can agree to reboot and log back into Snow Leopard.

Now it's up to the xMove utility. After launching it, you need to mark the empty section that we prepared for Lion in advance, and xMove will transfer the files unpacked by the Install Mac OS X Lion program there. If Snow Leopard is installed using the iBoot + MultiBeast method, then it is enough to boot from the hard disk and select the "Lion" partition in the Chimera bootloader menu. If iATKOS or another solution was used for installation, but the bootloader and kexts are also not the first freshness, then you will have to boot from the iBoot disk. The subsequent procedure completely repeats the process of installing Snow Leopard from a branded distribution. Moreover, as a target, you can select a partition with an already working Mac OS X, and then it will be painlessly updated.

⇡ Installing and removing kexts
How do I remove the problematic driver, injector, or add support for devices that won't start after the initial installation? The storage of kext (kernel extensions) in Mac OS X is the / System / Library / Extensions directory, and they are loaded from a single cache at /System/Library/Caches/com.apple.kext.caches/Startup/Extensions.mkext, where the OS places only the necessary extensions. But modern Hackintosh loaders (already familiar to us Chameleon and Chimera) can load additional kexts from the / Extra / Extensions directory, and from them their own small cache /Extra/Extensions.mkext is formed. In MultiBeast and iATKOS exactly this scheme is used, only in the latter case the / Extra directory is hidden. Display hidden files enabled with a command in the terminal.
defaults write com.apple.finder AppleShowAllFiles TRUE
killall finder

To install many kexts, just copy them to / Extra / Extensions. But some will not be able to resolve dependencies (there are no necessary extensions in the cache /S/L/C/c/S/Extensions.mlext), and you will have to create a single cache in the / Extra directory from all "native" and "third-party" extensions, which the OS won't be able to remake. This is done by the following command:
sudo kextcache -m /Extra/Extensions.mkext - / System / Library / Extensions / Extra / Extensions
Before these files in / Extra / Extensions need to be assigned the necessary permissions. Commands:
sudo chown -R 0: 0 / Extra / Extensions
sudo chmod -R 755 / Extra / Extensions
And one more caveat: if even with the correct permissions the cache has not entered the cache and is not loaded, you need to open it using the Show Package Contents option in context menu file and view the Info.plist file in the Contents directory. This is an xml file, and at the end, before the closing tags there should be the following entry:
Otherwise, you need to add or change it.
In Mac OS X 10.7, things are a little different. Lion uses a different cache format - the prelinked kernel. By default, Chameleon does not read it and scans the entire contents of the / Extra / Extensions directory, which slows down loading. The only thing that can be done for now is to create a shared cache in the system directory /System/Library/Caches/com.apple.kext.caches/Startup. Team:
sudo kextcache -c /System/Library/Caches/com.apple.kext.caches/Startup/kernelcache -v -t -K / mach_kernel - / System / Library / Extensions / Extra / Extensions
And in order for the loader to pick up the kernelcache, you need to use the "UseKernelCache = Yes" argument at startup. But unlike the content / Extra, this file is subject to operating system, and from time to time she will update it, forgetting, of course, about our "hacker" extensions. A solution to the problem is to move the kexts from / Extra to the / System / Library / Extensions directory and set the necessary permissions to them with the commands:
sudo chown -R 0: 0 / System / Library / Extensions
sudo chmod -R 755 / System / Library / Extensions
⇡ OS update
Hackintosh can be updated from the Apple server using the built-in Software Update utility. But at the same time, you need to be prepared for the fact that after the update any cakes will stop working or start to cause failures and you will have to find a replacement for them. Fortunately, the developers of popular extensions respond promptly to the release of new versions of Mac OS X. In addition, after the update, you need to rebuild the cache of caches by first loading the system with the "-f" argument. Users of AMD processors should make sure that the latest version of the modified kernel is available before updating the OS, or you can leave the old one.
⇡ Bootloader configuration
The operation of the Chameleon bootloader or its analogues is controlled by the com.apple.boot.plist file in the / Extra folder. It can be modified manually, but there is also a special utility with a graphical interface - Lizard, which can be downloaded from darwinx86.net/software/darwinx86_software.html. In the configuration it is desirable to include the screen resolution, arguments for loading (for example, the aforementioned "UseKernelCache = Yes"), and for the owners of "non-standard" processors - the name of the modified kernel file. In iATKOS, this is a custom file (look, it is located in the root partition of the disk). Also check Graphics Injection if this option helped you enable 3D acceleration.
The 32bit Compatibility Mode option will force the kernel to boot in 32-bit mode, which may be necessary for some kexts. At the same time, support for large amounts of RAM is preserved, and applications can run in 64-bit mode independently of the kernel. A similar argument command line- "-x32".
The argument list may also contain special options for individual kexts.

The program automatically opens the file /Extra/com.apple.boot.plist, and if it is missing, it will create it when you try to save the changes. This is exactly what will happen with iATKOS, because this assembly by default stores the bootloader configuration in the system file of the same name /Library/Preferences/SystemConfiguration/com.apple.boot.plist. This is not correct, so it is best to clean up after creating the file in / Extra system file leaving only the lines shown in the screenshot.

Another Lizard function is to edit the /Extra/SMBIOS.plist file. It contains information about the computer model and installed hardware, and helps to represent the computer as some kind of "Mac" in the System Information program.


⇡ Apple peripherals
A question that worries many, but do not want to spend money on an experiment: do Mac devices - Apple Cinema Display, Magic Mouse and Magic Trackpad - work with Hackintosh. So, the monitor is compatible with any video card equipped with DisplayPort (DP Mini or the full-format version of the port with an adapter is suitable), and both the light sensor and the brightness control in System Preferences work. For the mouse and touchpad, you need a USB Bluetooth adapter - some work right out of the box without any additional cakes, and the connection process is again no different from that on real Macs.
⇡ Free swimming
www.kexts.com - a database of original and third-party kexts for Mac OS X.Parallel installation of Mac OS and Windows may be required in different cases. Two users on one computer, Windows is required to run certain programs and games at maximum performance, etc.
Parallel use methods:
- Installing operating systems on different hard drives. In this case, we will make the choice at boot by pressing the F12 key at boot and selecting a specific hard drive on which Mac OS X or Windows is installed.
- Installation and selection the operating system using the bootloader. We will look at the example of using the Clover bootloader, but if you wish, you can use any Hackintosh bootloader that is more familiar and convenient for you.
- Installing Windows on virtual machine Parallels Desktop. In this case, you get Windows as a program running on Mac OS X. Performance in this case is slightly degraded, since two systems are running at the same time. you can read our article.

Installing operating systems on different hard drives
The simplest, but at the same time and efficient way combining two systems. With this use, all PC settings are taken by Windows directly from the Bios, which does not lead to even a minimal drop in performance.
The method is very simple to implement and does not require special skills. The choice of the bootable system is carried out through the Boot Menu, which can be called up by pressing the F12 key when the PC boots. Having chosen a certain hard disk, thereby we determine in which operating system we will work.
Installing Mac OS X and Windows on separate partitions of the same hard drive
When using this method, the operating system is selected using the bootloader window. In this article, we will look at the example of a bootloader Clover.
![]()
You can use any other Mac OS Hackintosh boot loader.
IN this way the installation sequence is very important:
- Installing Mac OS X on a PC. If you have not already done so, you can read the instructions in our articles (,). This is important because Windows environment we will not be able to format the partition in Mac OS Extended (Journaled), which is essential condition to install Mac OS X.
- Installing the Clover bootloader on your hard drive. You can find out how to do this in the articles on installing OS X mentioned above. Sometimes, for security reasons, Clover is not installed on a hard drive, but launched from a flash drive, which in this case acts as a key to OS X. Important! So that the EFI partition on the flash drive is fully configured to boot Mac OS on your PC, since in many cases the installation and boot settings are different.
- Installing Windows.
Preparing to install Windows
Formatting a partition
In a running Mac OS X system, format the disk partition that is intended for Windows in MS-DOS (FAT) using the disk utility. This operation is necessary in order to ensure that installing windows a partition to install was found. The Mac OS Extended (Journaled) format used by Apple is not recognized by Windows and the partitions will not be detected.

BIOS setup
If during the installation of OS X you had to disable the virtualization settings in the BIOS, you must definitely enable them. Without these parameters enabled, the installation will fail in 90% of cases.
By the way, these BIOS settings are disabled only when installing Mac OS, after installation they can be safely enabled, they will not affect the system startup in any way.
Configuring config.plist
It is very important that a timeout is specified in config.plist before starting the system. Otherwise, you will not have a choice and the system specified in it or the last loaded system (the default setting in Clover) will start automatically.
To do this, open config.plist in CloverConfigurator and change the parameter for 5-20 seconds (if you want the last running system to start automatically, if there is no choice). The value "-1" so that the bootloader does not start the system automatically, but waits for our choice.

Then we save.
After restarting the computer with the connected one, we will see an additional icon for installing views in the Clover window.
After starting the installation, we format the FAT partition we have chosen in advance and format it with the Windows utility in NTFS, after which the process is not much different from the usual installation.
Now our Hackintosh is completely ready to install the second system, in our case Windows.
Installing Windows is the same as installing Mac OS.
