Purpose of the program: testing and repair hard drives.
Let's see what they are offering us.
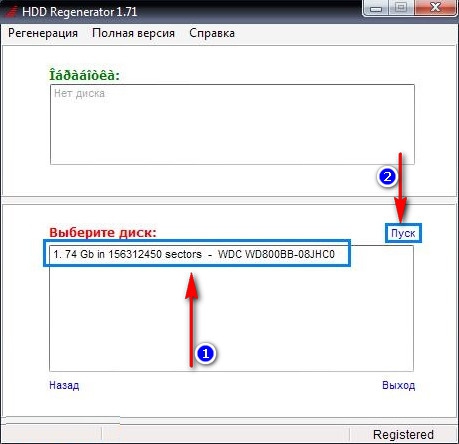
We launch the program, select the disk for work. Double-clicking on the disk line launches a console window with the program itself.
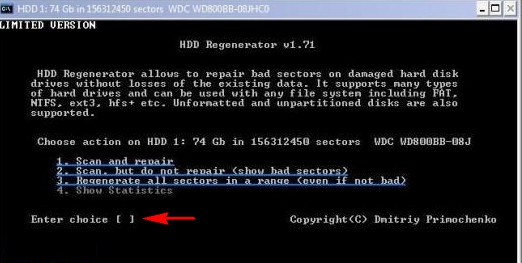
A DOS-like window opens, which is somewhat outdated, but it is probably easier to update the program this way - you have to rewrite less. We select the type of scanning. Confirmation of selection - enter.

- Quick search (there is no explanation of what this means in the description, perhaps scanning of individual areas of the disk)
- Full scan with or without recovery

Then the following menu is displayed. You need to choose how to scan.
- Scan and Repair.
- Scan without recovery.
- Regenerate (do you believe in miracles?) All sectors, even the good ones.
And the last menu.

You need to specify the scan range. You can start from the beginning - from the zero address, you can continue the interrupted session, you can set the range of sectors manually. We will scan the entire disk first - select 1.

Checking the disc surface begins. From the current data, only the percentage of passed and, approximately, the remaining time. What other options are there? When paused (Esc), an additional menu is displayed.

Let's see what's in there.
- Proceed.
- Show statistics.
- Change scan boundaries.
- Change scan mode.
- Exit the program.

The number of sectors checked, sectors with a delay is shown, but there is no breakdown by the delay time, how many sectors were not recovered, the number of recovered sectors, the number of new bad sectors. Oddly enough, but all free analogs (Victoria (dos & win), MHDD, HDDScan (win)) display much more current information about the scan, which allows you to more accurately assess the state of the disk and the prospects for its recovery.
What is paid in this utility? This becomes clear when she bumps into the first bad. One she processes as a demonstration of possibilities. And on the second bed, it displays such an enticing message.

The disc contains Recoverable damage and in order to fix them, you need to pay for full version programs.
It would be appropriate to compare HDDRegenerator with its competitors such as Victoria for windows. An example of how to use it, we have a "link". Here we show how it looks and what it can do just for comparison.
Getting started with the program.

The disk is selected from the list of devices in the system. The working window displays the disk passport. The regenerator does not display the passport. For some malfunctions, the disc displays the wrong passport. The capabilities of the program are visible in the Test tab.

Here only at first glance it seems that it is difficult. After reading the description practical application everything quickly becomes clear. For example, the notorious sectors with a delay in the regenerator here in Victoria are sorted by response time and, for clarity, are highlighted in colors.
As for the recovery of sectors, there is also a full set of tools.
Remap- analogue of repair in the Regenerator.
Erase- analogue regenerate, yes, it is overwriting, no information will remain in the sector.
If Vitoria seems to be overloaded, then there is also HDDScan, very convenient program and an example of its use here is the "link".
The principle of operation of the regenerator is that it repeatedly overwrites badly read sectors until the disk itself replaces them from the reserve zone. It will simply overwrite the soft-bad, and for the hardware bad it will start the remap procedure provided for by the ATA standard, i.e. nothing supernatural is applied. All these procedures are fatal for data contained in slow-reading sectors.
If you use this program or any other with a similar purpose on a damaged disk with important data, then you should remember that all operations for repairing a drive are fatal for the information on it, because write during operation, which is unacceptable for DataRecovery procedures.
But all programs, except for hddregenerator, honestly warn about the danger of data loss. And only the regenerator promises miracles without warning that it is actively using writing to problem sectors and that this can lead to the loss of user data.
HDD Regenerator can be used to get rid of soft-bad blocks from a disk. He will cope with this task. But given that this product is paid, if there is free utilities, its use is extremely limited.

Hdd Regenerator is designed to recover sectors that are not working correctly. The developers assure that the program copes even with severe cases with a probability of more than 50%.
Principle Hdd works Regenerator
The program generates and alternately sends to the damaged sector hard disk high and low level signals. Thus, creating a magnetization reversal of the disk. Most often, this helps to restore sectors, because they become inoperative due to improper magnetization of the disk.
When using the program, system files and custom folders are not affected. Thus, the information on the recovered disk will not be affected.
How to work in Hdd Regenerator
To get started, you need to download the program. It does not require financial resources - Hdd Regenerator is distributed absolutely free of charge.
The downloaded archive contains the "Read me" file, which must be used as instructions for installing the program. There is also a patch and a crack.
After installation, the Hdd Regenerator icon will appear on the desktop.
Launch the program by clicking on the icon.
The program window will appear on the screen, where they offer to start scanning the hard disk or disk.

We proceed immediately to the recovery process: click the "Regeneration" button in the upper tab bar, and then in the drop-down list - "Run the process under Windows".

In the next window, select the hard drive for recovery. It is visualized by numerical characteristics: capacity and number of sectors.
Click on the "Start" button, which is located in the middle of the active window.
After clicking the "Start" button, a window may pop up, which contains information about the use of the disk by programs running on the computer. To continue the process, you must close these programs or processes. If you see a window as shown below, then you must click the "Retry" button.

Another variation of the message is shown below. In this case, click "Ok".

After that, a DOS-specific window should appear on the screen.
It suggests four options for further actions with the hard drive:
1 Performing disk diagnostics and then recovering it.
2 Run diagnostics only and output the results when finished.
3 Perform recovery of specific sectors of the hard drive.
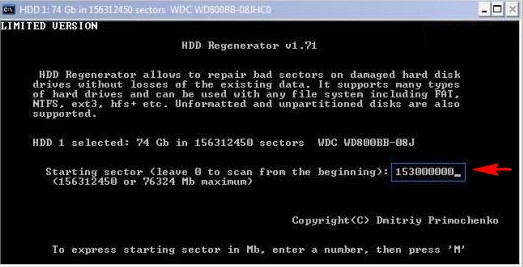
In the next window, we indicate from which sector to start the analysis.
Once selected, the program will scan the hard drive. At the end of the process, a window with the results will appear on the screen, where you can see: the number of bad sectors, the number of fixed and sectors that cannot be restored.

As you can see, the recovery process using the Hdd Regenerator program takes a little time and does not require any special knowledge from the user. With a low weight of the program, which is only 8.8 Mb, it copes with its work quite successfully.
HDD regenerator is a powerful tool for recovering disks and their sectors. If you tried more simple programs, and they did not give any results, then it's time to turn to the regenerator HDD. The utility works entirely in English. Of course, on the developer's site there is a file "regenerator HDD rus", but it only Russifies the start menu, which you will rarely see. Try to diagnose and restore bad sectors of the hard drive in this program.
Go to the official website of the developer at the link http://www.dposoft.net and download the installation file of the program. Click on the “Download” link, select the save directory. Next, proceed to the process of unpacking the regenerator HDD, all the text in the window will be in English. Just click on the “Next” button.


In the main regenerator HDD window, you will see three main links.
- “Bootable USB Flash” - creates boot card memory, if you have only one hard drive on your computer and you have nowhere to install the program. Or, for personal convenience in carrying.
- “Bootable CD / DVD” is a bootable optical disc.
- The topmost link that starts with the words “Click here to repair ...” is what you need in this moment, it will run diagnostics.


- Prescan - diagnostics, after which you will see all the bad sectors.
- Scan with / without repair - a scan in which you can immediately run diagnostics.
- Assembly information.
Which item to choose depends on your goals and the condition of your hard drive. In order to see the whole picture, it is better to opt for Prescan.
Write the number 1 and press Enter.

If you know exactly which sector you need, then write 3.


In addition, it is prohibited to open programs on the hard disk being diagnosed.

In the menu that appears, you need the fourth item to change the option. Press 4 and Enter.


- Scan and repair bad sectors.
- Scan but do not repair. You have already completed this item.
- Regenerate all sectors in a certain interval. To do this, you need to know the interval of broken sectors, it is better not to select this item if you are not an experienced user.
Press number 1 to restore.


Please note that the program recovers only one bad sector. To fully restore a hard drive, you need to purchase a licensed version of the program on the developer's website. As a trial period, you receive one recovery procedure to evaluate the performance of the regenerator HDD.
This utility is an indispensable assistant to many computer repair services, since it does not mask the problem, like other programs, but fixes it. Other programs simply turn off the “bad” sector, so you lose some of your disk space.
Devices for storing various data are important components of any computerized system. At present, data storage devices on magnetic hard disks (HDD) are widely used. These devices are highly reliable, but like every detail personal computer, not insured against malfunctions and failures. In order to restore the operation of the hard drive and provide this component with full service, there are many special programs.
Among them, HDD Regenerator took a worthy position. This is a very common and effective solution to a large number of hard drive problems.
HDD Regenerator: how to use
It is very easy to learn and use this application. This software tool is designed to reanimate the damaged sectors of the hard drive and restore the surface. A characteristic feature of the program is special principle of magnetization reversal of the coating, on the basis of which the software functions.
The application also has a pleasant interface and easy control - there are no complex add-ons and menus with a large number of levels, and the commands for activating certain options are clear to any user. but the regenerator has many advantages and functions... We will not consider in detail all the advantages of the program, but we will analyze only the main use cases that are most popular among computer users.
So, HDD Regenerator for hard drive recovery is often used in the following cases:

In addition to a wide "assortment" of options, the developers have also included several activation options in this application, - The "regenerator" functions purely at the physical level, because it has no dependence on the version and variety of OS. Installation, launch and use are possible in Windows environment, and when activating the program from a disk or flash drive - and in DOS mode. This point should be discussed in more detail.
Launch methods
Windows

Flash drives
It should be noted right away that starting the program with USB storage device useful only in a situation where the hard disk is badly damaged or is the only one. In addition, the use of a flash drive is also useful for those users who often repair different P.K. So, to make a bootable flash drive, you need to do the following:
- Run the program and click on the "Bootable USB Flash" item.
- Select a specific USB device and click on "Ok".
- After bootable USB drive will be created, restart your computer.
If you need to do boot disk, then in the program, press the "Bootable DVD \ CD" button and select the recommended burn (write) speed in the window that appears.
How to use HDD Regenerator 2011
BAD-blocks detection

Scanning and troubleshooting
- Click with the mouse on the item "Normal Scan ...".
- Next, click "Scan and repair". This mode performs in-depth scanning and recovery of faulty blocks.
- The definition of the scan range is done with the arrow keys.
- After pressing the Enter key, the procedure itself begins.
- Blocks that have been successfully restored are highlighted with a green R.
- You can exit the application using any button on your PC.
Recovery by means of magnetization reversal technology
- Click on the item "Normal Scan", and then on the button "Regenerate all sectors in a range".
- Next, you need to define the range of blocks.
- Recovery is started by pressing C on the computer keyboard.
As a conclusion, it should be said that the resuscitation of hard data storage devices using HDD Regenerator is available to all computer user and does not require special knowledge. It should be remembered that any work related to software repair and maintenance of hard disk drives requires maximum accuracy and care. Hope this HDD Regenerator manual will be useful for you.
Hard disk - memory, random access device for storing information: systems, programs, photos, video files, works using magnetic recording. The performance of the system depends on the integrity of the device, and in addition, the ability to work with the data stored on it. In the event of a malfunction, bad sectors, it is necessary to correct and optimize the operation of the hard disk, which is possible with the help of a program such as hdd regenerator delays detected. "What is it? Will she be able to restore the disk completely? " - the question arises for those who for the first time decided to independently "heal" their "Winchester". When starting the check, you should make sure that all important information is copied, because if the system is located on a damaged disk, manipulations and different ways diagnostics and recovery, can lead to its incorrect operation.
Possible problems
No matter how good the quality of the components system unit, sooner or later there will be problems. And given the fact that, on average, for every person who is a little versed in hardware and their malfunctions, there are 20 people “uncles, aunts, grandmothers, their acquaintances” - this topic has already touched everyone. When starting work with a problem, you should not count on its quick solution - the check can take from several hours to a day, so 1 TB on a computer with average characteristics will be processed for about a day. To improve the efficiency of recovery, the program can be used twice - there is a possibility that those sectors that could not be restored the first time will still succumb to resuscitation. In case of possible malfunctions of the storage device, pay attention to the following manifestations:
- Some programs or files cannot be opened or copied. It is important to distinguish between a disk malfunction or a broken program.
- Time-consuming process of opening a folder. If the problem of insufficient RAM is excluded.
- Incorrect launch operating system... When a painfully familiar acquaintance arises " blue screen death ", pay attention to the inscriptions:" NTFS FILE SYSTEM "," KERNEL STACK INPAGE ERROR ", indicating the presence of bad sectors of the storage device.
- Prolonged "freezing" of the computer, even with very simple actions, accompanied by a minimum load of RAM.
- Inability to install a new operating system. In addition, damaged devices with a large number of bad sectors, even if they are eliminated by the program, are undesirable to use to install the OS (operating system): this will worsen the performance, response and durability of the OS.
Ways to solve problems
A broken disk is not the best a big problem: if it can be reanimated, it will be suitable for storing data, if not, replace it with another. Most utilities hide bad sectors, programs like HDD Regenerator restore the hard disk. It is worth figuring out how to do it correctly:
- We install the Regenerator, you can even trial version on a USB flash drive or other external media, it will be more convenient, but you can also work through the OS.
- It is necessary to disable everything that interacts with the memory, the sectors of which are needed to work with the recovery program.
- If the work will take place with external device, then after opening the Regenerator, select the tab “Regeneration” in the upper left corner, then “Start Process under Windows”.
- To select a drive for recovery and verification, you need to open "Choose Drive to Process", then click "Start Process". At this stage, HDD Regenerator will offer to close the missed programs that could not be closed in step 2, if their work is not essential, we agree.
- Will appear command line- black window, only the keyboard can be controlled in it. To carry out a full-fledged scan with the subsequent selection of sector recovery, press "2" and "Enter" on the keyboard, selecting the second item.
- Then there will be two options: check with error correction - # 1 "scan and repair" or only check - # 2 "scan, but do not repair"
»/ - The stage of the check - displayed on the screen as a percentage, the indicators "B" are recorded red - the number of errors found, "R" turquoise - the number of corrected.
- After the end of the check, a report will appear, in addition to the indicators of found and corrected errors, it will be displayed such as "D" white, indicating the delay time. High numbers of this value indicate that the device is badly damaged, it may need to be replaced.
There are many such auxiliary methods, using Victoria hdd or MHDD, they are more focused on diagnosing and analyzing the state of memory and data storage, while HDD Regenerator is able to fix up to 80% of bad sectors and stabilize the operation of the device. In practice, you can use several options, choosing a more convenient diagnostic method for yourself. The verification process is slow, it can take up to a day, depending on the characteristics of the personal computer. But it's worth it - the existence of an additional memory slot will please the owner for some time, while important information still worth duplicating.