Today, HTC's smartphone called Desire C (not to be confused with other Desire phones of past generations) has fallen into our grasping paws. The device is remarkable first of all in that it houses the Qualcomm MSM7225A processor, known for its outstanding characteristics. 600 MHz for the fourth android? In 2012 (released May)? I would like to look tenderly into the eyes of the developers of the device and ask - guys, you need to save wisely. As a result of the manufacturer's ugly decision "out of the box", the phone thinks so slowly that there is a need to do something. The money has been spent, and the phone, in principle, is good, if not for the processor. The obvious solution is to speed up everything and everything by flashing. No sooner said than done, we are starting to remove the restrictions. To begin with, a warning - everything that follows below will automatically void the warranty (but not the phone's performance). You assume the entire risk in this regard.
Before you start, copy all important files from your phone, including your phone book! A blank memory card of at least 2 GB (no more than 4) must be inserted into the phone. In the application settings, check the checkbox for debugging by USB and software installation from other sources!
Drivers and bootloader unlocking
The first action that awaits us while waiting for the transformation of the carriage into a racing car is unlocking the bootloader. Get ready, you will have to download and install a lot. First, we pull the Android SDK out ( http://developer.android.com/sdk/index.html#download) for your version of the system (x86 or x64). Put it on. Perhaps during installation you will be asked to install Java ( http: //java.com /). Choose your version of the operating system and add the missing, then continue to install the Android SDK. Having installed both, take a look around. The android-sdk-windows, which is on the C: drive, has the SDK Manager program. We ask her to install us additionally the Android SDK Platform and Android SDK Tools. In turn, here we are looking for a couple of files that are useful for the rest of the process as a whole. This is adb.exe and adbWinApi.dll (daddy android-sdk-windowsplatform-tools) and fastboot.exe (hidden in android-sdk-windowstools). This trinity you are without a shadow of doubt copy to the root of the C: drive (in other words, without dropping into the folders available there). Create your own folder named Android. Move the three files to the Android folder. A start. Think the install frenzy is over? We've only just begun! We are strongly advised to add to the list of installed HTC Sync ( http://www.htc.com/www/help/). Reluctantly, agree, remove all unnecessary later. HTC Sync contains the necessary drivers, which is why it is so necessary. Additionally, install the HTC driver package ( http: //yadi.sk /d /sY09bJ2_1ii-k).
After installing all the software, reboot. While the computer is turning hard disk, pull the battery out of the phone, wait five seconds and insert it back. This is necessary, because even the shutdown button does not completely turn off the device, but it is necessary that the power is not supplied at all. We check the dexterity of the fingers - simultaneously hold down the sound key down, and also turn on. The phone will show a dark screen and light letters. Navigate the menu with the sound keys until you see that you have switched to the fastboot item. Select it with the power button by lightly pressing it. The phone will start in the mode we need. Connect it to your computer, open Device Manager and make sure the smartphone is visible to the operating system.
In the start button, you probably saw the "execute" item. We call the command line by typing CMD and pressing enter. XP stable rarity users will find a challenge command line in search of. Run it and leave the window open, it's time to get down to the boring task - register on the site http://htcdev.com/(an account confirmation will be sent to the mail). On the right on this site for those who like to mock phones, you see a window with three answer options. We like Unlock Bootloader, go to it. The next window asks for the phone model and your decision - to unlock or not. Naturally, we cannot refuse, it was not in vain that we filled the computer with programs and drivers with might and main ?! Our device is not in the list (remember the letter C in the name), so scroll down to the bottom, it shows All other supported ... Let's dwell on it. Press Begin and quickly scroll to the last page, along the way seeing that we have done 8 out of 10 required steps. Leave this window alone for now and return to the command line, which beckons with a black background and white letters on it. By the way, our fathers and mothers, grandparents were sitting behind such a colorful interface - this is where the harsh everyday life of the user is, and here we are complaining about the installation.
In the command line, enter the command (there is no other way to say):
cd c: / android
Then another one:
fastboot oem get_identifier_token
The terminal will give us an indescribable beauty with something like this:

Copy with the right mouse button all the text that starts with a line <<<< Identifier Token Start >>>> and ending with the same, but with the word End. It is necessary to copy by capturing these lines. Paste the newly copied one into the window under item 10 on the HTCdev website (so it waited for its finest hour). Do not forget to confirm that you copied everything with the Submit button. HTC (more precisely, the robot instead of it) will send you an email with the attached archive a minute later. Take it. There is Unlock_code.bin, that it just asks for a folder to other files with strange names. Send it to C: / Android. Go back to the lonely command line by copying this: fastboot flash unlocktoken Unlock_code.bin. The phone, in response to the launch of the command by the enter, will inform us that we now belong to the subspecies of the Dark Jedi, since we have switched to the dark side of the force (as it is written, we are not kidding). Then there will be horror stories about the loss of the warranty, low-quality firmware and other joys. If after reading you are not scared, then select yes by scrolling down with the sound keys (the choice is the power button). You can abandon the venture with paragraph no. Everything will go back to the beginning. That is, to the complete destruction of everything in the phone's memory, including the phone book. Just factory settings.
By agreeing to go to the dark side, we get an open bootloader. The phone will restart while put it aside. The case is not over yet, there are many interesting things ahead!
ReceivingRoot and installing firmware with overclocking the processor specifically forDesireC
And again, take the postponed device in your hands, pull out the battery and wait 5-10 seconds. After inserting it back, start the phone as you did above - by pressing the volume key down and turning it on. Select from the fastboot list by pressing the power button. Connect your phone to your computer and wait for the phone to be detected.
A small but powerful program is capable of obtaining administrator rights, take it here ( http://yadi.sk/d/XsleRuhW1iiAO). Unpack it to any place that is more convenient (for example, on the desktop) and run install-superboot-windows.bat from the administrator. Executable file will be executed immediately by running the administrator on the phone. Wait for the message about the end of the process and restart the device. Among the programs will be the Superuser application.
The penultimate step in the dance with the phone is the installation of an alternative recovery CWM, which allows the installation of third-party firmware. Take the archive here ( http://yadi.sk/d/Xxq-UMVI1ij-w), move recovery.img to the C: / Android folder, where all the rest of the good is located. Go to the command line, write the text there:
fastboot flash recovery recovery.img
Then write
adb reboot recovery
The phone will restart in CWM recovery (CloclWorkMod recovery is written on the top of the screen). Select the reboot item on the screen. The phone will boot normally. Connect it to the computer and copy the archive to the memory card ( http://yadi.sk/d/QzLvB1sO1ijVY) with firmware (without unpacking). From the copy you have left, pull out the boot.img file and place it in C: /Android.
Copy to the command line: adb rebootfastboot
The phone will reboot into familiar text beauty. On the command line, write:
fastboot flash boot boot.img
So we flash the core with the processor overclocked to 726 MHz (in the settings a little later, you can decrease and increase the processor values, but not more than the specified figure, otherwise an abundance of glitches is guaranteed). Having seen the report on the success of the event, we do the last part of the flashing dance with a tambourine.
There is just a little bit left, be patient, dear. We will install the firmware based on the official firmware 4.0.3, but with the presence of a superuser, overclocking the processor, speeding up the firmware, reducing the consumption of RAM, the ability to set special sound settings that improve the sound in the headphones (see sound profiles in the settings).
Screenshots of the system in front of you:

Write on the command line:
adb reboot recovery
In the touch menu that appears, select the backup item, wait for a copy of the standard built-in firmware, just in case. If you don't like the unofficial one, you can return your old one by booting into recovery and selecting nandroid - restore.
Having saved, before the final firmware we clear the old system - right there, in recovery, look for the items Wipe Data Factory Reset, Wipe Cache, Wipe Dalvik Cache (the latter will most likely be in advanced). Choose them to make room for the new occupant of the phone. And now, the fanfare sounded - we are installing the firmware! Through Install ZIP from SDCARD choose NamelessROM.zip. For a minute and a half or two (up to five), it will be installed. After completing the task, the phone will write a message that everything is fine. Select the reboot item in the phone. The smartphone will restart normally. The first download lasts about ten minutes, be patient. When the start screen appears on the screen, your stay with the new system begins.
phone via computer
Phone firmware is software for a computer that is installed on a microchip at the time of production. When there is a need to reflash the phone. Simply put, it is easier to update the operating system of the device. For what purpose is this necessary? Re-flashing is needed if at one time different OS failures occur with the phone. Or if you need to Russify the device. In any case, the information is what really is, how to flash a Droid phone through
a computer
it certainly won't be superfluous.
Preparation
Before proceeding specifically to flashing the phone, you need to take preliminary measures. This event should be treated with great care. Otherwise, severe problems with the device may appear. So, before reflashing the Droid, you must:
- Charge the phone. If the device turns off during flashing, then this will lead to unnecessary consequences (loss system files, data). Therefore, make sure that your accessory is charged to the maximum. Better yet, connect your device to a power source while reinstalling the OS. Then the device will definitely not turn off.
- Clarify the hottest version of the OS directly for your device. To do this, use the information stored in the "Settings" menu in the "About phone" section. There you can view the current firmware, the build number of the device, the number of cores, etc.
- Download the latest firmware. Using the information received, find the latest firmware on the web and download it. Remember, the OS must match all the features of your device.
Flash device via PC
If you want to reflash your phone using a computer without the help of others, then first you need to download the appropriate software to your own PC. The program must be selected depending on the brand of your phone. For example, if you are the owner of a Samsung phone, then download and install a utility called Odin on your PC. Here is a detailed list of utilities for specific manufacturers:
- Lenovo - Flash Tool;
- Sony - Flashboot;
- LG - KDZ Updater HTC;
We will use a software called Fastboot. how to flash Explay. Step-by-step instructions on how to reflash an android phone through a computer at home. You need to install the phone on your computer via USB and wait. It is suitable for people who use devices from Nexus or HTC.
Flashing instructions
Find the Fastboot program on the web and download it to your own computer. We unpack the downloaded files in the root of the system drive C. Ultimately, the path to the file should look like C: \ Android. The phone can be flashed as in Cellular telephone, computer, After a while. How to flash Android through a computer. The downloaded utility consists of two folders. The directory under the heading Tools contains the utilities that are needed to update the system. In the Driver folder, as you can see from the name, there are drivers.
The next step is to connect the flashed device to the PC via a USB cable. After the computer is combined with the gadget, it will start automatic installation drivers. If you do not know how to connect your phone to a computer via Wi-Fi, then reading this article will do you good. Nevertheless, from time to time, the device cannot find firewood without the help of others. In this case, you need to go to the official website of the manufacturer and download the latest version of the OS from there. Do not forget that the downloaded version of the Droid must match all the features of your phone. After downloading a suitable OS, drop it into Tools as a zip-type archive.
Before flashing the Droid via PC, you need to unlock the so-called bootloader on your mobile accessory. To do this, you need to open the command line. To do this, press the hot R Win combination, after which the standard Run utility will open. We drive cmd into the line, and then press Enter. The window for Windows commands has opened.
Read also

Real iPhone Ringtone Change - Easy! Two ways! If you decide to become part of a large family of modern technology lovers. please contact our consultants. In our store, you can find any gadgets that are in trend today. we try ...

Eileen Brown for Social Business | April 26, 2019. 19:05 GMT (12:05 PDT) | Filed Under: Tablets ✓ Sturdy Build Quality ✓ Dual SIM ✓ Good Speaker Sound Quality Cameras Bad Cameras ✕ Long Shutter Lag ✕ Problems ...

Using a smartphone without Email cannot be considered complete. Moreover, the full functionality of most sites on the Internet is not available without an email client, since registration account email address required ...

Setting the children's watch Q50. annotation. Smart watches for children with GPS tracker Smart Baby Watch Q50Presetting the children's watch Q50 will ensure their clear and smooth operation. Such a device will help parents to always be aware of where they find ...

StarX Satellite TV StarX for PC Broadband can have low latency enough to tighten up aggressive online gaming, and generally can be immediate enough that buyers might not take into account ...

How to repair a TV with your own hands It is impossible to imagine a modern apartment or house without video and audio equipment. This equipment is used on a daily basis and therefore breaks down more often than others. You can repair your TVs for several ...
HOW TO FLASH AND RESTORE ANY BRICK / ANDROID. RELIABLE AND UNIVERSAL METHOD
Requisites for.
Flashing HTC Desire 816G dual sim using SP Flash Tool
Sberbank card number 4276070016295455. To support the development of the channel and if someone needs my videos. Will.
Enter cd C: \ Android \ Tools into the terminal, and then press Enter. You will be taken to the Tools section. You need to use the fastboot devices command. After that, the console will display the code of your mobile device. This means that the utility has determined the accessory and you can proceed specifically to the flashing
operating system
If the line waiting for device appears, it means that the smartphone was not found. To get the device code, you need to install the drivers.
To update the Android OS on your gadget, you need to use the fastboot update command. Enter fastboot update zip into the console and click on the Enter button. Instead, you need to specify the name of the file with the finished firmware. Will begin
renewal process
system that will take a certain amount of time. After the firmware has been reinstalled, you need to reboot the mobile phone.
Firmware via Recovery
There is another way to flash Android
telephone
Read also

How to disable TalkbackWhat remains for our client to do, users of devices on the Droid, seeing the new logo, in the middle installed applications ask questions about what Talkback is, how to use the app, and how to disable Talkback. Here we will analyze ...

A primordial problem concerning users of any OS, and Windows 10 was no exception - the refusal of a complex of accounting programs to start. Why this happens, how to avoid it and how to turn on the computer, read below ...

Most likely, many are annoyed by the screen rotation in Android 7, Android 6.0 1, etc., but you can tame it if you want. Even though even the advanced technologies offered by tablets Samsung smartphones, lenovo, etc. may come out of with ... at some point.

How to find out the password for your wifi How do you find out the password for your Wi-Fi? Surely, some asked this question because they forgot the password for their network. A positive point in this, if the computer, in other words, the smartphone has already been connected to the network, for ...

Amazon kicks off the week with weekly discounts on some of the most popular gadgets. From our beloved Echo Dot smart speaker to smart watch Amazon currently offers some of the best deals we've seen in ...
without a computer. HOW EASY TO FLASH THE PHONE THROUGH recovery. The essence of the method is to use custom or standard Recovery. So, in order to update Android, search the Internet for the firmware that matches the characteristics of your mobile phone. How to flash an Android smartphone through a computer if it does not turn on (brick). Flashing program ( Hard reset) Android tablet or phone. After that, download the OS and transfer it to the root file system gadget. If you want to use custom Recovery, then install TWPR or CWM on your smartphone (you can download applications for free via Play Market).
After that, you need to reboot the device and enter the recovery mode. Recovery Mod is activated in different ways on different smartphones. It all depends on the manufacturer. As a rule, the recovery is turned on by simultaneously pressing the Power keys (smartphone on / off button) Volume Down (volume down key). After you go to the Recovery menu, you need to open the section for installing firmware. In standard recovery, this item is called "apply update from external storage ". As for custom Recovery, in TWRP you need to select "Install ZIP, and in CWM -" apply update from sdcard ". Moving through the recovery is carried out by the sequence of the Volume Down and Volume Up keys.
After you click on the desired item, you must specify the path to the firmware that you previously downloaded to your device. The process of updating the operating system will begin. After you finish flashing, you need to reboot the mobile device and reset the characteristics to factory defaults. How to flash an Android phone. How to flash an Android phone Do it through a computer. To do this, go to the "Settings" section on your smartphone and find the "Reset settings" item there.
Flashing via ROM Manager
You can carry out the firmware at home through a program called ROM Manager. The utility, unlike the same CWM and TWRP, has a simple interface, which facilitates the process of updating the firmware. In addition, the program has a couple of interesting features. For example, you can make a system backup and return the OS to its original state if the firmware process is unsuccessful. So, to yourself
to flash
Android phone via ROM Manager, you must have root rights... You can get root through special applications such as Unlock Root, Vroot, etc. Prompt pzhlsta! the computer does not see the photo on the iphone, that is, it does not open the phone as a camera with a photo. there were no problems before. In addition, it is necessary that the smartphone has a custom recovery on board (the same CWM or TWPR).
If you have all of the above, then download and install the ROM Manager application from the Play Market or the Internet. Then we look for a suitable firmware and download it too. Then we launch ROM Manager and follow the instructions below:

How to restore the system via ROM Manager
If you have any problems after updating the OS, you can roll back the changes by returning the old firmware version. How to flash an Android if it does not turn on through a computer. This is done as follows (provided that you have made a backup in advance):

If you have any questions about the firmware of your phone or something does not work out - leave yours.Also, one of the methods is shown in the video below using Lenovo as an example:
Post Views: 3
One is no longer the last novelty from the manufacturer, having acquired a worthy successor, but the smartphone is still highly popular due to its functionality and reliability. If you like to use the device's capabilities to the maximum, you should update HTC One OS in a timely manner, which is possible in two scenarios: using OTA updates, or using custom ROMs.
By choosing any of the procedures, the user will be able to access all the latest innovations, as well as increase the performance of the device. It is worth noting that updates often open up new possibilities for personalization. Now let's take a closer look at how to accurately update the HTC One operating system.
It's no secret that automatic OTA updates of HTC One have always been and will be the simplest way, but it is worth paying attention to this nuance: OTA updates are not received on all devices of the same model at the same time. This factor depends on the operator, manufacturer and region where the smartphone itself is located. If OTA updates to HTC One are not yet ready, but they can already be found on the network, you can install it yourself. In this situation, the device warranty remains valid. Another option when you need to manually install official updates is to switch from unofficial custom to official Android OS from HTC.
If you want to receive additional opportunities and dramatically increasing the performance of your HTC One, it's worth installing a custom ROM. This implies the need, and the installation of a custom recovery image or. The Extended Features Pay is a factory warranty. However, you can get it back by downloading and installing the official latest HTC One firmware.
What do you need?
PC or laptop
Disabling antivirus protection temporarily
Smartphone battery charging at least 50%
Backups of important data and settings, including Nandroid backup
Confidence that these updates are specific to this HTC One model
Awareness of the share of risk and personal responsibility for installing a custom ROM.
Updating HTC One with OTA
1. Check if HTC One is connected to a WiFi network.2. Go to the smartphone menu, open the settings option.
3. Click on the System option, HTC Software Updates sub-item.
4. Select Check now.
5. If there are new updates available, install them on HTC One.
6. The installation process will be automatically completed after restarting the smartphone.
Updating HTC One manually
1. Install on a PC that matches your HTC One model.2. Following the instructions, launch the Update Utility.
3. When USB help cablez HTC One is connected to the computer.
Updating HTC One with custom firmware
1. (in the absence of applications in this firmware) download to a personal computer.2. You do not need to unpack them.
3. Connect the smartphone to the PC and transfer both files to HTC One.
4. Turn off the smartphone and reboot into recovery mode.
5. We make a wipe ( wipe data factory reset and wipe cache partition, as well as wipe dalvick cache from the menu section advanced).
6. We go back to the main menu, select the following options: install zip from SD card and choose zip from SD card.
7. Install the update file first, and then Gapps.
8. Go back to the main menu of the recovery mode, reboot HTC One.
Applying this theoretical material in practice, one should not forget about the high degree of responsibility for this procedure, which is entirely assigned to the user of the mobile device, at his own peril and risk.
HTC Desire 516 Dual Sim is a smartphone that, like many other Android devices, can be flashed in several ways. Reinstalling system software is a necessity that occurs not so rarely among the owners of the model in question. Such manipulations allow, if done correctly and successfully, to some extent "refresh" the device in terms of software, as well as restore the performance lost as a result of failures and errors.
The success of the stitching procedures predetermines the correct preparation of the tools and files that will be needed in the process of work, as well as the clear implementation of instructions. In addition, the following should not be forgotten:
Responsibility for the result of manipulations with the device is borne solely by the user who conducts them. All the actions described below are performed by the owner of the smartphone at their own peril and risk!

The preparatory procedures preceding the direct process of transferring files to the device partitions can take quite a long time, but it is highly recommended to complete them in advance. Especially in the case of HTC Desire 516 Dual Sim - the model often creates problems for its users in the process of manipulating the system software.
Drivers
Installing drivers for pairing a device and software tools for firmware is usually straightforward. You just need to follow the instructions for Qualcomm devices from the article:

Just in case, the archive with drivers for manual installation is always available for download from the link:
Backup
In view of the possible need to restore the smartphone software, as well as the mandatory removal of user data from the device during the software installation process, you need to save all the valuable information contained in the phone's memory in a safe place. And it is also highly recommended to create a backup of all partitions using ADB Run. Instructions can be found in the material at the link:

Since several methods of installing software are applicable to the device in question, which differ quite significantly from each other, download links required programs and files will be posted in the description of the methods. Before proceeding to the direct execution of the instructions, it is recommended that you familiarize yourself with all the steps that will have to be carried out, as well as download all the necessary files.

Firmware
Depending on the state of the device, as well as the goals set by the user performing the firmware, the method of performing the procedure is selected. The methods described below are sorted from simple to complex.
Method 1: MicroSD + Factory Recovery Environment
The first method by which you can try to install Android on HTC Desire 516 is to use the native recovery environment (recovery) capabilities provided by the manufacturer. This method is considered official, which means it is relatively safe and easy to implement. Download the software package for installation according to the instructions below, using the link:
As a result of the following steps, we get a smartphone with an installed official firmware for the European region version.
There is no Russian language in the package! The interface Russification will be described in an additional step of the instruction below.

Optional: Russification
For the Russification of the European version of the OS, you can use the Android application Morelocale 2. The program is available on Google Play.


Method 2: ADB Run

The result of following the instructions below will be a smartphone with the official firmware version 1.10.708.001 (the last existing for the model), containing the Russian language. You can download the archive with the firmware from the link:
- Download and unpack the archive with the firmware.
- The resulting unpacked folder contains multivolume archive containing the most important image to install - "System"... It also needs to be extracted into the directory with the rest of the image files.
- Install ADB Run.
- Open the directory with ADB Run in Explorer, which is located along the path C: / adb, and then go to the folder "Img".
- Copying files boot.img, system.img, recovery.img, obtained as a result of unpacking the firmware, into folders with the corresponding names contained in the C: / adb / img / directory (that is, the file boot.img- to the C: \ adb \ img \ boot folder and so on).
- Writing the above three image files to the corresponding sections of the HTC Desire 516 flash memory can be considered a complete system installation. The rest of the image files are usually not required to be installed, but if there is such a need, copy them to the C: \ adb \ img \ all folder.
- Turn on USB debugging and connect the device to the PC.
- Launch Adb Run and reboot the device into the mode "Fastboot"... To do this, first select item 4 "Reboot Devices" in the main menu of the application,

and then enter the number 3 from the keyboard - item "Reboot Bootloader"... Push "Enter".
- The smartphone will reboot into the state "Download", as indicated by the frozen startup splash screen "HTC" on white background.
- In ADB Run, press any key, and then return to the main menu of the program - item "10 - Back to Menu".

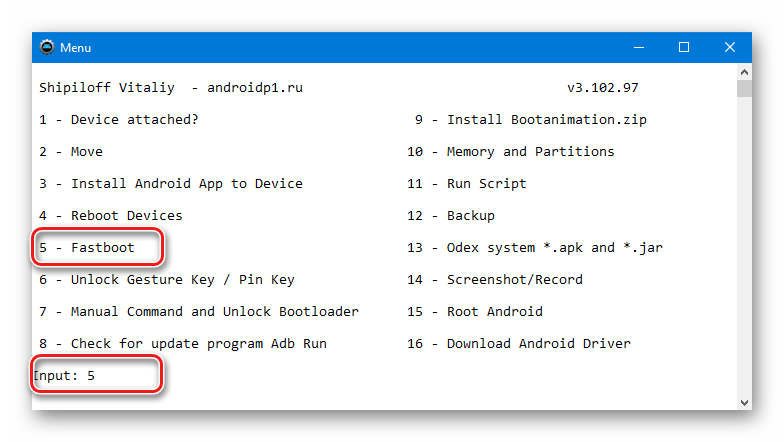
We choose "5-Fastboot".
- The next window is a menu for selecting a memory partition to which the image file will be transferred from the corresponding folder in the C: \ adb \ img directory.

- Optional but recommended procedure. We clean up the sections that we are going to write down, as well as the section "Data"... We choose "E - Clear Partitions (erase)".

And then one by one we go to the items corresponding to the names of the sections:


"Modem" and "Splash1" DO NOT wash!
- We return to the image selection menu and write down the sections.


and "System" to the memory of HTC Desire 516.

Form "System" in fact, it is the Android OS, which is installed in the device in question. This section is the largest in terms of volume and therefore it takes a long time to rewrite it. The process must not be interrupted!

And wait for the process to complete.

This will cause the smartphone to reboot, take a long time to start, and, as a result, the HTC Desire 516 initial setup screen will appear.

Method 3: Fastboot
If the method of flashing each section of HTC Desire 516 memory individually seems too complicated or too long, you can use one of the Fastboot commands, which allows you to burn the main part of the system without, in some cases, unnecessary user action.


fastboot devices

The system should respond with the serial number 0123456789ABCDEF and the inscription "Fastboot".

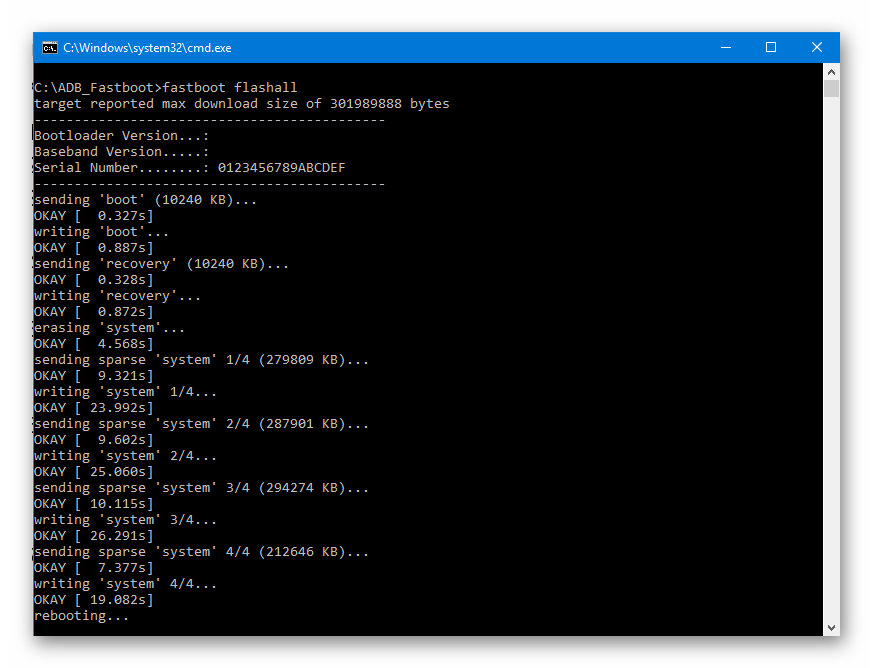
fastboot flash partition_name image_filename.img
For example, let's write down the section "Modem"... By the way, for the device in question, recording the "modem" section is a procedure that may be needed after restoring the smartphone from a non-working state, if as a result the smartphone works as it should, but there is no connection.
Copy the required image (s) to the directory with Fastboot (1) and send the command (s) (2):
fastboot flash modem modem.img


Method 4: custom firmware
HTC Desire 516 has not gained wide popularity due to its hardware and software features, so, unfortunately, it is impossible to say that the device has a lot of modified firmware.

One of the ways to transform and refresh the device in question in software terms is to install an Android shell modified by one of the users of the device, called Lolifox. You can download all the necessary files that will be needed when performing the steps of the instructions below, using the links below.
In the proposed solution, its author has done serious work in terms of changing the OS interface (looks like Android 5.0), deodexing the firmware, removing unnecessary applications from HTC and Google, and also added an item to the settings that allows you to control the startup of applications. In general, the custom works quickly and stably.
Installing custom recovery.
To install a modified OS, you will need custom recovery capabilities. We will use ClockworkMod Recovery (CWM), although there is also a TWRP port for the device, which can be downloaded. In general, the installation in the D516 and the work with different custom recovery are similar.


Installing custom Lolifox
After the modified recovery is installed in HTC Desire 516, the installation of custom software is straightforward. It is enough to follow the steps of the instruction from the lesson at the link below, which assume the installation of zip packages.
Let us dwell only on a few points recommended for implementation for the model under consideration.


Method 5: Recovering Inoperative HTC Desire 516
When operating and flashing any Android device, a nuisance can happen - as a result of various failures and errors, the device freezes at a certain stage, stops turning on, reboots endlessly, etc. Among users, the device in this state was called "brick". The way out of the situation may be the following.
The methodology of recovering ("scratching") HTC Desire 516 Dual Sim involves performing a fairly large number of actions and using several tools. Carefully, step by step, follow the instructions below.
Switching the smartphone to the "Qualcomm HS-USB QDLoader9008" mode
- Download and unpack the archive with all the necessary files and recovery tools.
As a result of unpacking, you should get the following:
- To recover, you need to put the smartphone into a special emergency mode QDLoader 9006. Remove the battery cover.
- We remove the battery, SIM cards and memory card. Then we unscrew 11 screws:
- Carefully remove the part of the case that covers the motherboard of the device.
- On the motherboard we find two contacts marked "GND" and "DP"... Subsequently, they will need to be bridged before connecting the device to a PC.
- We install the QPST software package from the folder of the same name obtained as a result of unpacking the archive using the link above.
- Go to the directory with QPST (C: \ Program Files \ Qualcomm \ QPST \ bin \) and run the file QPSTConfig.exe
- We open "Device Manager", we are preparing a cable connected to the USB port of the PC. Closing contacts "GND" and "DP" on the D516 motherboard and, without opening them, insert the cable into the MicroUSB connector of the phone.
- We remove the jumper and look out the window "Device Manager"... If everything is done correctly, the device will be defined as "Qualcomm HS-USB QDLoader9008".
- Go to QPSTConfig and make sure that the device was detected correctly, as in the screenshot below. Do not close QPSTConfig!
- Reopen the folder with the QPST files and run the file emmcswdownload.exe on behalf of the Administrator.
- Add files to the fields of the window that opens:

- Press the buttons and tell the program the location of the files:

- We check the correctness of filling in all the fields (it should be like in the screenshot below) and click "Download".
- As a result of this operation, HTC Desire 516 Dual Sim will be put into a mode that is suitable for writing a dump to memory. In the Device Manager, the device should be defined as ... If, after manipulating through QPST, the device was determined somehow differently, we manually install the drivers from the folder "Qualcomm_USB_Drivers_Windows".


Additionally
In the event that errors occur during the QPST operation and the smartphone switches to Qualcomm HS-USB Diagnostics9006 it is not possible to carry out, we try to perform this manipulation through the MiFlash program. You can download the flasher version suitable for manipulation with HTC Desire 516 Dual Sim, as well as the necessary files, follow the link:
- Unpack the archive and install MiFlash.
- We follow steps 8-9 described in the instructions above, that is, we connect the device to the computer in a state when it is defined in the Device Manager as "Qualcomm HS-USB QDLoader9008".
- Launch MiFlash.
- Push the button Browse in the program and specify the path to the directory "Files_for_miflash" located in the folder obtained by unpacking the archive downloaded from the link above.
- Push "Refresh", which will lead to the definition of the device by the program.
- Calling the list of button options Browse by clicking on the image of the triangle near the last

and choosing from the menu that opens "Advanced ...".
- In the window "Advanced" using buttons Browse add files from the folder to the fields "Files_for_miflash" in the following way:

After all the files have been added, click "OK".
- Next, mindfulness is required. Making the window visible "Device Manager".
- Push the button "Flash" in the flasher and observe the COM-ports section in "Dispatcher".
- Immediately after the moment when the smartphone is defined as Qualcomm HS-USB Diagnostics9006, quit MiFlash, without waiting for the end of the manipulations in the program, and proceed to the next stage of HTC Desire 516 recovery.


File system recovery

Thus, having studied the methods of installing system software in HTC Desire 516 Dual Sim, the user gains full control over the device and can quite simply restore the device's performance if necessary, as well as give the smartphone a “second life” using customization.
Yes, a little out of topic, but still the other day I updated my, already quite old, smartphone and I have experience. As they say, the same firmware is something in common with satellite receivers.
I hope with this post I will help someone and reduce the time spent, since there is a lot of information, but most of it is very scattered. Further myself the process of flashing the phone htc desire a8181 on the android version 4 or higher.
To start. Many people write that you need to unlock the bootloader - I never succeeded, not with the program HTC Bootloader Unlock, nor by the standard method through the office. htc website.
Instructions for flashing the phone htc desire for android 4+
As it turned out, I had the last official update with android version 2.3. Accordingly, S-ON - protection of software change. Which must be removed first.
But before you do anything, you need to install the drivers for your device on your computer twice.
This should be done in semi-automatic mode, each time pointing to the folder with the drivers.
The first HTC + Drivers are needed when the phone is working normally, and the second Android USB Driver- when working with a bootloader and in recovery mode.
According to the instructions. Personally, I unloaded the archives to the root of the C drive and installed them from there, or rather indicated where they were.

So the drivers are installed and the phone is visible in the computer - let's move on.

As already mentioned - you need to remove S-ON to become S-OFF. You can view the status like this. Turn off the phone - take out the battery and press the volume down + turn on.

At the very top you can see.
How to remove S-OFF HTC?
More precisely, as I did. Go to the site http://rev.alpharev.nl/ - download the application for Windows in the same place. We fill in the data here. Serial number we take it in our phone - we look in the settings or look under the battery.

We enter respecting the register. We generate and receive the code which we enter in the running application from there. The phone must be connected with a cable.
After that, you should get S-OFF and the inscription in pink.

Further action - we sew a recovery for an alternative one. We need an archive Android- which we unzip to the root of the C drive.
There is Recovery Flash.bat and recovery.img (recovery-clockwork-touch-5.8.0.2-bravo.img). When you start the first one, the second one should be sewn. I chose this version of the recovery, since it seemed to me convenient, it worked adequately and the control is familiar - with a finger. You can look for an alternative and just rename it to recovery.img and sew the same way.
Next, you need to get super user rights. The program worked for me Kingo ROOT from under Windows when the phone is normally turned on via a cable.
All this allowed me to flash my phone with custom firmware. Of course, the first one that came across to me did not fit, and the second one was also poorly installed. In short, I stopped at this CM10.1_VJ_4.2.2_V6.2_Sense_Data ++. Zip. With an increase in space for programs on an external flash drive.
Do not think that everything is only in the firmware - that is, installing the software. It still needs to be configured. So this is almost a bare system.
The instruction at the address helped me a lot
http://w3bsit3-dns.com/forum/index.php?showtopic=366523&st=7220#entry39335246
But you shouldn't trust her completely. See for yourself what you need more.
I did not delete Google services and updates - I just turned it off and this immediately gave a lot of space for the necessary programs.
It seemed to me necessary to install LowSoundFixer_v1.0.8.apk(increases volume - firmware bug) and SD + Maid + Pro + v3.1.4.6_arm-zipalign(cleans cache and junk on the phone). The rest is not.
pic phone screen
Conclusion - the phone works fine and is configured for modern android. Now you can install required applications that didn't work for old version, besides, there is a lot of space for games and programs. You definitely need to sew.
Video firmware htc desire a8181 android 4