How insidious virus developers are! Worth Microsoft release another patch to the system, and antivirus companies add an addition to the signature database, as a new attack appears. What is happening is a typical eternal "dispute" between armor and a projectile, but everyone earns as a result. The only disadvantaged party is the user. He is no stranger to the consequences - stolen logins and passwords, overwritten data beyond recovery, lost system performance, and so on. Fortunately, there are certain rules that allow you to avoid the fact of infection in principle. Well, if the trouble did happen, all that remains is to restore the system to work using the usual methods.
One of the last "squeaks" of viral fashion in recent years - displayed after Windows boot black screen. IN current version(Windows Seven) the problem is that after a successful initial boot stage, and then the user authorization process, a black screen appears instead of the desktop and menu with shortcuts. The cause of the problem is incorrect entries in the registry keys responsible for loading the shell. The problem has several solutions, and they differ significantly. For example, if you get a black screen after booting Windows 7 (or in a previous and still popular system, you can do the following.
The first is to install the Black Screen Fix program. An indispensable condition for the effectiveness of this program is the removal of malicious software even before you run Black Screen Fix. For this purpose, the Drweb Cure IT utility is recommended, which has a huge anti-virus database. You can run it from a USB flash drive from by successively pressing "Control, Alt, Divit".
The second, perhaps the surest way is to restore the system through the built-in service. It should be noted that in Windows 7 the procedure is greatly simplified.Simply press F8 almost after the detection procedure hard drives- you can't go wrong! In this menu, select the startup recovery mode. Load into it by pressing the "Enter" button and select the first or second item. When you choose "Startup Restore", you save a lot of time, while choosing the second item "System Restore", you get a guaranteed result. After completing this procedure in the seven, the problem "after booting Windows - black screen" will be a thing of the past. Now be more careful in your actions - use account, limited in rights, and put good antivirus.
"But what if the system is not 7, but XP?" - asks the conservative reader, who stubbornly does not want to demolish his favorite system, which completely suits him, and install the "seven". Unfortunately, this also happens after booting into Windows XP. Black screen and that's it! Then you have to use the registry editor. Well, before that, thoroughly clean the system using the already mentioned Drweb Cure IT. Well, we press the coveted combination "Control, Alt, Divit" and we get the "Task Manager" window. Then, through the file menu, select a new task by typing regedit and now the main system administration tool is launched.
You need to go to HKLM and select the SOFTWARE bush. From here you should choose Microsoft and WindowsNT. Now we are looking for the Winlogon subsection in the Current Version folder, without it the system would not boot even to the authorization window. Check the value of the Shell parameter. It should be strictly explorer, without various add-ons. After all, the essence of the problem lies in the incorrectly loaded malware, it is from here that the roots of the problem "after loading Windows - black screen" grow. It will also be useful to check the Userinit value, which is also critical for loading. That's right - userinit.exe.
It should be noted that this is not all possible options, which the insidious "infection" suggests. The task manager can also be disabled. Then the method with zeroing the parameters to the correct values is unlikely to work. We'll have to go a little differently. We launch it via F8 with command line support and, having loaded, give the regedit command. We consistently go through CureIT and follow the above recommendations, and then reboot. Black Screen after Windows Boot Problem Solved! If you are a fairly experienced PC user, it is recommended to use Zaitsev's Anti-Virus along with these programs, which allows you to both remove malware and automatically return the correct values to the registry parameters.
I made myself some tea, turned on my computer, set myself up to work effectively, but it didn't work: after a few seconds of loading Windows, a black screen appeared out of nowhere. Just like in a children's horror story. But it’s hardly a laughing matter, something needs to be done with it, it’s not in vain that the tea has been brewing for so long! Well said - done, because the solution to the problem lies on the surface. Don't believe me? Let's check it out!
Step # 1: Start the system in safe mode
The very first thing to start with in the event of a black screen after Windows boots is to give it a try. To do this, depending on the version of the OS, you can use different methods. The easiest way, of course, is to turn off the PC and use hotkeys (for example, F8, Del or Shift + F8) when Windows starts up, and then select one of the options for:

This method is perfect for XP and Windows 7, but for 8-ki you may need other methods (). If, after booting, the computer starts normally in safe mode, it is most likely that the matter is in a system settings failure (registry, drivers, updates, etc.). In this case, you can solve the problem by reading the information described in step no. 1.1. - 1.7.
However, if none of the methods succeeded in starting Windows in safe mode, you can try putting the computer to sleep (step # 2) or using special boot disks.
Step # 1.1: Activating the operating system
In 50% of cases, the cause of the failure is running Windows, associated with an unexpected black screen when the computer boots up, is the use of an unlicensed copy operating system, or rather, its recent update. This happens because, having updated, the system did not pass the authentication check and, in fact, issued you headlong to the Windows developers.
It's easy to verify this: just boot the OS in safe mode. If the problem is related to this, a black screen will be displayed on the desktop instead of the usual background image, and at the bottom a corresponding message about using a non-genuine version of Windows. On XP it will look like this:

How to get rid of the problem? Activate your beloved Windows, no matter what - 7, XP or 8. How to do it? Purchase an activation key or, in extreme cases, crack it with a special program (for example, RemoveWAT21). The latter option, however, will save you from the black screen for a short time: with the next system update, it is likely that the problem will reoccur. Well, maybe you're lucky, who knows?
If a black screen appears after booting Windows precisely because of a failure to update an unlicensed version, activating it, you can sleep peacefully.
Step # 1.2: Reinstall graphics card drivers
Often a black screen is displayed in Windows versions XP, 7, 8 after booting the computer and when, for some reason, the video card drivers are damaged or simply flew off. In this case, the only correct solution is to download and install them on your computer. You can download the drivers from the manufacturers' official website, and it's completely free.
However, it should be borne in mind that to eliminate the black screen during Windows boot, you will need only those video card drivers that are completely suitable for your PC. Note that they differ by manufacturer (NVidia and AMD), OS type (32- or 64-bit), its release (Mac, Linux, Windows) and version (for example, Windows XP, 8, Vista, 7).
If you do not know what drivers you need, but Windows XP, 7 still managed to load (for example, in safe mode), you can press R on the keyboard at the same time and set the dxdiag parameter for the Run utility:

After that, in the window that opens, select the "Screen" tab and read the information about the video card drivers. Using this data, we download the necessary updates, install and configure them on our PC. If the problem was in them, after a new OS boot, the black screen will no longer appear.
Step # 1.3: Debug Using Registry Editor Tweaks
At the time of loading Windows 7 and XP, a black screen often appears in case of data corruption in the registry by viruses. It is clear that the solution to such a problem must be sought in the restoration of its full-fledged work. How to do it? To get started, start the task manager with the Ctrl, Esc and Shift keys. After that, open the "Application" tab in it and click the "New task" button at the bottom of the window:

As a result, Windows will offer to create a new task. Enter regedit in the free field and click on the OK button:

As a result, the "Registry Editor" window will appear on the screen. You need to find the same branch and file in it:

After that, double-click on the Shell file, delete all entries in the window that opens, type in the explorer.exe parameter into the empty field and save the settings:

The final touch is restarting the PC. If all the actions were performed correctly and the reason for the black screen after booting the computer with Windows 7 (XP) was the corruption of the registry data, as a result of their debugging, the problem will be resolved. If this does not happen, it is very likely that the cause of the problem was not correctly identified and a different solution is therefore required.
Step number 1.4: Restoring the system using the AVZ program
You can also configure the work of explorer.exe and, accordingly, get rid of the black screen, which appeared as a result of a system failure, when booting Windows 7 (XP, 8), you can also use the AVZ utility. If the browser does not open on its own and there is nowhere else to download it, we use this output: we call the R combination and the Run program, enter the iexplore.exe task for it and press Enter (OK):

You can also perform this task through the task manager, if it is running. In this case, press Shift, Esc and Ctrl at the same time on the keyboard, select "File" in the window that appears, and in it the item "New task". Next, in the Create Task utility, enter the iexplore.exe command and click OK:

After it opens Internet Explorer, we drive into the search bar http://z-oleg.com/avz4.zip, and then download and install the AVZ utility on the PC. In it, open the "File" menu and select "System Restore":

In the new window, mark item 8 and item 16 and click the "Run ..." button:

After the program completes the tasks prescribed for it, we send the computer to restart. As a result, when you reboot Windows, no matter what version 7, XP, Vista or 8 it is, the black screen should no longer appear.
Step # 1.5: Eliminate the conflict with the antivirus
A black screen at the very beginning of loading Windows 7 / XP / 8 may also appear when a conflict occurs between the system and the antivirus, primarily Avast. In this case, to cope with such rudeness of the antivirus program, which partially blocked the system files, you can delete the processes associated with the work of the antivirus in the task manager. Open it by simultaneously pressing Ctrl, Alt and Esc:

Note that this is a temporary solution. To finally get rid of the appearance of a black screen at the same time as loading Windows 7 (8, XP), open the antivirus and enter the exceptions for it from item 6. For the example of Avast, it will look like this:

Then, to start the explorer.exe process, open the Task Manager and enter this task from the Application tab using the New Task button:

After restarting Windows XP / 8/7, the black screen issues should be gone.
Step # 1.6: Resuming the system from a restore point
This method will be effective in cases where neither the registry, nor the task manager, nor the Run utility will open on the computer. True, you can use it to solve the problem with the appearance of a black screen at the time the system boots up only on a PC with OS Windows 7 and 8. However, the process on different versions The OS will be different:
Continuously hold the Shift key on the keyboard for several seconds or press it 5 times until such a window appears:

In this window, click the item "Go to ...", enter the Center special features enter the word "dis" in the search field:

As a result, Windows 7 will open the "Control Panel", in which you need to select the "System" section, and in the next window - the "System Protection" tab:

After that, in a new window we find and press the "Restore" button:

In the "System Restore" window that appears, click on the "Next" button, and then select the appropriate restore point:


As a result, it will happen, which will restore the old settings for the system and relieve, accordingly, the cause of the black screen when the computer starts up.

After that, we perform the following actions one by one:

As a result, having selected a restore point for Windows 8, we will start the process of restoring the old system parameters, which will save you from repeatedly popping up the black screen after the system boots.
Step # 1.7: Fix the problem after upgrading to Windows 8.1
From the name it is clear that this method should be used if the problem with the appearance of a black screen appeared immediately after updating Windows 8 to Windows 8.1. First you need to find and delete on your computer hidden folder C: \ Windows Activation Technologies. If the uninstallation failed on the first attempt, we access it using the UnLocker program.

As a result, the program for checking and correcting errors in Windows system... Note that you can use this function not only in Windows 8, but also on 7 and XP:

After that, we start the explorer.exe process, as indicated in step No. 1.5, and restart the computer. As a result, the black screen should not appear on a new boot of Windows. Note that you can fix the result in Windows 8 by enabling quick launch systems:

Step # 2: use hibernation
Let's say right away that if the start of the computer in safe mode did not work, you should not really hope that hibernation will help. However, what the hell is not joking. How do I put Windows to sleep? If you are using a laptop / netbook and the power button is exposed to boot the system in sleep mode, press it.
If there is no such function or you are used to working with a stationary PC, you will have to tinker a little. Just a little:
We press the button on the keyboard and thus open the "Start" menu. In it, click "Shutdown", then press Shift and select "Sleep Mode":

We go to "Start", open the "Shutdown" menu and select "Sleep" in it:

Windows 8:
Go to "Options", press Shift and at the same time select "Shutdown" on the screen. In the menu that opens, click "Sleep Mode":

After the system has slept for a few minutes, turn on the computer again. If the black screen disappears, then the problem has been resolved by itself. What if the problem persists? Try again to run safe mode, what if it works out?
What if the miracle did not happen, and none of the methods described above helped? In this case, it remains only to restore Windows using an installation disk or image, or, in principle, reinstall the operating system. But that, as they say, is a completely different story.
Sometimes, when booting the system, users encounter such an unpleasant problem as the appearance of a black screen, on which only the mouse cursor is displayed. Thus, it is simply impossible to work with a PC. Consider which are the most effective ways troubleshoot this problem in Windows 7.
Most often, a black screen appears after the Windows welcome window has been opened. In the vast majority of cases, this problem is caused by an incorrectly installed Windows update when something went wrong during the installation. This entails the impossibility of launching the system application explorer.exe ( Windows Explorer), which is responsible for displaying the graphical shell of the OS. Therefore, instead of a picture, you just see a black screen. But in some cases, the problem can be caused by other reasons:
- Damage system files;
- Viruses;
- Conflict with installed applications or drivers;
- Hardware malfunctions.
We will explore options for resolving this issue.
Method 1: Restoring the OS from under "Safe Mode"
The first method involves using "Command line" launched in "Safe Mode" to activate the explorer.exe application and then roll back the OS to a healthy state. This method can be used when the device has a restore point that was formed before the black screen problem appeared.
- First of all, you need to go to "Safe mode"... To do this, restart the computer and when you turn it on again after the beep, hold down the button F8.
- A shell for selecting the type of system boot will start. First, try to activate Last Known Good Configuration by using the arrow keys on the keys to select that option and pressing Enter... If the computer starts normally, then consider that your problem is solved.

But most of the time it doesn't help. Then in the shell of the boot type, select the option that involves activation "Safe Mode" with the support "Command line"... Next press Enter.
- The system will start, but only a window will open "Command line"... Type into it:
After entering press Enter.
- The entered command will activate "Conductor" and the graphical shell of the system will be displayed. But if you try to restart it again, the problem will return, which means that the system should be rolled back to a working state. To activate a tool that is capable of performing this procedure, click "Start" and go to "All programs".
- Open the folder "Standard".
- Enter the directory "Service".
- In the list of tools that opens, select "System Restore".
- The starting shell of the standard OS resuscitation tool is activated, where you should click "Further".
- Then a window is launched where you should select the point to which the rollback will be performed. We recommend using the latest version, but which was necessarily created even before the black screen problem appeared. Check the box to expand your choices. "Show others ..."... After highlighting the name of the optimal point, press "Further".
- In the next window, you just need to click "Done".
- A dialog box will open where you should confirm your intentions by clicking "Yes".
- The rollback operation will begin. At this time, the PC will be rebooted. After enabling it, the system should start in standard mode, and the problem with the black screen should disappear.


Method 2: Recover OS files
But there are times when the OS files are so badly damaged that the system does not boot even in "Safe Mode"... Also, one cannot exclude such an option that you may simply not have the necessary restore point on your PC. Then you should make a more complex procedure for reanimating the computer.
- When starting the PC, move to the window for selecting the type of boot, as demonstrated in the previous method. But this time, from the items presented, choose Troubleshooting ... and press Enter.
- The recovery environment window opens. Select from the list of instruments "Command line".
- The interface opens "Command line"... In it, enter the following expression:
Be sure to click Enter.
- The shell will start "Registry Editor"... But you need to remember that its partitions will not belong to the current OS, but to the recovery environment. Therefore, it is required to additionally connect the registry hive of the Windows 7 that needs to be fixed. For this in "Editor" highlight the section "HKEY_LOCAL_MACHINE".
- After that press "File"... In the list that opens, select "Load bush ...".
- The window for loading the bush opens. Go to the disk partition where your operating system is located. Next, go sequentially to the directories Windows, "System32" and "Config"... If, for example, your OS is located on the C drive, then the full path for the transition should be as follows:
C: \ Windows \ system32 \ config
In the directory that opens, select the file called "SYSTEM" and press "Open".
- After that, a new section will be created in the folder "HKEY_LOCAL_MACHINE"... Now you need to open it.
- In the opened directory, select the folder "Setup"... On the right side of the window, among the items that appear, find the parameter "CmdLine" and click on it.
- In the window that opens, enter the value in the field "Cmd.exe" without quotes, then click "OK".
- Now go to the parameter properties window "SetupType" by clicking on the appropriate item.
- In the window that opens, replace the current value in the field with "2" without quotes and click "OK".
- After that, go back to the window. "Registry Editor" to the section that you connected earlier, and select it.
- Click "File" and from the drop-down list choose "Unload the bush ...".
- A dialog box will open where you need to confirm the decision by clicking "Yes".
- Then close the window "Registry Editor" and Command line, thus returning to the main menu of the recovery environment. Click the button here.
- After restarting the PC, it will automatically open "Command line"... Type in the command there:
Click immediately Enter.
- The computer will be checked for the integrity of the file structure. If violations are detected, the procedure for restoring the corresponding element is automatically activated.

- After the restore is complete, enter the following command:
shutdown / r / t 0
Push Enter.
- The computer will restart and turn on normally. It is important to take into account that if the system files were damaged, which caused the black screen, then, quite possibly, the root cause of this could be a virus infection of the PC. Therefore, immediately after restoring the computer's performance, check it antivirus utility(not standard antivirus). For example, you can use Dr.Web CureIt.


If none of the above methods helped, then in this case you can make Windows installation 7 on top of a working operating system while maintaining all settings, or a complete reinstallation of the OS. If these actions did not work, there is a high probability that one of the hardware components of the computer is out of order, for example, a hard drive. In this case, it is necessary to repair or replace the broken device.
The main reason for the appearance of a black screen when booting the system in Windows 7 is incorrect installed update. This problem It is "cured" by rolling back the OS to a previously created point or by performing a file recovery procedure. More drastic actions also involve reinstalling the system or replacing hardware components of the computer.
» What to do if instead of a worker windows desktop XP displays a black screen?
What if a black screen appears instead of the Windows XP desktop?
Black screen after booting Windows XP. What happened?
You turn on your computer and observe the normal Windows XP boot process. However, instead of the desktop, you have only a black screen, in some cases - with a cursor arrow, in others - without. What does it mean? What could have caused this to happen? Let's try to figure it out.
Black screen reasons or why Windows does not boot to completion
- Invalid monitor resolution value (not supported by driver).
- Malfunction of the computer video subsystem (video card, cable connecting the video card to the monitor, the monitor itself or the laptop matrix, etc.).
- Missing or damaged video drivers.
- Critical Windows errors immediately after startup.
- Damage or absence of a number of system files (most often - dynamic libraries).
- Damage to the system registry.
What is the most common cause of file and registry corruption?
- Hardware Issues: Surface Defects hard disk, its interface cable, errors random access memory, power outages during file read / write operations, etc .;
- Viral infection (one of the most common causes);
- Illiterate use of customization programs (tweakers) to optimize Windows;
- Using tools for cracking (breaking protection) and pirated software;
- Manual deletion of files or editing the registry by the user.
Fixing hardware problems
Correcting the monitor resolution
A problem can arise, for example, after replacing a monitor or video card, if the screen resolution set by the user is not supported by the new driver. But sometimes this is also the result of software failures.
How do I return the screen to its normal resolution?
- Reboot your computer. Before the next start of Windows, press and hold the F8 key to enter the additional boot options menu.
- Select “Enable VGA Mode” from the menu. The system will boot with the standard video driver, which is used in Safe Mode and during the initial startup phase of Windows XP.
- Right click on free space on your desktop. Select "Properties" from the context menu.
- Open the "Options" tab and change the screen resolution to one of the standard ones. Save your changes.
- Boot Windows XP normally. Go to the display settings again and set a more suitable resolution.
We solve problems with the video card and video driver
Often a black screen after loading Windows occurs due to the failure of the video card or damage to its driver. What can be done in this case? If your computer is equipped with two video cards (integrated and discrete), go to the BIOS settings and switch to the integrated video mode (how to do this, you need to find out from the documentation for your BIOS version). Turn off your computer and connect the monitor cable to the appropriate connector.
If you were able to fully boot Windows XP and see the desktop, you have found the source of the problem. This means that your discrete graphics card is out of order and needs to be repaired (or replaced).
In some cases, if the video subsystem malfunctions, the computer boots normally in safe mode. By using this opportunity, there is a chance to check if your video card is detected in the device manager and whether the operating system recognizes its driver. To do this, follow these steps.
- Reboot your PC. Before starting Windows, press and hold F8 - a menu of additional boot options will open.
- Select "Safe Mode" from the menu.
- Open up context menu“My Computer” and select “Properties” in it.
- Open the Hardware tab and click Device Manager.
- If in the list of equipment instead of a video card you have unknown device, you need to install a driver for it.
A suitable driver can be downloaded from the manufacturer's website, if the model of the video card is known for sure, installed from the disk that was attached to the card upon purchase, or found by the device code. The code can be viewed on the "Details" tab in the properties of the unknown device.
To do this, select the “Equipment ID” item from the “Property” list. Copy the top line and with search engines determine the model of the video card. Then download the driver from the manufacturer's website.
If the video card is not detected either in Windows XP or in the BIOS of the computer, it remains to assume that it is incorrectly connected or is faulty. The failure of the device is also indicated by its inability to “hold” the driver - that is, after some time after installing the driver, the video card is again defined in the device manager as Unknown Device.
Finding and fixing other hardware problems
HDD
Other reasons you only see a black screen after booting into Windows XP include hard disk and RAM problems. And in more rare cases, the culprit is the power supply, motherboard, and other hardware.
For testing and fixing hard disk errors, it is convenient to use the Windows tool - the "checkdisk" utility (chkdsk.exe). To start it open command line through "Start" - "Programs" - "Standard". Enter the command: chkdsk / f / r(/ f / r – search and repair attributes for disk errors and bad sectors) and press Enter.
The system will prompt you to check after the next boot. Press “Y” to agree and restart your computer.
Memory
RAM testing is best done with third party applications... One of the best tools is Memtest86 +. To work, you need to prepare a boot disk with this program, start a computer from it and carry out a check, lasting 6 - 8 hours. Red lines in the Memtest report indicate RAM errors. If this is your case, the memory must be replaced.
Other equipment
Finding hardware problems system unit at home, it is usually carried out by alternately replacing the tested parts with known good ones. In order to find a problem node in this way, you need to have in stock a set of at least the most basic equipment compatible with the tested one - a power supply and motherboard with a processor. If this condition is not feasible, you will have to contact a specialist.
Black screen after starting Windows XP followed by reboot
One of the variants of the described problem manifests itself as follows: the computer boots normally, Windows starts, but instead of the desktop a black screen “hangs” for several seconds, after which the PC goes into reboot. The situation repeats itself cyclically.
The reason lies in the crash of the system, usually associated with any of the drivers or automatically loaded programs. Usually, in such cases, a BSOD is displayed on the screen - a blue screen of death with an error code and an indication of its source. But if in Windows settings XP had automatic restart on crashes enabled instead of blue screen there will be just such a picture.
To find out what is causing the fatal error, run the Advanced Boot Options menu (F8). Select "Disable automatic restart on system failure" from the list.
Now, in case of a failure, you will see a STOP error code and a problematic driver. Based on this information, you can determine the cause of the problem. The most reliable interpretation of BSOD data is on the official MSDN Microsoft website, in the Blue Screens section.
We are looking for the source of the software failure
Software problems account for about half of the black screen after booting into Windows XP. A black screen appears due to the system not finding critical files or registry keys. We have already said how they can be damaged, and now we will figure out how to deal with it.
Last Known Good Configuration
First of all, let's try to boot the computer with operating parameters - Windows last good configuration. This option is available all from the same additional boot options menu.
Virus treatment
If nothing has changed, and the system is still showing you Malevich's black square, check your computer for viruses. In this situation, this can be done in two ways:
- booting Windows XP in safe mode and running a scan with the installed antivirus;
- if safe mode does not load, it remains to scan the system with an antivirus for boot disk or a USB flash drive.
For this, monsters such as:
Quite often, after checking and removing a virus, corrupted files have to be replaced manually. The source of clean files can be:
- similar Windows version XP with the same service pack as yours;
- setting Windows disk(i386 folder), where the files are stored in a compressed form and need to be unpacked before being replaced. Unpacking is done through the command Windows string or the recovery console with the following command: expand / r source destination folder... For example, expand / r D: \ i386 \ myfile.dl_ C: \ Windows \ System32.
- folder C: \ Windows \ System32 \ dllcache.
Registry repair
The black screen can also be the result of registry corruption. At the same time, Windows cannot fully boot, since it does not find the boot options for some important files.
This recovery method is recommended by Microsoft. It will help you defeat the black screen if you had System Restore enabled on your computer and have checkpoints. All you need is installation disk with Windows.
- To load the Recovery Console, insert the installation disc into the drive, change to BIOS settings boot priority (first boot device make an optical drive) and restart your PC. When the welcome screen of the installer appears, press the “R” key.
- After starting the console, log in to the system. If you have the only copy of Windows installed, press 1, then enter the administrator password.
- Type the following lines in the console window:
md tmp
copy c: \ windows \ system32 \ config \ system c: \ windows \ tmp \ system.bak
copy c: \ windows \ system32 \ config \ software c: \ windows \ tmp \ software.bak
copy c: \ windows \ system32 \ config \ sam c: \ windows \ tmp \ sam.bak
copy c: \ windows \ system32 \ config \ security c: \ windows \ tmp \ security.bak
copy c: \ windows \ system32 \ config \ default c: \ windows \ tmp \ default.bak
delete c: \ windows \ system32 \ config \ system
delete c: \ windows \ system32 \ config \ software
delete c: \ windows \ system32 \ config \ sam
delete c: \ windows \ system32 \ config \ security
delete c: \ windows \ system32 \ config \ default
copy c: \ windows \ repair \ system c: \ windows \ system32 \ config \ system
copy c: \ windows \ repair \ software c: \ windows \ system32 \ config \ software
copy c: \ windows \ repair \ sam c: \ windows \ system32 \ config \ sam
copy c: \ windows \ repair \ security c: \ windows \ system32 \ config \ security
copy c: \ windows \ repair \ default c: \ windows \ system32 \ config \ default
- To exit the console, enter the command exit.
If you have access to another PC, you can create a batch file with this text to save time. To do this, copy the commands to notepad and save the file under any name with the txt extension. For example, MyRegCopy.txt Place it on a USB flash drive, connect the USB flash drive to the computer where you are restoring the system, then type the command in the recovery console: batch F: \ MyRegCopy.txt, where F is the letter of the flash drive.
The corrupted registry will be replaced with the copy that was created when Windows was installed. If you are satisfied with this option (all installed programs will have to be reinstalled), you can stop there. If you are not satisfied, go ahead.
- Download Windows XP. Does the black screen no longer appear? Now you have to extract from the folder C: \ System Volume Information more recent copies of the registry. Unfortunately, you will not be able to use the System Restore application, since no checkpoints will be found. Nevertheless, these points were saved on the computer just in the above-named folder.
- Access System Volume Information by following this article from Microsoft.
- Find in the System Volume Information folder a subdirectory named Snapshot, created later than everyone else.
- Open it and copy from there to the folder c: \ windows \ system32 \ config the following files:
REGISTRY_MACHINE_SOFTWARE
_REGISTRY_MACHINE_SYSTEM
_REGISTRY_USER_.DEFAULT
_REGISTRY_MACHINE_SECURITY
_REGISTRY_MACHINE_SAM.
- Create and save on the C: \ drive a text file with the following content:
del c: \ windows \ system32 \ config \ sam
del c: \ windows \ system32 \ config \ security
del c: \ windows \ system32 \ config \ software
del c: \ windows \ system32 \ config \ default
del c: \ windows \ system32 \ config \ system
ren c: \ windows \ system32 \ config \ _REGISTRY_MACHINE_SOFTWARE SOFTWARE
ren c: \ windows \ system32 \ config \ _REGISTRY_MACHINE_SYSTEM SYSTEM
ren c: \ windows \ system32 \ config \ _REGISTRY_USER_.DEFAULT DEFAULT
ren c: \ windows \ system32 \ config \ _REGISTRY_MACHINE_SECURITY SECURITY
ren c: \ windows \ system32 \ config \ _REGISTRY_MACHINE_SAM SAM
- Boot Recovery Console again and run the command: batch C: \ File.txt(put the name of the new batch file here).
- To exit the console, type exit.
The registry will be restored and all your software will work again.
Installing Windows XP in Recovery Mode
If you still haven't managed to beat the black screen after booting Windows, don't despair. There is another chance to restore the system without reinstalling. To do this, you will also need a distribution disc. Let's get started.
- Boot your computer from disk. Wait until the screen appears with the text “Welcome Windows installation”. Press Enter (continue installation).
- The installer will scan the disk for other copies of Windows and offer to restore them. In our example, one copy was found. Let's restore it by selecting and pressing the "R" key.
- During the recovery process, the files of the Windows directory will be copied to the hard disk - everything necessary for the normal functioning of the system.
- After copying is finished, the computer will restart. When you restart it, the installer will prompt you to press any key to continue with the installation. You don't need to do this, because then your settings, desktop, etc. will not be saved.
If done correctly, a black screen instead of a desktop will no longer bother you. The system will restore its work, and you have to take measures so that this situation does not happen again: create a restore point, install a good antivirus, and also copy important data to another medium and store it in a safe place.
Today we will look at:
It is not difficult to imagine what a novice user experiences when looking at a black screen of a seemingly loaded operating system. In most cases, in such a situation, all the user can do is aimlessly move the mouse cursor over the blank screen. You will be pleasantly surprised, dear friend, but the problem of "Black screen when starting Windows 7" can be solved even by a primary school student, guided by the material of the presented article.
A few words about the "black" reason
As practice shows, basically this kind of trouble occurs as a result of improper shutdown of the computer (in addition, interruptions in the centralized power grid), or when the user completely ignores the issues of preventive maintenance of the electronics entrusted to him. In any case, the file structure of the computer's hard disk is damaged, and this, in turn, leads to commonplace software glitches.

Often, the so-called "Malevich Black Square Effect" is manifested as a result of viral infection. Malicious program code destroys the integrity of system files, the result is that after the OS starts, the desktop disappears, that is, the user is greeted by emptiness, and that's all.
And finally, the third "black" reason is a technical malfunction of the video card or monitor, or a banal video signal due to mechanical damage to the connecting cables.
Where to begin?
First of all, you need to find out if everything is in order with the display device, that is, to check the performance of the video card. Moreover, not always visually observed information at the initial stage of loading is an indisputable confirmation that everything is in order with the graphics adapter - this is a delusion.
However, if during the boot process of the OS you observe an incomprehensible flicker or other "visual artifacts" - it's time to sound the alarm. If possible, switch to a different video scheme, that is, disable the discrete video card and use the integrated video chip.

The second stage of diagnostics: check if everything is in order with connecting cables, maybe somewhere the wire is broken (bend it slightly, twist it, in general, move it). It is possible that your pet has clearly played with the hanging wire (bite marks, bare winding, etc.).
It makes sense to disconnect all peripheral devices from the system unit or laptop. Perhaps a "black conflict" - there is a result, so to speak, of the flown drivers of some external device such as a printer, removable storage, etc.
Software fault diagnosis and recovery
There are quite a few methods to restore the former "beauty of visualization", but we will focus on the most basic of them. Remove the disc from the optical drive, if there is one, and unplug the USB flash drive if you have not already done so.

If all the attributes of the desktop appear on the screen, you're in luck. Now you can safely proceed to the next stage of system recovery.
- In the search box of the Start menu, enter "recovery".
- In the window that opens, click on the link of the same name.
- Next, select a workable rollback point and start the process of "healing" the OS.
If on your PC the above service has been disabled and the rollback copy simply does not exist, then try the method described below.
Checking the hard drive for errors
As a result of intensive use of the hard drive, systematic violation of operational rules (incorrect on / off of the system) or ignoring the optimization and maintenance of the information storage device (HDD), the emergence of various system errors it's only a matter of time. By the way, the obsolescence of the disk surface and the mechanical parts of the hard drive also lead to software failures and hardware conflicts.
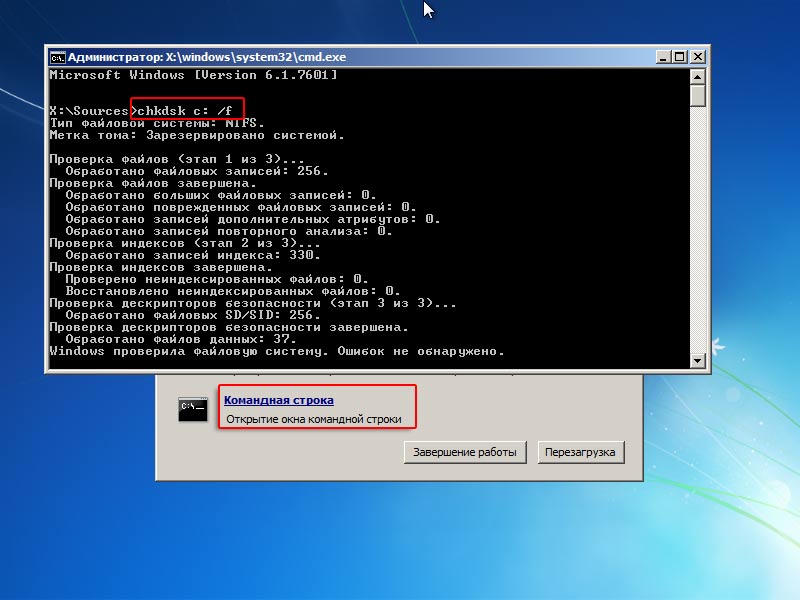
- So, press the key combination "Win + R".
- In the Run Service Console, type cmd.
- Next, in the command window, write - chkdsk with: / f
To the request for a restart, we agree in the affirmative.
Virus infection and editing the Windows registry
It is not uncommon for a malicious program to modify the operating system registry. Therefore, you need to make sure that the correct values are written in the responsible (for the blackness of the screen) branch.

It is also worth checking another registry key:

Well, the last thing you need to do is scan the entire hard drive for an item. It is likely that the remnants of a digital infection through certain time will make themselves felt again.
In conclusion
Hopefully, the recommendations in this article helped you. However, do not let your guard down. Install a reputable antivirus program and remember to do preventative maintenance on your computer at all times. Stability of your system!