(early 2011) at home.
The crisis is in the yard, and dreams of buying a new Macbook dissipate like smoke. In this harsh time, when a kilogram of ordinary cucumbers costs like a kilogram of Israeli apples, it's time to get a screwdriver and update your faithful aluminum companion with your own hands.
If you do not have a screwdriver, hands, or lack the courage, please contact the professionals of modding and repair. Proven masters live in the company ModMac, who with unwavering hands will mercilessly disassemble any gadget, fix it and put it back together without any unnecessary parts left.
On a Saturday winter morning, from the pattern of clouds in the sky, I understood - it's time! After making a backup, my MacBook Pro and I went to workshop for a rejuvenation operation. The plans were to replace the native HDD cable with a new one, as well as replace the optical drive with a super-fast SSD drive using a special Optibay tray.
Few people know, but if an SSD drive is installed instead of a native HDD, and the native HDD is installed with a second hard drive instead of a CD drive, then in this situation the system will work a little slower. It is better to stick the SSD disk in place of the optical drive, and leave the native HDD in its place. The performance will be higher.

Upon arrival at the site, my laptop immediately passed into the hands of the master, and I got the small role of an impassive extra, who recorded every movement of the specialist's hands on the camera.
Preparation
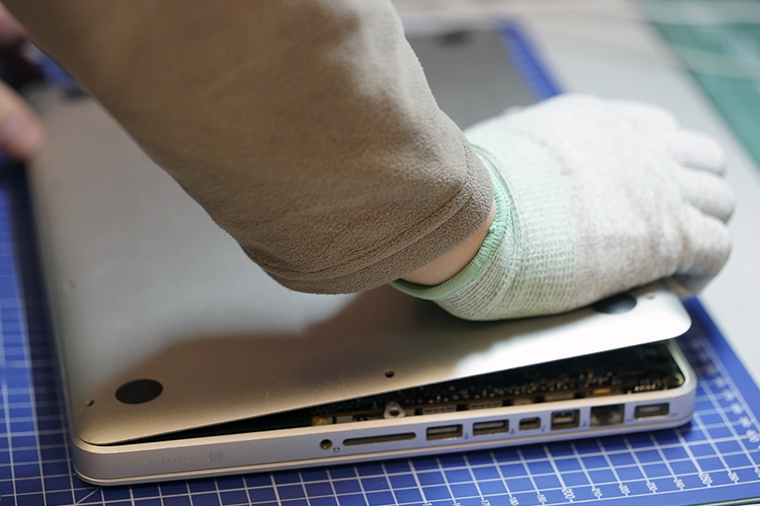
So, the MacBook Pro is located on the table, turned upside down, revealing its defenseless belly to our gaze. With dexterous movements of a Phillips screwdriver, 10 screws were unscrewed along the perimeter of the back cover. And then, without much effort, the lid was removed and neatly set aside.


Once again, I marveled at the ergonomic arrangement of all components inside the brainchild of Steve Jobs. How fascinatingly all the filling is fitted to each other!

The first stage has been successfully completed, we go to the next level.
Replacing the HDD cable
Removing the hard drive is easy on my MacBook. In some models, for example, to remove the HDD, you must first remove the battery, but this is not our case. So, what needs to be done, point by point:
1) Disconnect the cable leading from the battery to the board;


2) unscrew the two screws and pull out the clamping bar;


3) Gently pull the hard disk by the special tab and with your fingers (a pick, a special plastic spatula) disconnect the ribbon cable from the hard disk.


The hard disk cable is very fragile, tugging, tearing and twisting it is highly discouraged.

Why you need to change the cable to a new one: sometimes (rarely, but still) after replacing an ordinary HDD with an SSD, the MacBook disk starts to behave strangely. It seems like the disk utility sees the new SSD, formats it and doesn't find any errors; The operating system is downloading, but all installation attempts are interrupted by a gray screen with a blinking folder or question mark icon.

In this case, replacing the hard drive ribbon cable helps. The operation is very elaborate and requires confident movements and some skill in such actions. Here's how to replace the HDD cable:
1) Carefully disconnect the ribbon cable connector from the board, unscrew the two screws securing the ribbon cable in the case and two screws securing the black bar on the front inner wall of the case.


Using your fingers, gently pull out the black bar to which the HDD cable is glued and be horrified at the miniature size of the connector, which must be carefully removed.

At this stage, you need to collect all concentration in a fist and use tweezers to disconnect the connector from the HDD cable. You can't swear at your mother, it is advisable to breathe every other time.


After this dangerous procedure, you can exhale and relax, the HDD cable is completely removed.

So, at this stage, we have removed our native hard drive and completely disconnected its cable. To install a new loop, all the above steps must be repeated in reverse order. Again, the hardest part is plugging the little connector into the connector on the new HDD ribbon cable.
Replacing an optical drive with an SSD drive


Carefully disconnect the Airport / Bluetooth cable and the camera cable from the board. These cables (like most others) are fragile and brittle.


Then carefully remove the cable around the perimeter of the CD drive and disconnect the antenna connector.


The easiest thing left is to unscrew the three screws holding the optical drive, carefully remove it, and disconnect the ribbon cable connector. Everything, half the work is done, now you need to insert the SSD drive into the resulting void.
SSD and Optibay


Everything is simple here. An Optibay tray is taken, a brand new SSD drive is inserted into it, two fixing screws need to be tightened on the side, a short cable from the CD drive that was removed in the previous step is inserted into the tray, and the entire resulting structure is inserted into place. Finally, repeat all the above-described operations for removing the drive in reverse order.

At the very end, the main thing is not to forget to reconnect the battery cable, which was disconnected at the very beginning of this instruction article.
Note to the hostess

After “pumping” the MacBook, the wizard from ModMac can customize something like Fusion Drive.
Fusion Drive is a technology that combines a conventional hard disk drive (HDD) and solid state drive (SSD) with 128 GB of flash memory into a single logical volume. Mac OS X automatically manages its contents, so frequently used files such as applications, documents, photos (and so on) are dynamically moved to flash memory for faster access. For example, if a program is used frequently, then it will automatically be moved to the SSD drive to speed up access to it. As a result, startup time is reduced, and as the system accumulates information about the computer use profile, the launch of programs and access to files accelerates.
- Wikipedia
By cunning manipulations with terminal commands, the guys from ModMac can configure the MacBook so that the system will see one shared drive with a capacity of 768 gigs (total capacity of SSD and HDD drives) as if it were one SSD.
Performance improves, nerves are taken care of, the owner is happy. I highly recommend it. The only caveat is that you need to avoid emergency shutdowns during the operation of the laptop, Fusion Drive can "fall apart", and you will have to restore all the information again ( therefore, you should always remember about the backup!).

In the base McaBook Pro, Apple installs 5400 rpm hard drives. And their performance with modern operating systems Mac OS X (10.6-10.8) leaves a lot to be desired. And it is no coincidence that Apple is gradually, but surely, switching to installing ssd drives in all laptops.
We think it's time to speed up your beloved MacBook too. You just need to install an SSD drive into it. And so that you do not get confused by the limited ssd size - you can install a second hard drive in place of the DVD drive.
Which laptop models is this solution suitable for? - Yes, to almost all MacBook and MacBook Pro except MacBook Pro Retina
| SSD 120Gb | SSD 240Gb | SSD 500Gb | SSD 1Tb | SSD 2Tb |
|---|---|---|---|---|
| RUB 9,000 | 12,000 rubles | 20,000 rubles | 55,000 rubles | 94 600 rub |
In laptops, a combination of read / write speeds from / to a hard disk at a disk spindle speed of 5400 rpm. does not even reach 50 Mb / s. A 7200 rpm disk will almost double your MacBook's life: read / write speed can fluctuate between 80 ... 105 MB / sec.
It should be noted that there are also Seagate hybrid hard drives on the market, in the design of which a 7200 rpm hard drive with a 16MB data cache and an 8GB ssd drive. With such a "combo" drive, the read / write speed can increase by another 5-7% compared to a regular 7200 rpm drive.
Read / write indicators of ssd drives differ from manufacturer to manufacturer and from model to model. Plus, prices for ssd drives are still below the level of conventional hard drives. The price is gradually falling, and even top-end ssd with volumes of 500 and 960GB are approaching the $ 1 mark for 1GB of storage.
Since Mac OS X is a very compact operating system, and in a set with most of the necessary programs, the total disk space usually does not exceed 30-50GB, you can safely look at ssd with a volume of 120GB or more.
Although, in our opinion, it is already worth considering ssd with a volume of 180GB or more.
Precisely because the volume of ssd in combination with its price limits most users in choosing to use ssd - we suggest that you consider the option of high speed ssd and good capacity hdd installed in place of the DVD drive.
To upgrade Apple MacBook Pro 2011-2012 years of release, we need 3 screwdrivers: torx 6, torx 8 and Philips 00 or 000 Phillips screwdriver.
Remember! Discharge any residual static electricity from yourself before disassembling any device.
Unscrew 10 screws on the bottom cover, 3 of which are long.

It looks like MacBook Pro 13 "from the inside

Before you change anything in the laptop configuration, you MUST disconnect the battery from the motherboard. We do not want to start a repair with you to replace the motherboard after a short circuit, do we?


In place of the regular "slow" hard drive, we install an ssd drive, and we can put the old drive in optibay in place of the DVD drive. In our case, we installed a new 750GB 7200 rpm disk in optibey in order to increase the speed when accessing user data, which we plan to store on the hdd.
Unscrew the two screws on the bracket that holds the hard drive.


4 screws (torx 8) along the perimeter of the "old" hard drive are transferred to the ssd drive.

Install ssd in place of the system disk and fix it with a strap on two screws.

We install the hard drive in the optibe and be sure to screw it on the back with two screws.


Removing the optical drive.
We need to disconnect 5 cables.
We do this very carefully.
Disable
- hard drive flex cable
- optical drive ribbon
- WiFi loop
- camera cable
- speaker cable


We turn off the speaker and disconnect the antennas from the Wi-Fi module and put the speaker aside.


DVD superdrive. We unscrew the three screws and take it out.

We move the data cable and the mounting angle from the DVD drive to the optibay, observing the direction of installation of the angle.


Install optibay with hard disk in place of the DVD drive.

We put back the plastic speaker bar and connect the antennas to the Wi-Fi module.

We connect the cables and cables to the motherboard in reverse order. And we connect the battery.

We close and fasten the bottom cover.
We install the system from an external boot drive or through the Mac OS X recovery system via the Internet (using the Cmd + R combination when booting the computer).
Now, at the disposal of the owner, a very fast Apple MacBook Pro 2011 release: the system itself and all programs run several times faster than with a stock hdd. The system responds instantly. With a significant number of open applications, there are no freezes and freezes of the "spinning colored candy". Programs that use production data caching work with large files without any lag. And when processing very large amounts of information, the work time was reduced (according to the laptop owner) by 2-3 times.
It should be noted once again that the hard disk is limited by the physical read / write capacity on rotating metal plates. Therefore, its "bandwidth" does not exceed 115 megabytes / sec. (best case scenario). There are no mechanical elements in ssd, so the read / write speed on ssd can reach 550 megabytes / sec. There is an option to theoretically increase this value to 1.2 Gigabytes / sec., But for this you need to use an external hardware RAID array, which is NOT a system disk connected at best via the Thunderbolt 10 Gigabit / sec bus (or 1.25 Gigabytes / sec. .) and exchanging data with another of the same RAID array over the same Thunderbolt bus.
If you own an Apple Mac Pro, you can install four or more ssd drives, make a large RAID array (but note that it will not be hardware, but software, if you do not use a special RAID controller). And even in this case, you can achieve theoretical data transfer rates up to 750 Megabytes / sec (which corresponds to the data exchange rate on the sata bus of 6 Gigabits / sec).
In the next article, we will tell you how to make a Fusion Drive yourself on an Apple laptop with two or more hard drives installed. And how, in our practical opinion, Fusion Drive differs from the operation of a conventional SSD + HDD combination.
The article was prepared based on the results of the repair work of the MacFix Service Center.
The cost of installing an SSD on a MacBook in our service center
| SSD 120Gb | SSD 240Gb | SSD 500Gb | SSD 1Tb | SSD 2Tb |
|---|---|---|---|---|
| RUB 9,000 | 12,000 rubles | 20,000 rubles | 55,000 rubles | 94 600 rub |
Please enable JavaScript in your browser to send this information.
Select a country or region Asia Australia België Belgique Brasil Bulgaria Canada (English) Canada (Français) Česko 中国 大陆 Danmark Deutschland Eesti EMEA España Ελλάδα France Hong Kong (English) 香港 India Indonesia Ireland Italia 日本 Κύπρος 대한민국 Latin America América Latina Luxembourg Latvija Lietu ) 澳門 Magyarország Malaysia Malta México Nederland New Zealand Norge Österreich Philippines Russia Polska Portugal România Saudi Arabia Schweiz Suisse Singapore Slovensko Slovenija Suomi Sverige 台灣 ไทย Türkiye United Arab Emirates United Kingdom United States Vietnam Other countries Country / region When you change this control, the page will automatically refresh
Solid State Drive Service Program for 13-inch MacBook Pro without Touch Bar
Apple has identified that a limited number of 128GB and 256GB solid state drives (SSDs) used in 13-inch MacBook Pros without Touch Bar may experience data loss and drive failure. 13-inch MacBook Pros with these drives were sold between June 2017 and June 2018.
Apple will also email customers who have registered their devices with Apple about this program.
Eligibility
First, check which 13-inch MacBook Pro you have. From the Apple () menu in the upper-left corner of your screen, choose About This Mac. Make sure you have a 2017 13-inch MacBook Pro with two Thunderbolt 3 ports. Then enter the serial number of your computer below to see if the software is covered.
This program does not cover the 13-inch MacBook Pro with Touch Bar or earlier 13-inch MacBook Pro models.
Maintenance procedure
Find a drive to service. Your 13-inch MacBook Pro is inspected prior to service to determine overall operability and eligibility for this program.
It is important to back up all data stored on the drive because it will be deleted during maintenance.
- A technician will launch a utility to update the drive's firmware, which will take less than an hour.
- Your 13-inch MacBook Pro with macOS reinstalled will be returned to you.
- After service, you will need
Immediately, we note that the information will not be useful for owners of the most modern laptops, because, firstly, they come only with pre-installed solid-state drives, and secondly, the installed drives have an unconventional form factor and interface.
But for owners made in a 2.5 ”form factor and a SATA interface, the presented instructions will help to increase the performance of a laptop without significant costs.
You can, of course, ask for a replacement drive at an official Apple service center, but the service can be quite expensive, besides, you will probably be offered some kind of Solit-State Drive Kit - "official, from the manufacturer", the price of which, to put it mildly, will not match performance.
We, in turn, offer you to replace the HDD with an excellent SSD yourself and are ready to provide.
In the photos below, you can see the SanDisk SSD. It was this solid-state drive that ended up in our laboratory at the time of writing. This SSD is based on the SandForse SF-2281 controller, which has proven itself in other solid state drives. are distinguished by high read / write speed and increased fault tolerance.
So what do we need?
This whole procedure will not take you even 30 minutes, but the performance of the laptop will increase quite seriously - the operating system and applications will load almost instantly and in general the laptop will "respond" to your requests much faster. This is because the system will receive instant access to data, and this is exactly what is simply needed to increase the speed of work.
Plus, it doesn't make any sounds even when you're actively working with data, so your MacBook will be even quieter.
In addition, due to the significantly lower power consumption of the SSD, compared to any 2.5 "HDD, the MacBook will be able to work a little longer on a single battery charge - this is another indisputable advantage of using solid-state drives in laptops.
The only thing yours will lose is a couple of grams of weight, because an SSD is also a little lighter than a hard drive.
Let's figure out if you can upgrade your MacBook Air at home by increasing its memory.
It's not hard. But there are some very important points to be aware of. Otherwise, you will lose money.
Which MacBook Air models can replace the SSD?
IN MacBook Air before 2010 you can replace the drive with a 1.8-inch SSD with SATA interface. We will not talk about them today, since computers are outdated, and the SSD drives of this form factor themselves are generally available and do not differ in some features critical for Mac. Just bought and delivered.
IN MacBook Air models from 2010 years, you can also replace the SSD-drive. But there is its rare form, hence the need for this article.
Apple in its repertoire. SSDs in all modern MacBook Airs have a rather specific connector. 28pin... Thank you for not soldering the drive on the motherboard at least.
Posting from site (@ site) Dec 6 2017 at 11:53 PST
Because of this, replacing the SSD becomes much more difficult, and the following options remain:
1. Purchase an original SSD for your MacBook. You will have to look for such components, and the price for them is frankly not happy.
2. Find a similar third-party SSD drive. Again, everything depends on the price, as they say, the game is not worth the candle.
3. Use a special adapter. A small adapter for $ 13 on Amazon or $ 9.5 on AliExpress allows you to install almost any modern M.2 drive instead of the standard one.
A suitable 256 GB SSD will cost 7-10 thousand rubles. For 15-17 thousand rubles. (difference between MacBook Air models) 512GB model can be found.
After the upgrade, there will be another 128 GB stock drive on hand, which can be sold.
Important: just buying a "flat" SSD is not enough
Not every SSD is suitable for use with an adapter.
Firstly, SSD must overexpose Serial ATA interface and AHCI (Advanced Host Controller Interface) mechanism. This is usually indicated in the specifications of the device.Secondly, the drive must have a connection key M or universal B&M but not key B.
Thirdly, the length of the SSD board must not exceed 80mm, otherwise it will not fit. If the drive is too short, or if an adapter board is used, you will most likely not be able to get into the mounting hole and will need to use double-sided tape to secure the drive.
How to replace an SSD on a MacBook Air
Attention! Replacing computer components yourself will void your warranty. All actions you carry out at your own peril and risk.
To replace, you need a pair of screwdrivers: T5 Torx and P5 Pentalobe.
1. Using P5 Pentalobe, unscrew 10 screws on the back cover of the laptop.
2. Gently pry off the cover near the display hinge.
3. It is recommended to disconnect the battery to power off the laptop and prevent accidental start-up. To do this, you need to find the power connector and pull on the plastic tab.
4. Using a T9 Torx screwdriver, detach the SSD securing screw.
5. Install a new drive and repeat the operations in reverse order.
That's not all, you need to configure macOS
After replacing the disk, you can perform a clean install of macOS or roll a backup. In any case, after starting the system, you will need to perform one more operation.
When using a third-party SSD with macOS, you need to enable the TRIM command. Otherwise, over time, drive performance will degrade and write operations will be slower.
From version OS X 10.11 El Capitan you can activate TRIM on all SSDs using the terminal command:
After confirming with the administrator password and restarting the Mac, TRIM will be activated.


