Microsoft Word is a program that is in demand among the vast majority of PC users. Today she is an indispensable assistant for people of various professions, as well as pupils and students. And this is not surprising - Word documents, like the rest of the software of the Office suite of office applications, has a convenient and simple interface, as well as rich functionality that allows you to adapt the document to your needs. One of the possibilities provided by the program is the creation of frames that frame a document, section, paragraph, or just a piece of text. This allows you to make your text more descriptive. The article will discuss how to make a frame in different versions of Word (2007, 2010, 2013 and 2016).

How to make a frame in Microsoft Word 2007 and 2010
Both versions of the program contain the same interface, so the method for creating a frame is relevant both for Word 2007 and for the modification of 2010.
So, to make the frame, we need to follow a few steps:


How to set a border in Microsoft Word 2013 and 2016
In order to make a frame in these versions of Word, you need:
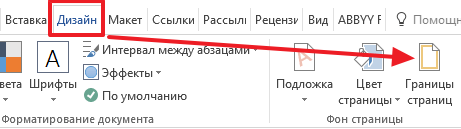
- Click on the "Design" tab located in the program menu bar;
- On the right is the "Page Background" block, in which we need to select "Page Borders";
 Everything here is similar to the versions of Word 2007/2010, except that the "Page Borders" tab is now located in the "Design" section
 A familiar window opens with the same interface and settings as in the 2007 and 2010 versions of Word.
How to instantly frame a specific piece of text

How to remove a frame in Word

How to make a frame in Word according to GOST
When registering term papers, theses and other works, it is often required to have a frame with a stamp, the creation of which, as a rule, causes problems regarding the "congress" of the text and incorrect indents. But everything is not as complicated as it seems at first glance. To set a frame according to GOST in Word, you need:

In order to exclude the repetition of the frame with a stamp throughout the document, go to the "Insert" block, select the "Footer" item, activate the "Change footer" parameter in the drop-down window, then deactivate the "As in the previous section" parameter for the selected text areas.


Now let's move on to creating the frame itself, for this:
- We pass to the main part of the text, the frame for which you need to set;
- Click again on the "Page Layout" tab, in the "Page Settings" block, select the "Fields" item and in the drop-down window open the "Custom Fields" tab;

- Another window appears in which you need to set the following parameter values;

- Return to the "Page Layout" section and select the "Page Borders" tab in the "Page Background" section;
- The "Borders and Fill" window, already familiar to us, opens, in which, of course, we select the frame as the type of frame, and in the "Apply to" tab, click on "This section";


- Open the "Parameters" section, located under the "Apply to" tab;
- A window appears in which we need to set the following indents and settings for the location of the frame.


Done - we got a frame in the Word that corresponds to GOST.
Conclusion
Now you know how to work with different types of frames in Microsoft Word. I hope this article will help you move deeper in learning this not the easiest, but interesting program.
If it becomes necessary to make a frame in Word, most users follow the most obvious path - they create a huge table on the entire page, inside which they place text. But, despite its simplicity, this method of creating a frame is not very convenient. Especially if there are other tables in the text.
Instead, it's better to use a tool called Page Borders. With it, you can make a frame in Word for all pages of a document, only for individual pages, or even for individual paragraphs of text. You can find out how this is done in this article.
How to make a border in Word 2007 and 2010
If you are using Word 2007 and 2010, then to make the frame you need to open the Page Layout tab and click on the Page Borders button. If you have Word 2016, then the button "Page Borders" should be found on the "Design" tab.
This will bring up the "Borders and Fill" window. Here you need to select a frame and click on the "Ok" button... After that, each page of the document will be framed.

If necessary, you can make the frame the way you want. In the "Borders and Fill" window, you can select the type of frame, its color and thickness.

If you need to add a frame only on certain pages, then you can split the Word document into several sections and then apply the frame only to those pages to which you need.

How to make a border around text in Word
If you do not need to make a border around the entire page, then you can make it around the paragraph of text of your choice. For this place the cursor on the paragraph around which you want to make a frame, click on the "Page Borders" button and go to the "Border" tab.

A quick way to make a border around text
There is also a faster way to make a border around the text in Word. The Home tab has a button that users usually don't notice.

This button allows you to quickly create frames around the text. To do this, just place the cursor on the desired paragraph of text, click on this button and select the appropriate frame.

How to make a border in Word 2013 and 2016
If you have Word 2013 and 2016, then the frame is added in exactly the same way as described above. The only exception is the "Page Borders" button will not be on the "Page Layout" tab, but on the "Design" tab.
Otherwise, the process for creating a frame is exactly the same as in Word 2007 and 2010.
When designing creative works, we try to decorate our documents with frames.
In different versions of Word, it is possible to make frames in the form of a picture for one or more pages.
If you do not know how to make beautiful frames in a Word, then today we will analyze this issue so that there are no unknown moments left.
Ready? Then we read.
Insert frames
1. Open the "Page Borders" window.
1.1. In Word 2013, go to the Design tab and click the Page Borders button.

By clicking on the tab - Design, click the button - Page Layout
(picture 1)
1.2. In Word 2010, go to the Page Layout tab and click the Page Borders button.

Here, instead of the tab - Design, click the tab - Page Layout
(picture 2)
1.3. In word 2003, we open a Word document, it can be clean, or it can be with already printed text.
Click "Format" - "Borders and Fill", if this inscription is not there, then click on the double quotes to expand the entire list.

(picture 3)
2. Go to the choice of boundaries
2.1. In the "Borders and Fill" window, switch to the "Page" tab, this is necessary to make a frame around the page, and not around the text.
2.2. Click on the black triangle and select the picture you like from the drop-down list.

(picture 4)
2.3. You can also choose on which pages your frame will be displayed, on all or only on the first.

(picture 5)
2.4. Inkjet printers do not print the entire bottom border of the frame.
By clicking on the "Options" button (number 5), you can make indents from the edge of the page, which will allow you to print the lower border of the frame more than usual.

(picture 6)

(figure 7)
conclusions
If you want to make the frame not entirely, but only on three sides of the sheet, then for this you can click on the corresponding buttons in the "Borders and Fill" window.

(figure 8)
Just like that, you can simply quickly decorate any document.
I would like to draw your attention to the fact that business documents should be drawn up in a stricter framework.
While working with the Microsoft Word word processor, I had to study it so that, if necessary, I consult on the phone without looking at the monitor screen.
I will assume that you, too, will easily master the possibility of inserting frames and that they will already ask you for help.
Thanks for attention.
Good day, dear readers of the site!
The time has come when the ability to work with Microsoft Office, and in particular in word, became as necessary as reading and writing. Let's consider one of the many questions about working with this wonderful program and learn how to make a frame in word, which will make the text more beautiful.
This article will work in Microsoft Office 2013.
How to make a beautiful frame in Word
First of all, open the Word 2013 document with the text in which you need to make the appropriate changes. Go to the tab Design.

After that, in the upper right corner, click on the icon Page borders... A window opens Borders and shading... There are a lot of settings here, at first let's make everything simple - we will learn how to make a frame for the entire text of the page.

Choosing a type Frame, then set Apply to entire document (if we want to apply to the entire document) and click OK.
Now let's start perverting and making a more beautiful version (especially since there are a lot of settings - choose the taste and color).

Now we will improve. Let's add a colored outline to the paragraph. We do everything in the same way: open the document, go to the bookmark Design... We put cursor to the paragraph that we want to style... In the window that opens, go to the tab The border.

Notice the bottom-right corner, which shows that any changes will apply to the paragraph. On this tab you can select.
- no - there will be no frame;
- frame;
- shadow;
- volumetric;
- another.
Please note that all changes are immediately visible on the diagram on the right. We choose Frame... Select the type (click on the corresponding icon)

Choosing a color. To do this, in the section Color, click on the small triangle. In the menu that opens, click with the mouse and select the color we need (for example, red).

In chapter Width choose the size in points. To do this, in the section Width click on the corresponding item. We look at the changes on the right. if everything suits us, then press the button OK.

That's all, where the cursor was, there was a beautiful paragraph outline.
And what is needed in order to do all this not in one paragraph, but in several? To do this, select the text we need.

Back on the tab Design click the icon Page borders. Go to the tab The border and press type Frame. 
Choose a color and width and press the button ABOUT TO.

All these actions can be seen in the video.
Headers and footers in a Word are text and images placed on the pages of a document that are not related to the main text, but are of an informational and design nature. If used correctly, you will be able to draw up a document that will only have to be sent to print.
Frames for text in a Word and headers and footers
Headers and footers in word are placed on each page of the document in the top, bottom and side margins. In these areas, you can place page numbers, text frames, time and date, company logo, document name, file name. In my opinion, headers and footers in word useful for the engineer in that they can use them to draw up a document according to the requirements for design and working documentation, insert a frame and stamps of the corresponding shapes. To get acquainted with headers and footers in a Word, I propose to do a little practical work to create a template for the first sheet with a frame for all types of documents in accordance with GOST 21.1101-2013.
How to make a frame in a Word using headers and footers
I think, having understood on a specific example, further work with headers and footers to insert a word frame will not terrify you. We will not consider various ways of performing certain actions (inflate the article), I think you will familiarize yourself with them. Let's look at the sequence of actions on how to make a frame in headers and footers in Word 2010 (other versions are similar):
1. First of all, download the file with the prepared source materials by clicking.
2. Open the file, and copy the inner frame for the text of the document on the second page, by clicking the right mouse button, at the moment when the cursor will appear with a cross when hovering over the frame.
4. Important. To create a special header and footer for the first page, check the box on the "Headers and Footers" tab in the "Options" section
5. Press the key combination Ctrl + V, or insert a word document frame by clicking the right mouse button.
6. In the top menu Format -> Position -> Advanced Layout Options ...
7. In the window that opens, set the frame parameters for the text as shown in the figure below.

8. Go to the "Design" tab and click "Close Header and Footer Window"

9. Copy the plate for additional sheet columns on the third page. The selection of a table occurs when you click the crosshair that appears when you hover the cursor over the table area.
10. Similar to inserting a frame for the word text on the sheet, follow steps and.
11. Having placed the cursor in the table area by clicking the right button, open the "Table Properties" window.

12. Click in the sequence shown in the figure below and set similar parameters. Close the header and footer window (similarly)

13. Copy the Form 5 title block template on the fourth page. The selection of a table occurs when you click the crosshair that appears when you hover the cursor over the table area.
14. Position the cursor on the first page with a text frame. In the top menu ribbon Insert -> Footer -> Change Footer.
15. Repeat the steps in sequence, and set the parameters as in the figure below.

16. Ehh ... well, it seems like everything, the frame for the text in the Word has been made, close the window for editing headers and footers ().
Different headers and footers in one document
The method of creating headers and footers with frames for text in a Word on the subsequent pages of the document is similar to that described, with the only difference that you need to insert a table in the form 6 in the footer. Now you can create a document for free with two different headers and footers (frames), for the first and subsequent pages. But what if you need to create different headers and footers (more than two) in one document? A separate article is devoted to this. By the way, in it you can download frames for a word document with ready-made headers and footers for free.
How to remove a frame in a Word from headers and footers
In order to delete or change the text frame or the entire header and footer, go to edit mode and delete all existing elements. The quickest and easiest way is to get into the editing mode by double-clicking the mouse by placing the cursor on the header element (frame, stamp), or use the ribbon of the top menu Insert -> Header / Footer -> Remove Header / Footer.
Helpful. In order for the document to be completed and to be sent for printing, there are not enough page numbers, but read how to do it.