With the development of technology and the increasing availability of high-speed Internet, the need for physical storage media is steadily decreasing. Of course, it is not possible to completely abandon CDs and DVDs, flash drives and external hard drives, since they are needed for backup data storage. However, virtual devices can quite reduce their use to a minimum.
What are virtual devices in Windows 10 and what are they for?
Virtual devices are software codes that imitate physical devices, fully or almost fully implementing their functionality. Examples of this type of devices that are most often used in everyday life, are:
- virtual (on-screen) keyboard;
- virtual drive;
- virtual hard drive(VZD).
Virtual keyboards are needed if it is impossible to use physical ones; they are not capable of more. For example, if the real keyboard is broken or a person with disabilities is using the computer, you can display the input device on the screen and use the cursor to enter a key combination or type text.
Using the virtual keyboard, you can fully enter dataVirtual drives are designed to connect CD and DVD images to a computer and then interact with them. Disk images are often used when installing software products: applications, games and system shells.
 Virtual drives are designed to mount disk images and then interact with them
 Virtual hard disks are the most widely used. First of all, because the virtual hard drive partition is very easy to encrypt or protect with a password. This significantly increases the security of documents and other important data. In addition, VZD is a convenient environment for testing software, scripts and other products software development. Virtual disk technology makes it easy to back up data, clone physical media, and much more.
How to create a virtual hard disk in Windows 10
Creating a VZD is a fairly simple procedure that takes little time. It is done as follows:
- IN Windows search enter the line “Computer Management” and select the best match.
 In the Windows search, enter the string “Computer Management” and select the best match
 - On the left side of the window that opens, go to the “Storage Devices” section and select “Disk Management”.
 On the left side of the computer management console window, go to the “Storage devices” section and select “Disk Management”
 - On the toolbar, open the “Action” tab and click on the line “Create a virtual hard disk”.
 On the toolbar, open the “Action” tab and click on the line “Create a virtual hard disk”
 - Select the location on the hard drive where the file containing the virtual hard disk will be located and enter its name. Set the size in MB, GB or TB in the appropriate field and click OK.
 Set the size of the VZD file, enter its name and indicate the location on the physical disk
 - At the bottom of the window, in the section with volumes, will appear new section“Disk 2” (the number may differ depending on the number of hard drives installed on the computer). This section will be marked to the left of the name with a red arrow pointing down. Right-click on it and select the “Initialize disk” action, and then click OK in the confirmation window.
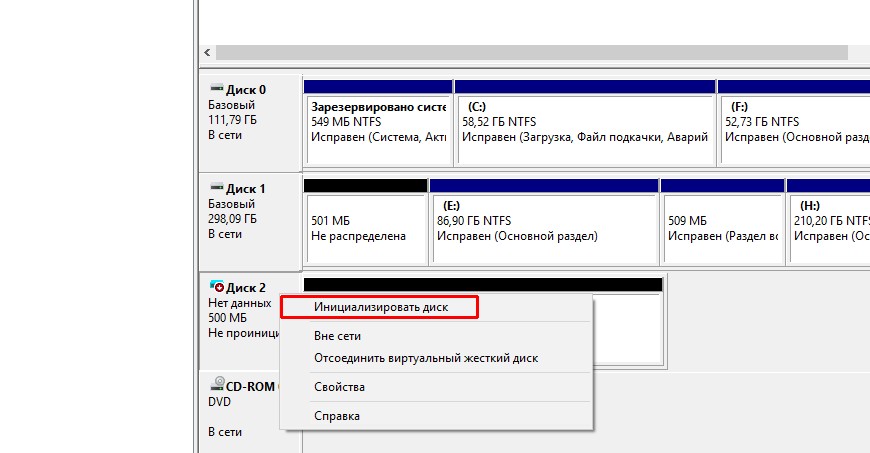 Right-click on the new partition and select “Initialize disk”
The virtual disk is connected and working. All that remains is to create a section. To do this:
- Right-click on the “Unallocated” area and select the “Create simple volume” option.
 Right-click on the “Unallocated” area and select the “Create simple volume” option
 - In the partition creation utility window that opens, click the “Next” button, select the virtual volume size and click “Next” again.
 Set the volume size in megabytes and click “Next”
 - Assign a drive letter from among the available ones and click the “Next” button.
 Select a Latin letter from the available ones and click the “Next” button
 - Leave the formatting settings untouched and click the “Next” button.
 Leave the file type NTFS systems and click the “Next” button
 - Confirm the changes with the “Done” button.
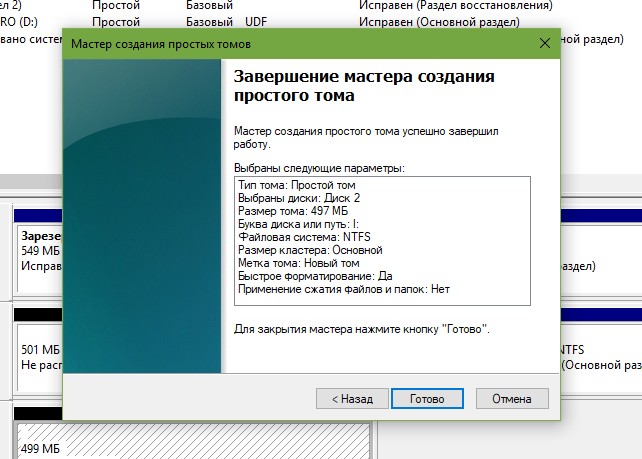 Checking given parameters and click the “Finish” button
 - Upon completion of the operation, a new partition will appear on the hard disk containing a ready-to-use virtual volume.
 In the Disk Management console, the VZD is practically no different from standard hard drive partitions
For myself, I only created virtual hard disks a couple of times. The first time the reason was that important documents were stored on a work computer, to which many people had access. Therefore in working hours I initialized the VZD, and after work I turned it off. All data on the disk was saved, but no one had access to it. The second time I created a VZD to store very personal media files. Unfortunately, the hard drive then burned down along with the virtual disk.
Video: how to create a virtual hard disk
How to create a virtual drive
Standard using Windows 10, you cannot create and permanently save a virtual drive in the system. The service responsible for virtual DVD devices starts working only after the image is mounted. That is, the virtual drive immediately disappears as soon as the ISO file is extracted from it. These are standard Windows features differ from special emulator programs. This implementation option was chosen for reasons of economy. RAM.
To connect a virtual drive, perform the following steps:

How to remove a virtual device in Windows 10
If the virtual drive is not used, then I recommend removing it. Supporting a virtual DVD takes up computer resources, albeit small ones, but they may be needed if you play a more or less decent game. I always immediately check out the image as soon as I'm done with it.
How to remove a virtual drive
As mentioned above, a standard virtual drive in Windows is removed by extracting a file - a disk image. If you used third-party emulator programs, then in each of them the drive is removed in its own way.
Removing a standard virtual drive
To remove a standard virtual drive, open the Disk Management console, and then do the following:

Disabling a virtual drive in emulator programs
In most emulators, virtual drives are created automatically the first time the program is launched, sometimes even without the user's knowledge. But they are easy to remove. This is done like this (each program has its own way):
- IN UltraIso program on top panel Open the “Options” tab and select the “Settings” mode. Then go to the “Virtual drive” tab, set the “Number of devices” filter to “No” and save the changes with the OK button.
 Find the virtual drive parameters and set the “Number of devices” filter to “No”
 - In the Alcohol 120% program, open the “Service” tab, select “Settings”, then go to the “Virtual disk” item, set the number of drives to 0 and save the changes with the OK button.
 Find the parameters of the virtual drive and set the “Number of virtual disks” filter to 0
 - In the Daemon Tools application, right-click on the bottom panel with drives, select “Delete all” and confirm the action.
How to remove a virtual hard disk
If a virtual hard disk is no longer needed, it is very easy to remove. You can do this in two ways:
- through the disk management console;
- using the command line.
Uninstall via Disk Management console
We perform the following steps:
- Open the Disk Management console. Right-click on the virtual hard disk and select the “Delete Volume” action. Then we agree that all data from this section will be deleted and wait for the result.
 Right-click on the virtual hard disk and select “Delete Volume”
 - Next, right-click on the virtual hard disk again, select “Detach virtual hard disk” and agree to the terms by clicking OK.
 Right-click on the virtual hard disk, select “Detach virtual hard disk” and agree to the terms by clicking OK
 - After this, we delete the virtual partition file itself.
 After disconnecting the virtual hard disk, delete the partition file
Uninstall using the command line
The command line also allows you to delete a virtual volume, and you can do this literally with one command.
To do this:

Create virtual device It's very easy on a computer. At the same time, you get a disk or drive that is almost identical in its properties to a physical one, and can be used for a variety of purposes. And when it is no longer needed, it is just as easy to remove.
Virtual disk devices have become indispensable in conditions of stress testing new functions of the latest operating systems, special encryption (for example, using the BitLocker algorithm) and studying new features and peculiarities of operating systems. It is important to understand that everything described above must function in an isolated environment in order to avoid damage to the operating system settings, the appearance of malfunctions in the registry settings, and violation of the integrity of the OS. All this becomes possible thanks to virtual drives created in the operating room Windows environment 10.
What is a virtual HDD? It's isolated disk device, which in its external structure is no different from a standard drive on which additional operating systems can be installed, software, DBMS and other files. This is a standard VHD file that, due to the mounting procedure (that is, installing or attaching to file structure disk drives - this operation is carried out without the help of any additional software) in Explorer looks like a standard auxiliary disk partition.
Essentially, the algorithm for mounting a virtual device can be similar to the method for connecting an ISO image to the system. But the main difference here is the ability to record and use other methods of exploitation. Remembering that virtual hard HDD- it's just ordinary external file, stored on a disk drive, you can easily move it to another PC and use it there.
Methodology for creating a virtual hard disk
The principle of creating a virtual disk drive has not changed at all since Windows 7 and 8. The only difference is that in the “eight” you have the ability to install a VHD file on the system by simply double-clicking on it: after clicking it will instantly be connected as an HDD and it will be associated with a specific letter. To launch the disk drive manager in the system, as always, we will use the Win+R key combination and the diskmgmt.msc command.
Alternative option– right-click on the Start button (or Win + X sequence) and select context menu Disk Management options.
How to find out your Windows 10 product key

The disk drive management snap-in starts. This is where all the steps involved in creating and managing virtual devices, as well as mounting and installing them, are performed.
To create a virtual partition, select the logical device on the basis of which the virtual disk drive will be created. Next we turn to top menu, selecting the “Action” -> “Create virtual HDD” option (note that here, very close, there is also the “Connect virtual disk drive” option; it will come in handy if you want to move a VHD from one PC to another or another).

As a result of such simple manipulations, the main form of the wizard for creating virtual disk drives will appear on the screen. Here you need to specify the location of the VHD file, its size (as for this parameter, its value must be at least 3 MB) and one of the formats provided to choose from: fixed size or dynamically expandable. To make it clearer, here are a few words about the differences between the formats: with a fixed size, the storage capacity is always static, that is, unchanged; even if the partition itself is empty, it will strictly occupy a clearly specified volume on the hard drive. A dynamic device, in turn, is more flexible and will occupy the volume on the drive that corresponds to the size of the files written to it.

When everything presets will be specified, and you click OK to confirm your choice, a new device will appear in the disk space structure. If necessary, the Microsoft Virtual Disk Drive HBA driver will also be installed.

As next step It is necessary to initialize the HDD we created by right-clicking on the new virtual disk and selecting “Initialize disk”.

During initialization of the disk device, we actually have to specify the partition style used to mark the disk space: MBR or GPT. In Windows operating systems, it would be more appropriate to specify the MBR style, since it is the one that is used in all environments above the designated generation.
What affects the speed of a computer?

The last step towards creating a virtual disk in Windows 10 is to generate a simple disk volume that will be attached to the virtual device. To create a volume, use a special step-by-step wizard, which will complete the entire procedure for creating a virtual disk. First, we will be asked to specify the volume size, which is based on the value we specified earlier at the stage of allocating disk space to the virtual device. It is logical to specify the same size as the first time, since otherwise not all of the disk space you allocated will serve its immediate purpose.

One of the most important actions in the wizard is the association of the virtual drive with a logical device, that is, in fact, a letter that will act as the name of the disk.

The next iteration is formatting the disk partition. If you don't want to format it right now, you can do it later, in Explorer. However, it makes sense to prepare the entire disk for use, so choose file system and volume label.

This brings the whole procedure to an end. The wizard's work is also completed, and now we can work with the virtual disk as with a regular one disk drive: write files to it, store information, install operating systems, create a RAID array and anything else that comes into your head.
How to delete a virtual disk in Windows 10?
If you are done testing the new utility, you may want to remove the device from the environment. How to do this? First of all, let's delete the volume corresponding to the new virtual device. Before performing this operation, make sure that all necessary information copied to a safe location, and you won't lose any valuable data when you delete the volume.
Right-click on the virtual volume and select the “Delete Volume” option.
Search for similar images on the Internet

Now we see that the disk partition is missing, and we can detach the disk device. Right-click on the designation of the disk itself and select “Disconnect virtual HDD” from the menu.

We confirm the operation on the next dialog mini-form and disconnect the virtual drive from the hard drive structure.
The virtual device is now detached, but it is still stored at the address you specified when creating the disk. We go to the folder we need in the file explorer, find our virtual disk there, and delete the corresponding VHD file completely manually - everything is as usual.

How to install Windows 10 on a virtual disk?
After the virtual hard drive has been created, you have the right to do whatever you want with it: install any programs, test services, set auditing and local policies, and, of course, install a new operating system (even Windows 10). How to do this, you ask? Yes, just like installing an OS on a regular hard drive. When installing the distribution from a disk or flash drive before the copying procedure system files you will be asked to select the logical partition to which this copy will be carried out. Among all the other devices on the hard drive, our newly created disk will be available, and you can install the OS directly on it without changing anything else in the parameters and settings of the virtual HDD. If desired, its volume can also be expanded by resorting to the services of the same “Disk Management” snap-in.
If you prefer to use third-party software for such operations, we recommend using emulators such as VMWare Workstation, Oracle VM VirtualBox or Virtual PC from Microsoft. All these software products have an expanded arsenal for working with virtual disks, and working with them here is as easy as in the standard Windows shell.
composs.ru
How to delete a virtual disk
As a rule, virtual disks are deleted by the same programs with which they were created. If you don’t remember which one you worked with, or you can’t remove the disk for other reasons, we’ll look at it in detail below. possible options solving the problem.
How to delete a virtual disk using Alcohol 120%
Even if your computer does not have any of the described programs, you can safely act by analogy - virtual disk emulators have a similar interface and operate almost identically. Launch Alcohol 120%:
- in the main program window we find the “Settings” menu item;
- select “Virtual disk” from the list;
- a new window will open with the line “Number of virtual disks”;
- change the value from current to zero;
- save the changes, exit the menu, check the result.

How to delete a virtual disk Virtual program CloneDrive
An equally popular analogue of “Alcohol” should be found in the “Taskbar”. Next:
- go to program options - right-click on the icon;
- from the context menu select “Settings”;
- in the window that appears, find the “Number of disks” block;
- on the selection panel, change the value to the “Absent” state;
- Save the result with the “OK” button.

How to delete a virtual disk - working with disks in DAEMON Tools and UltraISO
This is probably the easiest place to manipulate disks. Just launch the program, right-click on the bottom panel, and select “Delete all” from the drop-down menu. We confirm the requirement with the “Yes” button, getting rid of unnecessary virtual units. For UltraISO the sequence of actions is as follows:
- go to “Options”, item “Settings”;
- in the new window, select the “Virtual drive” tab;
- in the “Number of devices” line, select “No”;
- We confirm the changes.

How to delete a virtual disk with a command
In Windows, almost anything can be done with a command, including managing virtual disks. It is reasonable to use it if disks appear in the system after a reboot. This means that a certain component is included in startup and installs the disk automatically. This problem, for example, may be familiar to developers with the Denver package. To uninstall (for Windows 10):
- open the “Run” application using the Win + R keys;
- write the command shell:startup, the startup directory will open;
- look here for files similar to Virtual Hard Disk.cmd and delete them;
- reboot the PC and check the result.

The methods mentioned above work the same way in all iterations of Windows and will help you remove virtual disks without wasting any time.
SovetClub.ru
Creating a virtual disk on Windows 10
Many computer users have at least once encountered the concept of virtual machines. Sometimes there is a need to install not one operating system on a PC, but several. Installation of the second operating system to a hard drive is not always a rational solution, because this can affect the performance of one of the operating systems.
You can use the LiveCD tool, but this method is only suitable for superficial work with the emulated environment. If you need access to full functionality, you should resort to help virtual machine.
Main programs
Exists huge amount programs that are a virtual machine on Windows 10, they can be easily found, downloaded and installed. The most common and practical to use are products such as Oracle VirtualBox (or Innotek VitrualBox), MS Virtual PC, VMware Workstation.  The virtual machine for Windows 10 is installed almost identically in all cases; the process may differ only in some specific nuances.
The process of creating a virtual machine includes several main steps that are almost identical to each other. If you use third-party programs, the user will first have to install a virtual machine on Win 10. In the tenth Windows installed a built-in module called Hyper-V, with which you can create a virtual disk on Windows 10. This is much easier to do than with other specific applications.
The main steps that will need to be completed include: installing the program or activating the module, naming the machine and creating a location, determining the parameters of RAM, virtual disk and other components, installing the guest operating system. What you need to do the necessary actions in the Hyper-V module.  First, you will need to enter the Programs and Features section from the “Control Panel”, select Windows menu, check the box next to the module name. You will have to wait a few minutes until the service is activated.
After this, the system will reboot. The “Hyper-V Manager” component will appear in the administration section - this is the virtual machine that remains to be configured for operation.
When you log into the manager, you need to create a virtual switch. This is exactly what virtual Windows machines 10 created using third party programs, are different from the Hyper-V module. The switch allows you to set up an Internet connection. First, you need to launch “Manager”, click on the name of the computer, select the same module for virtual switches. There are 3 types: external, internal and private.
Main stages of creating a virtual machine
First, we indicate the name of the virtual machine, its location on the hard drive or in a logical partition. Next, select a generation. The second one is recommended because it has additional features, for example, works with UEFI, but at the same time does not support installation of 32-bit systems. The first generation can handle both 32- and 64-bit systems, but does not support UEFI.
 RAM reservation can be left unchanged (enabled automatic detection optimal parameter), however, if you have physical RAM at 4 GB or higher, the bar can be raised. Using dynamic expandable memory is not recommended.
 Select the created switch from the drop-down list and indicate the reserved space on the hard drive. Then specify the location of the pre-mounted image with the system to be installed, click “Finish”
  To activate, use the selection of the created virtual machine in " Hyper-V Manager" and use the appropriate command. Then press the green button on the panel, and then click any key.
After this, the guest OS will be activated and installed as usual.
How to create a virtual disk using VirtualBox
The Virtualbox application is not particularly demanding on PC hardware resources. You will need to make sure that the computer's processor is x86 and there is 200 MB of free space on the hard drive. You will need hardware rendering support, without which it will not install.
When planning a virtual machine installation, you need to consider the size of the virtual hard drives, which usually amount to at least several tens of GB. Don’t forget that Windows 10 itself requires 16 to 20 GB of disk space, and the guest system requires about the same amount. First, you will need to download the installation package from the official website. By double-clicking LMB on executable file The program installation window will appear.
What is a virtual HDD? This is an isolated disk device, which in its external structure is no different from a standard drive, on which you can install additional operating systems, software, DBMS and other files. This is a standard VHD file, which, thanks to the mounting procedure (that is, installation or attachment to the file structure of disk drives - this operation is carried out without the help of any additional software) in the Explorer looks like a standard auxiliary disk partition.
Essentially, the algorithm for mounting a virtual device can be similar to the method for connecting an ISO image to the system. But the main difference here is the ability to record and use other methods of exploitation. Keeping in mind that a virtual hard disk is just a regular external file stored on a disk drive, you can easily move it to another PC and use it there.
Methodology for creating a virtual hard disk
The principle of creating a virtual disk drive has not changed at all since Windows 7 and 8. The only difference is that in the “eight” you have the ability to install a VHD file on the system by simply double-clicking on it: after clicking it will instantly be connected as an HDD and it will be associated with a specific letter. To launch the disk drive manager in the system, as always, we will use the key combination Win+R and the team diskmgmt.msc.
An alternative option is to right-click on the Start button (or the Win + X sequence) and select the “Disk Management” option in the context menu.

The disk drive management snap-in starts. This is where all the steps involved in creating and managing virtual devices, as well as mounting and installing them, are performed.
To create a virtual partition, select the logical device on the basis of which the virtual disk drive will be created. Next, go to the top menu by selecting the option “Action” -> “Create virtual HDD”(note that right here, very close, is the “Connect virtual disk drive” option; it will come in handy if you want to move a VHD from one PC to another).

As a result of such simple manipulations, the main form of the wizard for creating virtual disk drives will appear on the screen. Here you need to specify the location of the VHD file, its size (as for this parameter, its value must be at least 3 MB) and one of the formats provided to choose from: fixed size or dynamically expandable. To make it clearer, here are a few words about the differences between the formats: with a fixed size, the storage capacity is always static, that is, unchanged; even if the partition itself is empty, it will strictly occupy a clearly specified volume on the hard drive. A dynamic device, in turn, is more flexible and will occupy the volume on the drive that corresponds to the size of the files written to it.

When all the preliminary settings have been specified and you click OK to confirm your selection, a new device will appear in the disk space structure. If necessary, the Microsoft Virtual Disk Drive HBA driver will also be installed.

As a next step, we need to initialize the HDD we created by right-clicking on the new virtual disk and selecting “Initialize disk”.

During initialization of the disk device, we actually have to specify the partition style used to mark the disk space: MBR or GPT. In Windows operating systems, it would be more appropriate to specify the MBR style, since it is the one that is used in all environments above the designated generation.

The last step towards creating a virtual disk in Windows 10 is to generate a simple disk volume that will be attached to the virtual device. To create a volume, use a special step-by-step wizard, which will complete the entire procedure for creating a virtual disk. First, we will be asked to specify the volume size, which is based on the value we specified earlier at the stage of allocating disk space to the virtual device. It is logical to specify the same size as the first time, since otherwise not all of the disk space you allocated will serve its immediate purpose.

One of the most important actions in the wizard is the association of a virtual drive with a logical device, that is, in fact, a letter that will act as the name of the disk.

The next iteration is formatting the disk partition. If you don't want to format it right now, you can do it later, in Explorer. However, it makes sense to prepare the entire disk for use, so select a file system and volume label.

This brings the whole procedure to an end. The wizard’s work is also completed, and now we can work with the virtual disk as with a regular disk drive: write files to it, store information, install operating systems, create a RAID array and anything else that comes into your head.
How to delete a virtual disk in Windows 10?
If you are done testing the new utility, you may want to remove the device from the environment. How to do this? First of all, let's delete the volume corresponding to the new virtual device. Before performing this operation, make sure that all the necessary information is copied to a safe place, so that if you delete the volume you will not lose any valuable data.
Right-click on the virtual volume and select the “Delete Volume” option.

Now we see that the disk partition is missing, and we can detach the disk device. Right-click on the designation of the disk itself and select “Disconnect virtual HDD” from the menu.

We confirm the operation on the next dialog mini-form and disconnect the virtual drive from the hard drive structure.

The virtual device is now detached, but it is still stored at the address you specified when creating the disk. We go to the folder we need in the file explorer, find our virtual disk there, and delete the corresponding VHD file completely manually - everything is as usual.

How to install Windows 10 on a virtual disk?
After the virtual hard drive has been created, you have the right to do whatever you want with it: install any programs, test services, set auditing and local policies, and, of course, install a new operating system (even Windows 10).
How to do this, you ask?
Yes, just like installing an OS on a regular hard drive. When installing the distribution from a disk or flash drive, before the procedure for copying system files, you will be asked to select the logical partition to which this copying will be carried out. Among all the other devices on the hard drive, our newly created disk will be available, and you can install the OS directly on it without changing anything else in the parameters and settings of the virtual HDD. If desired, its volume can also be expanded by resorting to the services of the same equipment "Disk Management".
If you prefer to use third-party software for such operations, we recommend using emulators such as VMWare Workstation, Oracle VM VirtualBox or Virtual PC from Microsoft.
All of these software products have an expanded arsenal for working with virtual disks, and working with them here is as easy as in the standard Windows shell.
Many PC users use it for work various programs, games are installed special utilities to create virtual disks. However, then they want to remove them as unnecessary, but not everyone succeeds. In this article we will try to solve this problem.
How to delete a virtual disk in Windows
Currently, there are many programs for creating virtual DVD drives. Of course, we won’t be able to review all the utilities, but we’ll try to figure out the most popular ones. However, do not be upset, all programs for creating virtual images are similar. The most common program is Alcohol 120%. You need to download the utility and run it installation file. After the installation is complete, run the program and go to settings, here select the virtual disk. Next, set the value in the number of all virtual media to zero.
Next, press the OK key. Now, when you open File Explorer, you will not find any additional drives other than optical drives.
How to delete a virtual disk in Windows in Virtual CloneDrive
This utility runs in the background. The program icon can be found by expanding the taskbar menu. You need to click on it and launch the settings. 
Here in the number of disks section you need to set the value to “None”, as shown below: 
After these manipulations everything installed disks will be disabled by the program.
How to delete a virtual disk in Windows in DAEMON Tools
You need to run the program and then in the window that appears at the bottom of the screen, click on the empty field by launching system menu, from the list you need to click on “Delete all”. 
All you have to do is confirm your actions, all disks will be deleted and will no longer appear in Explorer.
How to remove a virtual disk in UltraISO
Launch the program and go to settings. Next, in the window that appears, select the virtual drive partition, as shown in the picture. 
In the number of devices section, set the value to “No” and click OK. Now all disks launched by the utility will be disabled. It is worth noting that if you uninstall any application for creating virtual images, then all the disks and components they created will be removed along with the programs. Regardless of operating version Windows systems, the principle of deleting unnecessary images is similar.
Before you start deleting a virtual disk, you must first transfer all the information you need from it to another disk. Then open Disk Control Panel. To do this, press two keys on the keyboard at once WIN+X and in the context menu that opens, select Disk Management.
How to delete a virtual disk in Windows 10
In Disk Control Panel, hover over the virtual disk and click right button mice. A menu will open in which select the item Delete volume.
 How to remove a virtual disk in Windows 10
 When the partition is deleted and unallocated space appears in its place, you will need to move the cursor to the left side over the name of the disk and press the right mouse button. A menu will open in which select the item Detach the virtual hard disk.
 Remember the address where you can find the VHD file in Explorer
 As a result, a window will open in which you need to remember the location address of the VHD file, and then click OK and the virtual disk will immediately disappear.
 How to remove a virtual drive in Windows 10
 Now you will need to find the VHD file in Explorer and delete it from your computer. After this, deleting the virtual disk can be considered complete.