Many laptops are available for sale with a pre-installed version of Windows 8, which, as practice has shown, does not suit a large number of users. In addition, the OS Windows any version sooner or later "clogs up" and also requires reinstallation. Also, reinstallation is often caused by various problems with computers, for example, if it does not turn on or if it is locked. Despite the rather large number of steps when reinstalling Windows, even the most inexperienced user can install the OS using this instruction.
Preparing for reinstallation
The first thing to do is to select a disk partition for installing Windows. As a rule, a hard disk partition with a volume of at least 50 GB is allocated.
If your computer already has an operating system, you should save all the necessary documents in order to reinstall the OS without losing data.
To install the OS, you need an 8 GB DVD disc or flash drive, on which the boot installation will be created.
OS version selection
The most common and stable version of the OS from Microsoft is Windows 7, in some cases it is reinstalled on Windows XP. The most decisive factor Windows selection is the availability of the necessary drivers. To check for which OS version your laptop has drivers, you need to go to the developer's official website and look in the support section.
Most modern laptops have drivers only for Windows 88.1, some of them are also suitable for Widnows 7, unfortunately, the correct operation of all devices cannot be guaranteed. For correct operation, it is recommended to install exactly the system for which the manufacturer provided the drivers.
If your laptop has more than 4 GB of RAM, you should select the system bit - 32 (x86) or 64 (x64). To use more than 4 GB of RAM, it is recommended to choose Windowsx64.
After choosing a Windows version, you need to download it. It is advisable to download the image as close as possible to the licensed version without adding additional software. This version of Windows will be more stable and will not cause additional problems during installation. operating system... The most common option is the Windows 7 Ultimate license.
Video: How to Install Windows 7
Creating a bootable disk or flash drive
It is necessary to download the image in ISO format, most of the options are provided in this extension due to the convenience of working when creating a bootable USB flash drive or disk.
To create you need Windows program 7 USB / DVD Download Tool, which can also be downloaded from the Microsoft website.
Install the program and proceed to the main steps:
- run the program;
- Click Browse and browse to the location of the Windows installation image in ISO format. Presses "Next";
- in the next menu, you must select the type of media on which you will record Windows installation- USB or DVD disc. If the drive does not work or is missing, then there is only one option - USB stick;
- then you should select the disk on which the recording will be carried out. After selection, you must click "Begin Copying";
- for a flash device, the program will ask for confirmation of formatting, for which you need to click “Erase;
- The program will display a corresponding message about successful recording.
How to reinstall Windows 7 on a laptop completely
After creating a disk or flash drive, you can reboot your computer. Do not forget that all data on the disk on which you will install Windows will be deleted. You should also take care of the Internet connection settings, you can contact the provider or record the data yourself.
To start the installation, you need to restart your computer and install the boot from your device with the Windows installation files.
BIOS setup for installation
When reinstalling an operating system from a USB flash drive, you must set the boot priority from a specific device, in this case, a USB flash drive or DVD drive. This operation is performed for installation on a computer both without an operating system, and with it. Fortunately, most modern laptops have a feature. quick choice devices to download. To call this menu when the laptop is booted, a specific key is used.
Using this table, you can select a button for your device:
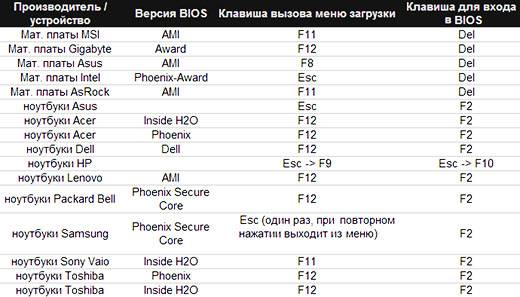
By clicking the button, the computer will provide a window for selecting the device from which it will boot in the first place. In our case, choose a DVD drive or a USB drive.

There is a more complex option for installing via BIOS on an empty laptop or with an installed OS. To do this, when starting the devices, go to the BIOS (the button is indicated in the provided table). BIOS from different manufacturers has some differences, so the location of the settings may differ from those shown.
In BIOS, go to the "Boot" or "Advanced BIOS Features" section and set the First Boot Device your device is a USB drive or DVD drive. To save the settings, press F10 and select "Save and Exit". Thus, the installation is performed from Dos via a USB flash drive or via BIOS from a disk.

Reinstallation process
After completing all the settings in the BIOS, you can proceed to installing the OS. If all actions are performed correctly after boot, the system will display the inscription "Press any key to boot from ...". To continue, press any key and wait for the download.
In this case, we will consider the installation of Windows 7, other versions have minor differences, but the principle of action remains the same:

- in the first menu of Windows installation, you must select a language, and then click "Next";
- in the next section, click the "Install" button;
- if the downloaded image includes several OS configurations, for example, "home basic" or "maximum", then the installer will offer to choose one of the options;
- in the next menu, you must confirm the agreement with all the points.
Selecting the installation type
- the program has the ability Windows updates, at which all files will be saved separate folder... Despite this convenience, it is recommended that you select Full Install mode. This option provides the installation of the most stable and "clean" operating system;

Formatting a partition
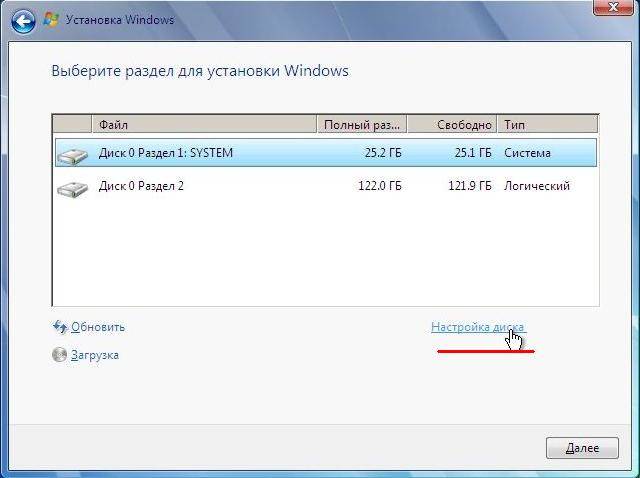
- after choosing an installation, the program will offer to select a disk partition to which Windows will be installed. In this menu, you can format or distribute space between your hard disk partitions by opening a set of additional options "Disk settings".
Unfortunately, during these operations, all information from the disk will be deleted. This function allows you to create disks of the required size, for example, if your laptop was purchased without an axis, its hard disk is not "broken". Do not forget to format all empty disks after performing hard disk partition operations. After completing all the actions, select the disk and click "Next".
- after copying, the system will prompt you to enter the username, computer name, and password;
- select "Recommended settings" as the security system settings to ensure computer protection;
- after selecting, set the time, date and select "Home network" in the Internet connection menu.
Attention! When you restart your computer, you should remove the disk or flash drive to avoid reinstalling Windows.
At this point, the Windows installation is complete. Now you can install drivers as well as various software and utilities. If you changed the settings for starting your computer in the BIOS, we recommend that you set the startup first from the hard drive.
The nuances of reinstalling if there is another OS
How to install Windows 7 on a laptop after Windows 8? Reinstalling an OS from Windows 8 does not make any difference if there is another OS from Microsoft on the hard drive. The only recommendation is to install the new operating system on the same partition as the current operating system.
Video: Why Windows won't install
How to reinstall Windows 7 with problems? If your Windows does not start, you will need to use another computer to create a disc or flash device. Since the installation is done without Windows startup, then problems with the previous OS will not interfere with the installation.
This article describes in detail the process of how to reinstall Windows 7 on a laptop without a disk formatting your hard disk partition. Thanks to detailed description, even users with little experience will figure out the principles of installing Windows 7 instead of 8. Reinstalling a new operating system allows you not only to get the desired OS version, but also to get rid of a large amount of software being reinstalled by the laptop manufacturer.
>Installing Windows 7 from a USB flash driveI can't, help, I reviewed everything I can on the Internet, I don't have a DVD drive, I live in the area, I have no one to ask for advice and I need to prepare for the exams, nobody answered me.So, no more, no less, let's try to help, and the most impatient can read the advice at the end of the article that helped our girl install the operating system.
Installing Windows 7 from a USB flash drive
Let's start at the beginning of why you and I can fail.
- Firstly, it is difficult to understand the girl, she does not have a DVD drive, it may not be in a netbook, almost all netbooks support booting from a USB device and she simply cannot change the priority of booting from a hard drive to a USB flash drive, then we read our articles and another one. Or she has a simple computer without a floppy drive and the motherboard installed in it does not support booting from a USB device, but let's hope that everything is not so tragic.
- Once I happened to observe how a user without proper experience installed Windows 7 from a USB stick to your netbook. He failed after failure, as it later turned out due to an improperly prepared Windows 7 distribution on his flash drive, read how, which describes in detail how to prepare a distribution with Windows 7 on a flash drive in nine simple and free ways.
- Use only original assemblies of Windows 7 from Microsoft, and you will get rid of many problems, the same thing may be in the flash drive itself, if it is many, many years old, try replacing it. The process itself installing Windows 7 from a USB flash drive, does not differ from the usual one, let's take a look at our article.
- Try to also change the USB port into which you insert the USB flash drive, preferably using the one located directly on motherboard, read
- The flash drive must have a capacity of at least 4 GB, all your files from it must first be copied to a safe place, because it will be formatted.
You should also prepare your netbook for installing Windows 7 from a flash drive, from the partition on which you will install the operating system, you also need to copy all the data to a secluded place, it will be formatted like the flash drive. - Friends, if you have a new computer, laptop, netbook with USB 2.0 ports, as well as USB 3.0, and you decide to install Windows 7 on it from a bootable flash drive, then you need to know that you need to insert a USB flash drive into a USB 2.0 port, since Windows 7 does not support USB 3.0 (ports are usually blue). If you insert a bootable USB flash drive into a USB 3.0 port, then the installation of Windows 7 will end with this error.
"A required driver for the optical disc drive was not found. If you have a floppy disk, CD, DVD or USB flash drive with this driver, please insert this media" - You may also be interested in our other interesting articles: and.
And finally, the method of creating a bootable USB flash drive with Windows 7 in just four steps from Microsoft, the Windows 7 USB / DVD Download Tool, this method is not in the article on our site "How to Make a Bootable Windows 7 USB Flash Drive".
We download the utility from the direct link Windows 7 USB / DVD Download Tool, by the way, it can also create an installation DVD.
Microsoft is required. NET Framework 2.0 (download)
Run the program, then click Browse and specify the file ISO image Windows 7
In some situations, users may need information on how to install Windows from a USB flash drive through the BIOS. Today the question is relevant due to several reasons, including the need for an urgent reinstallation of the Windows software package. It may so happen that the distribution kit will be written to the most common USB drive, and not to a disk, because the use of such a source of information storage is convenient. It's worth noting that many modern laptops simply don't come with a DVD drive, which has allowed manufacturers to create ultra-thin devices. In this case, reinstalling the version of Windows XP, 7, 8.1, 10 required for operation is possible only from a USB flash drive or an external hard drive that is connected via USB. Whoever installed the software package knows that this process is not complicated, but requires certain knowledge and skills from the user, without which it will not be possible to start the process. The installation of the upcoming version of Windows XP, 7, 8.1, 10 begins with entering the BIOS, in the parameters of which you need to be able to figure it out. It should be noted that through the BIOS from a flash drive, you can not only install the software package, but also carry out a deep check of the system for the presence malware, which in some cases allows you to establish the correct Windows work XP, 7, 8.1, 10 on a user computer or laptop.
When it is not possible to use a DVD drive, a flash drive comes to the rescue
Preparing for installation
If you purchased a laptop with a pre-installed licensed software package Windows 7, 8.1 or 10, then you should remember that it is called the factory distribution. We recommend that you prepare in advance for a situation when you need to reinstall the operating system and useful programs from the manufacturer. In this case, the distribution kit is written to a DVD-R disc, a USB flash drive or an external hard drive. In the last two cases, it will be necessary to configure certain parameters in the BIOS.
Installing an unfamiliar version of Windows XP, 7, 8.1, or 10 is very similar to installing a factory distribution. The main task of the user is to start the process, and then the system automatically installs the software package on a computer or laptop. We recommend that you pay close attention to the choice of installation files, since on the Internet you can find a huge number of pirated versions of software systems that do not work correctly after installation.

There are sequential instructions that describe the process of writing an operating system image to a USB flash drive, which will be used to install Windows on a computer or laptop. A successful result will depend on the quality of the image and the correctness of the algorithm execution.
So, reinstalling the operating system from a USB drive includes the following steps:
- Writing installation files to a USB drive.
- Transfer all the files you need in the future from the C drive to protect them from deletion.
- Installing a USB flash drive.
- Launching BIOS and changing settings in the menu. It is necessary to search for information on how to enter BIOS on a specific computer or laptop.
- Starting the installation of the operating system.
BIOS launch
Before starting the BIOS, all users should understand that the flash drive must already be connected to the working USB port of a laptop or computer. It is worth noting that the BIOS can be launched by a combination of different keys, for example, multiple pressing of Del, Esc, F12, F10. This action is always performed at the time of device boot. The input method depends on the BIOS manufacturer and on the computer model. Users should be prepared that the mouse will not work in this mode. All control in BIOS is performed by pressing keys. However, no one has any difficulties with this. The main task after entering such a menu is to launch an automatic installation from a USB flash drive. After the start of the Windows installation, user intervention is not required.

Key combinations vary by BIOS manufacturer
Changing BIOS Settings and Starting Installation
Immediately after entering the BIOS, you need to find a tab called Boot. Often the section you need is named in one word. Different BIOS versions have different interfaces, but the Boot tab is usually present in all firmwares. After entering the tab, you should select the Hard Disk Drives item, where the order of device recognition will be presented.
Users should understand that for a start automatic download the operating system needs the flash drive to be listed in the first place in the BIOS. Opposite the "1 st Boot Device" parameter, a device must be installed that has the word "usb" in its name. Rearrangement of devices in places is carried out using the keys Enter and Up, Down, Left, Right.
After all the changes have been installed, you need to save them. To do this, use the F10 button. There are many hints in the BIOS to help a newbie navigate. Then all that remains is to restart the computer or laptop, after which the process will start automatically.
Installing Windows 7, 8.1 or 10 from a USB flash drive via BIOS will solve the troubleshooting problem if the device does not have a DVD drive. Besides, USB sticks are reliable. Usually, when installing a software package from a USB flash drive, there are no failures or difficulties.
Not every user has a DVD drive, moreover, recently rare PCs have been equipped with them. But you still need to install the system, and for this it is most convenient to use a bootable USB flash drive. Let's figure out how to install Windows 7 from a USB flash drive - after all, you will not buy a DVD for this purpose.
Before proceeding with the installation, carefully study this article: in the process, various difficulties may arise that can be solved by one of the methods described below.
The installation process itself can be divided into the following stages:
- downloading the installation image;
- computer preparation;
- creating a bootable USB flash drive;
- PC BIOS setup;
- installing Windows 7.
Let's consider each stage in more detail.
Before you write the image to a USB flash drive and install the system from it, you need to download it. Today there are a huge number of ready-made assemblies of the operating system that are equipped with many applications and functions.
Very often in such distributions the default theme is changed or sound scheme... But not all users like such innovations. You only need to download original images created by Microsoft. The huge headquarters of the world's leading programmers does their job better than some artisanal modifier.
A little below you will find a button by which you can download a torrent file for downloading the Russian version of Windows 7 with 32 or 64-bit architecture. The file is taken from the official Microsoft website and is completely original. Start downloading, and when the download is complete, move on to the next step.
After the file has been downloaded, open it with a torrent client. If you do not know how to work with such programs, follow our step-by-step instructions.
- First, download the torrent client itself. This will be the qBittoorent application.
- Install the program and use it to open the previously downloaded torrent file.

- We choose Windows version 7 (in our case it is a professional 64 bit) and click "OK".

- After that, the operating system will start loading at the maximum available speed.

Getting ready to install Windows 7
First of all, you need to copy to a safe place all the important information on the C drive. Each user stores data in his own way, so everyone has their own choice of folders for backing up. Most often these are folders: Downloads, Desktop, etc.
You can save files to another logical drive (the one on which the system will not be installed) or to an external drive. You can also use cloud storage if there is not too much data. For example, the Mail.ru cloud gives you 100 GB of free space for free.
With an eye to the future, remember: while using a PC, you need to store your data on a different disk than the system installed on. Divide the physical disk into partitions and save your files to any of them except the system one. To install Windows 7, a volume of 70 - 100 GB will be comfortable (depending on the type and amount of software used).
Another important point that should be considered before the installation is started is the drivers for our network card... If at the end of the installation of Windows 7 it turns out that there is no driver for the network card, there will be additional difficulties that will have to be solved using a second computer by transferring files from it via a USB flash drive.
If the computer is just purchased, there is no valuable information on it and cannot be, feel free to proceed to the next section, without copying the data.
Create a bootable USB flash drive
In order to create bootable media and start the procedure for installing the operating system, we need:
- USB stick with 8 GB or more. Instead of a USB flash drive, you can use a simple memory card with a card reader;
- installation distribution kit "Seven" with the extension .iso;
- utility with which we will write the image to a USB flash drive;
Attention! Before you start creating the installation media, remember that all data on it will be irrevocably destroyed.
How to make installation media using Ultra ISO
The well-known disk imaging program can create bootable media. Let's consider the algorithm for writing Windows 7 to a USB device.
- Download and install the Ultra ISO program from the link.
- Run the resulting file and check the box next to "I accept the license agreement." We proceed to the next stage by clicking on "Next".

- Using the "Browse" button, select the installation path, then click on "Next".

- We don't change anything here and just move on.

- The program is being installed, we are waiting for its completion.

The Ultra ISO installation is complete, you can run it and go straight to creating a USB flash drive for installing Windows 7.

- The Ultra ISO program can be run in trial mode, so its functionality will not be affected in the least. Click on the button marked in the picture.

- Go to the "File" menu and click on the "Open" item.

- We select the uploaded by us windows image 7 and then "Open".

- Go to the "Startup" section and click on the item that we marked in the screenshot.

- We make sure that the media we need is displayed in the devices at the top of the window and click on the "Format" button.
Attention! This will destroy all your data beyond recovery. If your USB storage device has required files, save them before that.

- In the next window, just click "Start".

- Ultra ISO will once again warn us that all information from the flash drive will be erased. Click "OK".

- After the formatting is over, click on "Write".

- The process of recording "Seven" on a USB flash drive has begun. It will take about 5-10 minutes, depending on the speed of the drive and the selected OS version.

The recording is complete, our media can be used.

Consider a few more options for creating bootable media with Windows 7.
Rufus
This is another program that can create a bootable USB flash drive with the "Seven". First, let's download it.
The application, unlike Ultra ISO, does not require installation, so you can run the downloaded file and go straight to the process of burning the OS to a USB device. To do this, do the following:
- Choosing a device for recording. This will be our flash drive, in this case - 16 GB. Then click on the disk icon.

- We select the distribution kit we downloaded in the PC folder.

- We start the recording process with the "Start" button.

- Rufus will notify us that all files will be removed from the flash drive. If you have already created backup or there was no important information on the carrier, click "OK".

As a result, it will start Windows entry 7 to a USB flash drive, upon completion of which you will have a full installation media at your disposal.

Attention! Before starting the process of recording the system to a USB flash drive, be sure to save all the data on it, otherwise they will be irretrievably lost.
As you can see this way turned out to be much simpler than the previous one, but we will not dwell on this and consider several more options for recording Windows 7 to a USB drive.
Making a bootable USB flash drive using WinSetupFromUSB
Another application focused exclusively on writing operating system files to an external drive. Let's take a utility and look at the process of working with it.
- Select the path along which the program will be unpacked (click on the button with the image of three dots) and click "Extract".

- We are waiting for the end of unzipping all the necessary files.

- We open the directory into which the unpacking was carried out and launch the program depending on what architecture your operating system is based on. We have it 64 bit, respectively, we click on the marked file.

- We insert our flash drive into the USB port and make sure that it is displayed in WinSetupFromUSB. Next, check the box marked in the screenshot with the number "2". When the bird is placed, click on the icon with the image of three dots, marked with the number "3".

- Select the image of our operating system and click on "Open".

- It remains only to press the "GO" key and Windows 7 recording will begin.

Windows 7 is recording to an external drive. Once the process is complete, the USB flash drive can be used to install the system.


We will not stop at WinSetupFromUSB and will tell you how to burn OS to media via Windows 7 USB / DVD Download Tool from Microsoft.
Windows 7 USB / DVD Download Tool
This is the official application from Microsoft, so it is, in theory, should be the best one to cope with the task of writing Windows 7 to a USB flash drive. Let's start working with the program.
- First, download the utility from the link from the official website. Then we launch it and click on the "Next" button.

- We are waiting for the program to install.

- We finish the installation process by clicking on the "Finish" button.

- Let's get down to working with the program. Initially, you need to specify the file that we will write. To do this, press the "Browse" button.

- After the path to the image file is registered, you can proceed to the next step - click "Next".

- Here you should select the type of media on which we will put the "Seven". Since we have a flash drive, we click on "USB device".

- We see that our drive is displayed in the field marked with the number "1", and click on the button "Begin copying".

- After that, we will be warned that all information from the media will be erased and, after confirmation, the process of transferring Windows 7 to a USB media will start.

At the end, we will receive a bootable USB flash drive, with which it is easy to install the OS on a computer.
The program requires the Microsoft .NET Framework 2.0 library. If you do not have it, then download the program from the official Microsoft website.
We use the UNetBootin program
The UNetBootin utility is completely free. you can download it without registering or sending SMS. The program does not need to be installed - it works immediately after downloading. An application was created not only for recording on a Windows USB flash drive, but also for other operating systems, such as Linux or Mac OS.
We pass to the instructions for working with the application.
- First of all, set the checkbox to the "Disk Image" position and click on the button with the ellipsis. In the window that opens, we need a Windows distribution.

- In the drop-down list, marked with the number "1", select the USB device, indicate our USB flash drive and click "OK".

- The application will warn us that all data that is already on the flash drive will be irretrievably lost. If we don't need them, click "Yes to All".

The distribution kit is being written to a USB device. After it is completed, the flash drive can be used to install the OS.

Command line
You can create bootable media with "Seven" without using any programs by the system itself. We will use the command line for this.
The whole process is described in the form of detailed step-by-step instructions, each stage of which is accompanied by a screenshot for clarity.
- Initially, we launch the command line. This should be done exclusively on behalf of the administrator. We will create bootable media using Windows 10 as an example, but in the same way you can get the result on Windows 7 - 8. Press the Win + R key combination and press the Browse button in the window that appears.

- We follow the path indicated in the screenshot with the number "1", and find the cmd application. We click on it with the right key of our manipulator and select "Run as administrator".

- We write to command line diskpart command and press Enter.

- To start recording to a disk, you must initially select it, and take this choice responsibly, because all data from it will be deleted. You can view the list of disks using the operators: "list disk", "list volume" or "list partition". The first two show the list of disks, the third displays the number of its partitions and their names. Insert the USB stick into the USB port and enter the DISKPART command "list disk". Then press Enter. You will see a list of all drives installed on this moment in the PC.

- We select the disk that we need. To do this, enter select disk disk_number. The disk number can be viewed at the last step, we have it "1" since its size is 14 GB, which corresponds to our flash drive.

- Remove the disk with the clean command. Check again what you did right choice- all data on the medium will be completely erased.

- Now we need to create a main partition for the flash drive, from which it will boot in the future. Enter the create partition primary command and press Enter.

- We set the drive letter using the assign letter = drive letter statement. Let's do that. We know that our PC has drives C, D and E - hence we specify F. The final command will look like this: assign letter = F.

- You can also specify the size of the partition. If you skip this step, it will take up all the free space. Set size logical drive using the create partition primary size = disk_size command. The size must be specified in megabytes.

- Select our disk using the select partition 1 command (specify your disk number) and press Enter.

- Now we need to make our section active. To do this, use the active operator.

- It remains to format the flash drive - we register a command of the form: format fs = fat32 quick.

- Exit DISKPART using the exit command. Now you need to prepare the files for recording. We unpack our Windows 7 image using any archiver (we will use the familiar WinRAR) and extract all the files to our USB flash drive.

The installation media is ready and ready to use.
We use the WinToFlash program
Let's describe the process of working with another program for writing Windows 7 and other operating systems to a USB drive. First, download the utility from the link from the official website.
- Install the program and run it. In the window that opens, select the item marked with a red frame.

- At the very top, select "Windows", then specify Windows 7 and press the button marked in the screenshot with the number "3".

- We indicate the path to the Windows 7 image that we downloaded. To do this, press the "Select" button.

- Click on "Add".

- We make sure that the desired flash drive is indicated as the target, and click "Run".

This will begin the process of creating bootable media with Windows 7, after which the device will be ready for use.
We write a bootable USB flash drive via WinToBootic
This application is one of the simplest tools for writing operating systems to external media. To work with the utility, you do not need to install it, nor do you need administrator rights. It will work like with Windows files, and with her images. The interface here is simple, and the speed of the program is pleasing.
To write Windows 7 to a USB flash drive via WinToBootic, do the following:
- First, download the program from the link and launch it. Check the box next to the item "Quick Format" and click "Do It!".

- We answer affirmatively to the request when formatting.

- We are again notified that all data on the flash drive will be deleted. Do not forget to save important information from the carrier, if any, and click on "OK".

- The preparation of the flash drive is completed, click "Thanks!"

- Next, select the files that will be written to our USB flash drive. To do this, click the icon indicated in the screenshot, and select the image we need.

- Press the button to start the process again.

Windows 7 will start recording to the USB flash drive. When it is over, the device can be used to install the system.

How to boot from a USB flash drive
To successfully install Windows 7 from a USB flash drive, it is not enough for us to simply write the operating system to the media, we also need to force the PC to boot not from the hard drive, but from the USB media. This can be done in two ways: either with the help BIOS modifications, or through a special boot menu.
With regards to the Boot Menu, we can say that it is launched by different keys, depending on the model of the computer or laptop. You can see which button is responsible for this on your device in the instructions for it. We provide a list of combinations for the main brands of computers and laptops:
Launching Boot Menu on PC:

Launching the Boot Menu on a laptop:

Below is a list of the keys that launch the BIOS on different computers and laptops:

For clarity, we will show the process of installing a flash drive as the first boot device using the example of our PC with an Asus motherboard:
- We turn off or restart the computer and after starting it, press the button to go to the BIOS (for us it is Del).

- This is how the BIOS itself looks.

- Go to the Boot tab.

- We install our USB drive with the first device.

The process is similar on different computers, although the names of the tabs and items may differ. In order to understand how to enter the BIOS of your PC, read the instructions for it.
Installing Windows 7 from a USB flash drive
After the BIOS has been configured, you can go directly to installing Windows 7 from a USB flash drive. Let's get started.
- Immediately after the system starts, you will see the following window (preloading data for installing Windows 7 is in progress).

- We set regional parameters. Select the system language, region of residence, and keyboard layout. If desired, all these data can be specified after starting Windows. When the configuration is completed, click on "Next".

- In the next step, just click "Install".

- It remains to accept the license agreement, and the installation will begin. Check the box as it is done in the screenshot and click "Next".

- We select the full installation mode - this is the so-called clean option, when all old data on the system partition is deleted.

- We are now in the section settings menu. Click on the entry with a red line.

- If your disk is not partitioned, you can do it here (for Windows 7, it would be most expedient to use about 100 GB of free space, the rest will become disk D). Do not forget to format the system partition before installing Windows on it. When the operation is completed, click on the "Next" button.

- Finally, the Windows installation began. We are waiting for the process to be completed.

- Then the system will reboot and we are greeted by the Windows startup screen

- Initial optimization in progress. The system prepares all the necessary files.

- System services begin to start.

- Then we move on to completing the Windows installation.

- We are again informed about the need to restart the computer. Before that, be sure to remove the USB flash drive at the time of restarting the PC.

- The system will check how efficient our video card is.

- Now we need to provide our data. We write an arbitrary name and computer name. Then we press "Next".

- If necessary, you can set a password that the system will ask for when it starts. We skip this step, since the computer will be at home.

- If you have a Windows 7 key, you can enter it here, however, this can be done even after the system starts. We skip this step.

- We choose the option of protecting the system depending on our personal preferences. We will be installing another antivirus, so you won't need a regular one.

- Enter the time and time zone. Then we press "Next".

- We decide on the type of network. This is a pretty important step, because if we specify a home network, and we are connected to a public network, our security will suffer greatly.

- The parameters are being applied and automatic setting networks.

- The last minute of optimization before our Windows 7 starts up.

As a result, we installed Windows 7 from a USB flash drive, the creation of which was described above.

Instead of an afterword
We looked at a lot of different programs and tools of Windows itself in order to answer the question: how to install Windows 7 from a USB flash drive. However, these are not all options. There are a lot of such programs on the net. They differ in their convenience and functionality. Some utilities are better suited for ordinary users, while others are better for professionals.
Which method to choose for you and how to burn Windows 7 to a USB flash drive, you need to determine from purely personal preferences. Use the option that you like, and if you have any questions, ask us in the comments. We undertake to give a comprehensive answer as soon as possible.
Which we ourselves will write down in the simplest and most reliable way.
Since in the reviews on the Softobase portal we use only the simplest and most proven methods and programs, the article on installing Windows XP will not be an exception.
Despite the large number of ways to create bootable flash drives, in our example we will use the simple and reliable UltraISO utility, which is guaranteed to work with any USB drives and ISO images.
We launch it with administrator rights, for which we right-click on the launch shortcut and select the "Run as administrator" item in the menu that opens.
Download from the Internet any bootable image of Windows XP in ISO format you like, whether it is an original system from Microsoft, or manual assembly of a 32 or 64-bit system with integrated updates, exclusive themes and registry tweaks.
Getting ready to write the image to a USB flash drive
We will need a flash drive with a capacity of at least 4 GB. In our example we will use a 32 GB Transcend USB stick.
In UltraISO, open the image of the system we loaded from the disk:
File - Open - specify the image file on the computer disk.
In the window that opens, among the list of disks, select the Transcend 32 GB flash drive.
Recording method - USB HDD +
Then we press the button "Write".
In the warning window that all available information on the flash drive will be lost, click OK. We didn't forget to copy important files to another location, did we?
Now, with a clear conscience, you can drink coffee while the bootable flash drive is being written, since for a 4 GB image it takes, on average, about ten minutes.
Boot from a bootable USB flash drive
An equally important stage in which we need to boot not from the computer disk, but from the bootable USB flash drive we created earlier.
The order of devices from which the computer or laptop boots - whether hard HDD disk, USB flash drive, USB HDD-external HDD or CD / DVD drive - set in BIOS.
To get into the BIOS, you must immediately press and hold the Delete, Esc or F2 button on the keyboard when you turn on the computer.
Each manufacturer uses one of three buttons to enter the BIOS, so try them one at a time, or just search the Internet for which one is used on your PC.
After entering the BIOS, look for the option that is responsible for the boot order of devices. Typically, this menu bar contains the word Boot.
Main existing BIOS and selection line boot devices, we will show in the screenshots below.
Go to the item for selecting bootable devices, then press the Enter button and use the arrows on the keyboard to make sure that the USB flash drive is the first in the list of devices, and then the computer's hard drive.
Save BIOS settings by selecting the Save and Exit Setup item, after making sure that the USB flash drive is inserted into the PC, and wait for the reboot.
Now after turning on the system, the message "Press any key to boot from CD or DVD" will appear - press any button to launch the boot menu.
How to install Windows from a USB flash drive - go to the installation stage
Finally, we moved on to the final stage of installing Windows XP from a USB flash drive. In the first window, we are greeted by the installation program, to continue the installation, press Enter.
In the license agreement window, press F8 to accept it, otherwise the installation will not continue.
In our version, we install the system on a clean hard drive to understand the process. Therefore, we will create two partitions at once - Drive C (system, on which we will install WindowsXP) and Drive D - for storing personal files.
In this case, you must select the installation on the C drive:
Please note that you can install Windows "over" an existing operating system without formatting the disk. However, we do not recommend doing this, because this method may leave software errors and unnecessary libraries from the previous version of the OS. We advise you to install the system on a "blank" disk. In this case, all data will be deleted, so if you have stored on the system storage important information, it must be copied to another logical disk in advance.
We indicate the size of the partition in megabytes, for example, if it is 20 Gigabytes, then we need to write 20,000 Megabytes, since there are about 1000 Megabytes in 1 Gigabyte.
From the empty space on the disk, we will still have an unallocated area in which we create the next disk D, proceeding in the same way as in the previous paragraph, but indicating the entire remaining amount of free space.
We will have two disks in the system - C and D.
After creating partitions, select the very first Drive C - Partition 1.
Now we need to format the system partition, for which press Enter and select "Format partition in NTFS".
Next, the process of installing Windows itself will begin - depending on the speed of your computer and flash drive, the process will take some time, but it will definitely be more than it takes to make one cup of coffee.
After the first reboot, you can re-enable booting the computer from the hard HDD in the BIOS by repeating the steps in the reverse order when we enabled booting the computer from a USB-drive.
The screenshot below shows the section formatting progress.
Copy files to disk.
Windows XP graphical boot screen.
Windows XP installation process.
In the first window, which will require our participation, we need to specify "Regional and Language Options".