If the vibration switch on the iPhone 6 is broken, the operation of the gadget can lead to a number of curiosities. The inability to mute your phone makes it difficult to stay in meetings and formal events. If the iPhone 6 silent mode button is broken, frozen in vibration mode, the owner cannot avoid a series of missed calls. That is, such a trifle can cause great discomfort.
IPhone 6 Vibration Switch Broken: What To Do?
If the mode switch on the iPhone 6 is broken - it starts to jam, move freely without clicking, or does not affect the activation of vibration mode - it's time to think about replacing the Mute button. The iPhone 6 is built to be robust and reliable, but it is not immune to wear and tear. After all, prolonged or intensive use is the most common cause of failure of buttons and switches.
In addition, replacing the vibration switch on iPhone 6 may be caused by water or mechanical damage. In any case, the loop connected to the button is damaged. Replacing the iPhone 6 vibro switch cable will not cause difficulties for the master, but for a person without special knowledge it can become a big problem. After all, this task requires great professionalism.
To repair the iPhone 6 mode switch, you will have to disassemble virtually the entire phone, replace the element, and reassemble the gadget. Are you sure that you will complete this task carefully enough so as not to inflict further damage on the smartphone? One way or another, if the button for switching modes on the iPhone 6 broke, then the most reasonable way out would be to contact the service center and the help of a professional master.
Our service center conducts diagnostics completely free of charge.After a comprehensive check of the phone, we will inform you what repair of the iPhone 6 and the broken vibration button is needed in this case. More often, the repair of the iPhone 6 mode switch is limited to replacing the loop, less often it is necessary to replace the vibration mode switch as a whole. Regardless of the breakdown, the work takes no more than one hour.
How to mute iPhone every user of this phone should know. There are times when you need to create silence and eliminate all sound stimuli, this is where the silent mode comes in handy, or as it is also called - "Silent mode", which has long taken root in any mobile phone.
In order to turn on the silent mode of the iPhone, you do not need to dig into the phone's settings and look for modes, just use the switch located on the left side of the case. At the time of this writing, all iPhone models have such a mode switch and looks about the same.

This toggle switch has two positions "Normal" and "Silent". When the silent mode is on, a red dot or stripe (depending on the model) will be visible on the switch. As soon as you have activated silent mode, the phone stops making sounds, only vibration remains on.

IPhone mute is accompanied by a crossed-out bell pop-up notification on the phone display. After turning off the sound in the iPhone, it will still work and ring in the morning. If you play music or voice recordings in silent mode, they will also sound.
In addition to the above, in silent mode:
- Disable keyboard cheeks when typing
- The dialing sound is turned off, the same tone beeps when you touch the dial
- Not disturbed by the sounds of incoming messages

If your phone is in normal mode, you can mute your iPhone for an incoming call by pressing the Volume button or the Power button. Having applied a single press, the phone will continue dialing, but without the ringing ringtone. When you press the Power button again, the phone
Our company is a branch and we receive all layouts from the head office, from where edits can come to us at any time. And so it happened, we have already agreed and sent the layout for production (offset printing) in Arbat, as we received the layout edits. The situation, to put it mildly, is not the most pleasant .. But they not only treated us with understanding, Arbat met the printing deadline, despite the restart of production, but also kept an acceptable price. Thank you so much for that!
Natalia, customer service specialist
Many thanks to “Arbat” for the promptness! When the management once again sets a task with the deadline “it was necessary yesterday,” I do not hesitate to contact “Arbat”. From my own experience I was convinced that in our city no one works faster than them and the quality is at its best. I advise everyone who values their time.
Galina, assistant manager
I have been working with Arbat for several years, the only drawback is service, although here I understand that there are a lot of clients, and if they babysit one, then there will not be enough time for the rest. Now I just use online ordering and enjoy all the advantages - price, quality, efficiency.
Of the Barnaul printing houses, only Arbat approached us, they work quickly, efficiently, but there is a little lack of service (I hope they will grow). In the Altai region we work only with them.
Anatoly, brand manager
Helped us to carry out a promotion. I liked that we got everything “in one bottle”, we didn’t have to look for separate organizers, printing house and so on. Everything went great - I put five.
Alexander, Head of Marketing Department
Immediately, I note that it is better to order online, so you will avoid a long queue. It is both convenient and fast. And recently, our organization was assigned a personal manager - this, of course, is a completely different level. I put a firm “Good”.
Elena, marketer
One of the consequences of neglecting the device is the failure of the mode switch on the iPhone 6 and iPhone 6 Plus. Physical damage leads to the need to replace it and its adjacent components. Despite the fact that the iPhone 6 and iPhone 6 Plus are officially non-separable, you can replace the mode switch yourself at home. To do this, you need to purchase a special set of tools and use the proposed instructions.
So how do you replace the mode switch on the iPhone 6 and iPhone 6 Plus?
1. Unscrew the Pentalobe screws near the Lightining connector:
This procedure can be performed using a dedicated Pentalobe screwdriver set, which can be ordered online. It is worth noting that all the manipulations for disassembling the iPhone and replacing certain of its components should be performed only when the phone is off.
2. Lift the front panel of the device using a suction cup and a sharp-edged plastic tool:


This procedure can be performed using the most ordinary suction cup and the most ordinary mediator. Pressing the suction cup firmly against the front panel of the device, pry it off with a pick and open it like a book cover.
3. Remove the five screws that secure the front panel of the device:

4. Remove the protective metal plate:

5. Disconnect all cables from the front panel of the device and remove it:


6. Remove the two screws that secure the battery cable:

Manufactured by Phillips, these screws are of a standard design and can be removed from a quality toolbox with a few common screwdrivers.
7. Remove the protective metal plate:

The unscrewed plate can be removed with tweezers.
8. Disconnect the device battery cable:

This procedure should be performed as carefully as possible using a plastic instrument with a sharp edge.
9. Disconnect the Lightning port flex cable of the device:


This procedure should be performed as carefully as possible using a plastic instrument with a sharp edge.
10. Unscrew the two screws that secure the bracket for the upper part of the device motherboard cable:

Manufactured by Phillips, these screws are of a standard design and can be removed from a quality toolbox with a few common screwdrivers.
11. Remove the power and volume buttons bracket:


12. Disconnect the power and volume buttons cables:


This procedure should be performed as carefully as possible using a plastic instrument with a sharp edge.
13. Remove the four screws that secure the contact bracket bracket:

Manufactured by Phillips, these screws are of a standard design and can be removed from a quality toolbox with a few common screwdrivers.
14. Remove the contact bracket bracket:


The unscrewed bracket can be removed with tweezers.
15. Remove the two screws that secure the grounding bracket:

Manufactured by Phillips, these screws are of a standard design and can be removed from a quality toolbox with a few common screwdrivers.
16. Remove the grounding bracket:


The unscrewed staple can be removed with tweezers.
17. Remove the two screws that secure the corner bracket:


Manufactured by Phillips, these screws are of a standard design and can be removed from a quality toolbox with a few common screwdrivers.
18. Remove the corner bracket:


The unscrewed bracket can be removed with tweezers.
19. Remove one screw that secures the antenna cable:

Manufactured by Phillips, these screws are of a standard design and can be removed from a quality toolbox with a few common screwdrivers.
20. Disconnect the antenna cable and camera cable:


This procedure should be performed as carefully as possible using a plastic instrument with a sharp edge.
21. Remove the three screws that secure the motherboard:

Manufactured by Phillips, these screws are of a standard design and can be removed from a quality toolbox with a few common screwdrivers.
22. Remove the motherboard:


23. Remove the stickers securing the battery:


If there are problems with peeling, it may be necessary to warm up the case of the device from the back. It can be done with a household or industrial hair dryer.
24. Remove the battery:


This procedure should be performed as carefully as possible using a plastic instrument with a sharp edge.
25. Remove the film covering the mount with the camera base:


This operation can be performed with tweezers.
26. Unscrew the two screws that secure the main camera:

Manufactured by Phillips, these screws are of a standard design and can be removed from a quality toolbox with a few common screwdrivers.
27. Remove the main camera of the device:


This operation can be performed with tweezers.
28. Unscrew one screw that secures the flash bracket:
Manufactured by Phillips, these screws are of a standard design and can be removed from a quality toolbox with a few common screwdrivers.
29. Remove the device flash bracket:


This operation can be performed with tweezers.
30. Remove the two screws that secure the power button bracket:

Manufactured by Phillips, these screws are of a standard design and can be removed from a quality toolbox with a few common screwdrivers.
31. Remove the power button, microphone and flash cable:


This procedure should be performed as carefully as possible using a plastic instrument with a sharp edge.
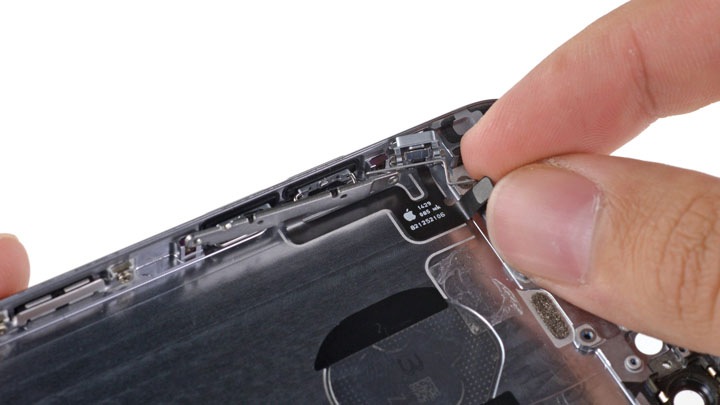
32. Remove the power button:


This operation can be performed with tweezers.
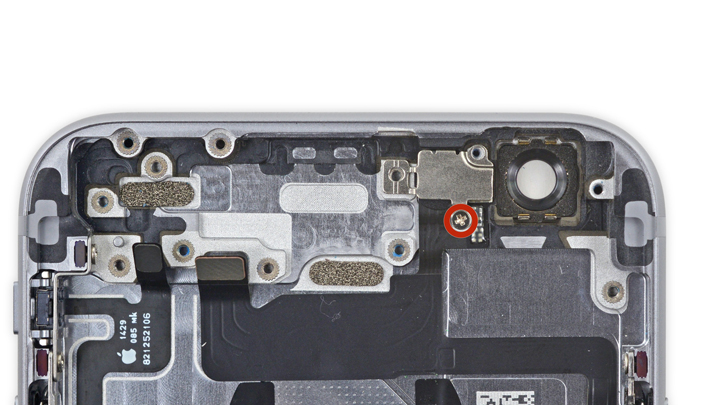
33. Unscrew the three screws that secure the bracket for the volume buttons:

Manufactured by Phillips, these screws are of a standard design and can be removed from a quality toolbox with a few common screwdrivers.
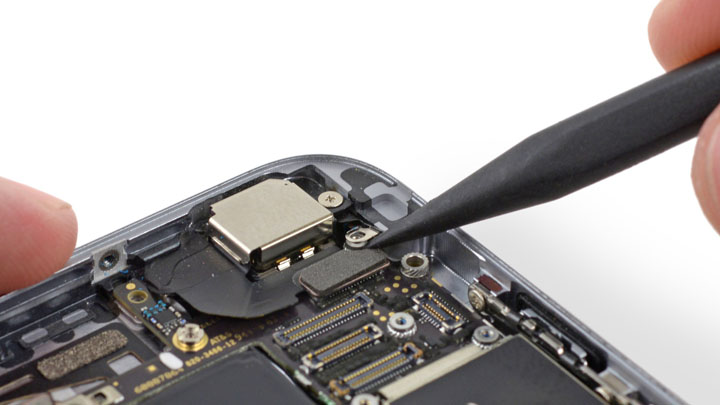
34. Remove the mode switch and related components:


This operation can be performed with tweezers.
35. Replace the mode switch and related components, assemble the device:

To assemble the phone, just follow the steps in reverse order. The mode switch and related components can be ordered from one of the online stores.
Thus, replacing the mode switch and related components on the iPhone 6 and iPhone 6 Plus can be done in just a few minutes. These actions must be carried out as carefully as possible so as not to damage the components of the device, which will cause the need for additional expensive repairs. In order to avoid all possible difficulties, you can contact the specialists of the EtoService company for help.
Hello everyone! What does a person do right after buying an iPhone? That's right, begins to study it closely. Scratches? Cracks? Clearances? All this is sought with an enviable, sometimes even some kind of manic-paranoid persistence. Is this strange? It seems to me not. After buying a rather expensive device, we have the right to count on the fact that everything will be perfect in it.
And at the moment of such research, you can easily find the fact that the mechanical power (volume) buttons are loosely installed and shake a little. On the one hand, it's frustrating. And on the other hand, maybe it’s so for everyone? Let's figure out if the backlash of the Power and volume up / down buttons is a fault or is it a common design feature of the iPhone?
One two Three. Let's go! :)
Personal experience or do the author's buttons on the iPhone stagger?
Stagger, but not much. Moreover, I drew attention to this right from the moment I bought my first iPhone 5S. I was very worried about this and even wanted to. But all this desire only lasted the first few weeks. Then, as they say, "scored" and this device has served me for the 4th year in a row.
The most interesting thing is that after all this time, the Power button is shaking almost the same as it was from the very beginning of use. Although, small improvements are still present - at the end of the article there are observations about what this may be related to.
In general, if you think logically, then the buttons will always have a slight backlash - after all, they must be pressed, and therefore there should be a small gap.
Before writing this article, I walked through friends, acquaintances, relatives and "felt" their iPhone for wobbling volume and power buttons. To be honest, I have not seen the most ideal fit in anyone - there is a small stroke in 100% of cases. Although, on a couple of iPhone SEs, the backlash was quite strong (as for me), but the owners simply do not pay attention to it and use the phone for their own pleasure.
On which models is the defect most common?
Judging by the reviews on the Internet, in most cases, users are unhappy with the iPhone 5S and SE.
Which is logical:
- These are some of the most popular and widespread iPhones on the market. The more devices, the higher the likelihood that someone will be upset.
- The body of the devices is exactly the same. Apple, having released the iPhone SE, did not change anything in the design, which means that the problem with the backlash buttons smoothly flowed into the new model.
And while iPhone 6 and 7 owners also complain about dangling power and volume keys, there are far fewer of them.
Loose buttons on the iPhone - a marriage or not?
Moving on to the most interesting thing - is such a defect a marriage? What will be the result of contacting the service center - will they repair (exchange) or say that "this is the norm"?
In fact, it is impossible to answer this question unambiguously. Each person has his own idea of quality - what for someone seems to be a normal move and “landing” of buttons, in the eyes of another will be a terrible backlash.

Moreover, this applies to both the user and the employee of the service center. There are no clear criteria like "here the power button should have a gap of 1 mm and walk to the sides by 0.5 mm" in any instruction.
In addition, this disadvantage can manifest itself in different ways:
- There is backlash, but it does not affect anything.
- Loose buttons interfere with the normal functioning of the device - for example, their rattling is heard when recording a video, or they are pressed "somehow wrong" and sink, or there is some other good reason to recognize this defect as a marriage.
Accordingly, in the first case, the service center will call it "technical backlash", a common situation, design features - and will, in general, be right. But in the second, you can already emphasize that the rattling prevents you from using the device normally, which means it is a marriage and.
How to fix button backlash yourself?
On some forums, it is advised to disassemble the device and put something under the Power button - they say, after that the key will become like a glove and will stop dangling. In my opinion, this is a rather dubious event, because:
- Assembly and disassembly must be done very carefully, and the warranty will be lost (if any).
- Pushing some foreign objects inside the iPhone (even if this action has a good purpose) is also undesirable.
There are much simpler ways to eliminate backlash:
- Use a tight (e.g. silicone) cover.
- Wait until dust gets into the button hole (during normal and daily use).
I agree - there are not very many options. And the second point so generally seems ridiculous. But!
Some users really note the fact that after some time the Power backlash decreases and associate this phenomenon with the clogging of the hole with fine dust. I don't know how true these messages are, but I would definitely not intentionally pollute the iPhone :)
P.S. If the buttons on your iPhone are loose, be sure to tell your story in the comments! Does it bother you and will you contact (or have already addressed) the service center?