From time to time, every user has to reinstall their operating system. The easiest way to do this is using a so-called bootable flash drive. This means that an image of the operating system will be written to the USB drive, and then it will be installed from this drive. This is much more convenient than burning OS images to disks, because a flash drive is easier to use, if only because it is smaller and can easily be put in your pocket. In addition, you can always erase the information on it from a flash drive and write something else. And the ideal tool for creating bootable flash drives is WinSetupFromUsb.
WinSetupFromUsb is a multifunctional tool designed to write images to USB drives operating systems, erasing these drives, backing up data, and performing many other functions.


Creating a bootable USB flash drive
To do this, we need only two things - the USB drive itself and the downloaded operating system image from ISO format. The process of creating a bootable USB flash drive occurs in several stages:

Working with additional features
The WinSetupFromUsb program has huge amount additional functions. They are concentrated just below the panel for selecting the OS image that will be written to the flash drive. To select one of them, you just need to check the box next to it.


In addition to additional functions, WinSetupFromUsb also has additional routines. They are located above the operating system selection panel and are responsible for formatting, conversion to MBR (master boot record) and PBR (boot code) and many other functions.
Formatting a flash drive for booting
Some users encounter a problem that the computer detects the flash drive not as bootable, but as a regular USB-HDD or USB-ZIP (and you need USB Flash Drive). To solve this problem, the FBinst Tool utility is designed, which can be launched from the main WinSetupFromUsb window. You don’t have to open this program, but simply check the box next to the item "Auto format it with FBinst". Then the system itself will automatically create a USB Flash Drive.

But if the user decides to do everything manually, the process of converting to USB Flash Drive from USB-HDD or USB-ZIP will look like this:

Convert to MBR and PBR
Another common problem when installing from a bootable flash drive is that a different information storage format is required - MBR. Often, on old flash drives, data is stored in GPT format and a conflict may arise during installation. Therefore, it is better to immediately convert it to MBR. As for the PBR, that is, the boot code, it may be completely absent or, again, not suitable for the system. This problem can be solved using the Bootice program, which is also launched from WinSetupFromUsb.
It is much easier to use than the FBinst Tool. There are simple buttons and tabs, each of which is responsible for its own function. So, there is a button to convert a flash drive to MBR "Process MBR"(if the drive already has this format, it will not be available). There is a button to create PBR "Process PBR". Using Bootice you can also split a flash drive into parts ( "Parts Management"), select sector ( "Sector Edit"), work with VHD, that is, with virtual hard drives(tab "Disk Image") and perform many other functions. 
Creating images, testing and more
WinSetupFromUsb has another great program called RMPrepUSB, which does just a ton of things. This is the creation boot sector converting the file system, and creating an image, and testing speed, data integrity, and much more. The program interface is very convenient - when you hover your mouse over each button or even an inscription, hints will be displayed in a small window.

Tip: When starting RMPrepUSB, it is better to immediately select the Russian language. This is done in the upper right corner of the program.
The main functions of RMPrepUSB (although this is not a complete list of them) are as follows:
- recovery of lost files;
- creation and conversion of file systems (including Ext2, exFAT, FAT16, FAT32, NTFS);
- extracting files from ZIP to a drive;
- creating images of flash drives or recording ready-made images on flash drives;
- testing;
- cleaning the drive;
- copying system files;
- performing the task of turning a boot partition into a non-boot partition.
In this case, you can put a tick next to the item "Ask no questions" to turn off all dialog boxes.
Making a boot-installation flash drive
Program for bootable flash drive WinSetupFromUSB + sequence of actions in pictures. Download WinSetupFromUSB 1.0.
 I haven’t used an optical drive for quite some time; I only remember about it when I’m chasing the ubiquitous dust around the components. Today, when I noticed this “suitcase”, I started thinking - is it needed in a modern PC? Which actually gave me the idea to write about what I use without noticing - a USB bootable flash drive with Windows. Next we will talk about how to hammer the last nail into the coffin with optics - how to create a bootable flash drive that works the first time. So what we need: USB flash drive, Windows image, WinSetupFromUSB 1.0 program for a bootable flash drive and a little careful patience....
How to make a bootable Windows flash drive from A to Z in pictures.
For those who thought of creating a bootable UltraISO flash drive, I’ll say this - there is such an option, but I don’t recommend it. WITH UltraISO bootable You will create a flash drive, but in addition, at a minimum, you will receive - txtsetup.sif is damaged or not found, and with it additional problems. So we discard these thoughts, and then we are only interested in the specials. program for creating a bootable USB flash drive WinSetupFromUSB 1.0 (for Windows installations XP / Vista / 7 / 2003 / 2008).
In fact, with her direct participation, using the Windows XP image as an example, we will create a bootable flash drive from an iso. So, step one - program for bootable flash drive WinSetupFromUSB 1.0 - download WinSetupFromUSB.zip. The program does not require installation, unpack the archive and WinSetupFromUSB is ready to create a bootable USB flash drive.
Step two - when WinRAR help unpack ISO image Windows XP. The bootable USB flash drive was created based on a stable image of Windows XP Pro SP3 Rus, and its performance was tested many times. For those who don’t want to bother with creating an image, I advise - download uTorrent 3.1.3 rus, with the corresponding torrent Windows XP Pro SP3 Rus. Well, we will continue to figure out how to make a bootable USB flash drive with Windows.
Bootable flash drive step three - connect the USB-Flash, log into My Computer, click right click mouse on the flash drive shortcut, left click - format. What and how to choose, look at the picture. Just a matter of minutes and now we are ready to create a bootable USB flash drive from iso.

Creating a bootable flash drive, step four - run the WinSetupFromUSB 1.0 program, in the window that opens, select Bootice.

In the next WinSetupFromUSB window, click - Perform Format.

In the third window, select the item - USB-HDD mode (Single Partition), at the bottom click the button - Next Step.

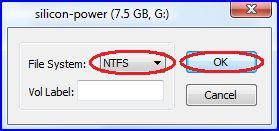
In the fourth window WinSetupFromUSB 1.0, select - NTFS, click - OK.
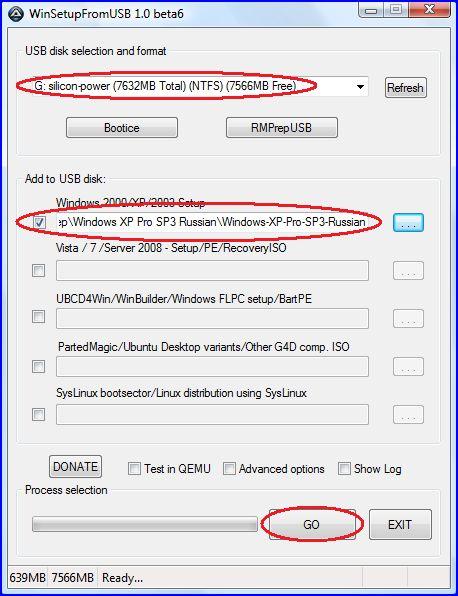
We agree with all requests and wait for the process to complete. Well, and then the actual creation of a bootable flash drive. We minimize all secondary windows, leaving only the main window WinSetupFromUSB. The following sequence of actions is shown in the picture. Check the box and select the folder with the unpacked image of Windows XP Pro SP3 Rus.

The bootable Windows flash drive is one step away from you, press the button - GO, there you will see a progress bar. The program for creating a bootable flash drive WinSetupFromUSB 1.0 has entered its final phase, have some tea.
When you return, a window will be waiting for you - Job done. I hasten to congratulate you - the bootable USB flash drive from Windows iso is ready, and you now know how to create a bootable USB flash drive with Windows.

WinSetupFromUSB is a professional software and allows you to record Windows versions 7, 8 (8.1) and 10 to USB media. Let's look at how to use this utility.
- The most in a simple way creation boot disk is to perform the following actions:
- We connect the flash drive and launch the application, taking into account the system capacity.
- We select the drive required for recording, taking into account data cleaning.
- Check the box next to AutoFormat (FB), which will automatically format the media.
- To create a flash drive for UEFI, use file system FAT If we are creating for Legacy, then we use NTFS.
2. We indicate what information needs to be added. You can host multiple distributions at the same time. Now click the Go button. We agree with the warnings and wait. Do not rush to restart your computer, as the program will take a long time to complete.
3. The program allows you to create images Windows custom versions, Server, WinBuilder, SysLinux, LinuxISO. For Windows 2000, XP and 2003 Setup, you will need to specify the folder with the i386 or AMD64 directories. If you want to create modern versions of Windows, you need to determine the path of the ISO image file.
Additional options

Video: Bootable USB flash drive Windows 7/8/8.1/10 Vista and XP in WinSetupFromUSB
M multiboot flash drive, equipped with a distribution kit of several operating systems, antivirus Live-disc, the necessary programs, working autonomously from bootable media - this is a universal tool for solving various problems and tasks with a computer that you have to deal with every now and then ordinary users. What can we say about IT-specialists, most of whose professional life is restoring the performance of computer equipment.
Flash drive, where various self-loading software solutions, will replace a bunch of different optical boot drives. A single multiboot flash drive can be used to neutralize viruses that block the computer from starting, and to reinstall the operating system, and to restore it from backup copy, and for allocating space on the hard drive, and for solving other problems. Available for download on the Internet ready-made images Live-disks with a selection of various software for solving computer problems. But, naturally, it is better to prepare a universal rescue tool yourself, selecting the contents of the bootable flash drive to suit your individual needs and preferences.
The program can create flash drives with various bootable software WinSetupFromUSB for Windows. It can complete a selection of bootable media based on the bootloader Grub4dos . This is what we will use to create a multiboot flash drive. And, accordingly, we will consider this entire process in detail below.
1. Contents of a multiboot flash drive
The first step is to prepare a distribution kit for a multiboot flash drive. In our case, we have a flash drive with a small volume by modern standards - just 8 GB. Therefore, it will be equipped only with the necessary tools. And this is the distribution Windows versions 8.1 , 10 and old XP , antivirus Live-disk from Avira, disk space allocation manager and free backup. Prepare for recording to a flash drive ISO-images of bootable media of the selected software and installation disks of operating systems.
2. Download WinSetupFromUSB
WinSetupFromUSB- free program. On the official website you need to download it latest version. At the time of writing this article, the current version is 1.6 . WinSetupFromUSB works portablely, without installation into the system. All you need to do is unpack the downloaded archive and launch the program shortcut in accordance with the bitness of the current Windows.
Download the WinSetupFromUSB program from the official website:
http://www.winsetupfromusb.com/downloads/
3. Formatting a flash drive
The next stage is formatting a flash drive. This process can be carried out as standard using Windows (team "Format" in the context menu called up on the flash drive in Explorer) , and inside WinSetupFromUSB. Let's consider the last option.
In the program window at the top, select the desired flash drive if there are several of them connected to the computer. Activate the option checkbox "Auto format it with FBinst". After which its additional options will open. Of these, you only need to decide on the future file system of the flash drive - NTFS or FAT32. If the distribution kit prepared for writing to a flash drive contains files whose weight exceeds 4 GB, you need to select a file system NTFS. If not, leave it FAT32 default.
The FAT32 file system must also be left if the multiboot flash drive is also intended to work with computers based on BIOS UEFI. In this case, you will not need to disable the function Secure Boot, and the distribution contained on the flash drive 64 -bit Windows 8.1 And 10 will be installed on GPT-disk partition.
WinSetupFromUSB prepares a universal bootable USB flash drive - and for computers with a regular BIOS, and for devices based on BIOS UEFI. But the interface UEFI sees only bootable flash drives formatted in FAT32. Some programs can bypass such restrictions and create bootable UEFI-flash drives with file system NTFS, but WinSetupFromUSB, alas, is not one of them.
So, decide on the file system and click the button below "Go".
In the warning window about erasing data on the flash drive, click "Yes".

And we press again "Yes" in another warning window.

In a few seconds we will see the inscription "Job done"- the job is done. Click "OK".

Now you can start adding the contents of the multiboot flash drive. The order in which you add images of installation disks of operating systems and bootable media for programs is not important. It is only important to adhere to the corresponding column in the central part of the window WinSetupFromUSB.
4. Adding a Windows distribution
Adding a Windows distribution kit is possible in two forms of the program window. One of the forms is designed to add images of Windows installation disks, starting with version Vista , the other is for installation files Windows XP and older versions of the system. In our case, we first add an image to the appropriate form Windows 8.1. We put a tick on this form and use the browse button to indicate the path to ISO-image. The set of a multiboot flash drive is formed in stages: each distribution is added and written in a separate order. Press the button "Go".

We wait for the process to complete and click "OK".

Now we activate the same form with a checkmark and use the browse button to add another Windows distribution. In our case, this is the installation disk Windows 10. For the same Windows versions you can add its various editions one by one - 32 - And 64 -bit. Add, click "Go", wait for the process to complete.

5. Nuances with Windows XP
Presence on a flash drive installation disk Windows XP It may be necessary in rare cases to reinstall the operating system on very old PC builds. But the process of creating a bootable USB flash drive with this version of the system using WinSetupFromUSB there are some nuances. In the program interface, the top form is intended for adding a distribution kit of Windows XP and earlier versions of the system.

This form's review button does not add the usual ISO-distribution image. Before contents ISO-The image must be opened in a virtual drive. In systems Windows 8.1 And 10 it's done regular means– on ISO-file is called context menu and a team is selected.

IN Windows 7 and earlier versions of the system mount ISO-images are possible through third party programs type Alcohol 120% or Daemon Tools . Contents of the connected ISO-the image is transferred to a separately created folder.

And this folder is already added to the program window during the process of creating a bootable flash drive WinSetupFromUSB.

The next step is to accept the license agreement.

And only then start recording.

Another nuance is the need to integrate drivers for SATA-controller in the distribution kit Windows XP, if it does not initially contain them.
6. Adding bootable media for programs
ISO- operating system distribution images Linux , Live -disks based Linux And WinPE, bootable media various programs using the browse button are added to the active form "Linux ISO/Other Grub4dos compatible ISO". After adding ISO-a small window will appear « Boot menu name", in which you can specify a name like bootable media will be displayed in the bootloader menu Grub4dos. In our case, we indicate the path to the antivirus image Live-Avira disk. Press the button "Go" and wait for the recording to complete.


And then the image.

7. Testing the flash drive
One of the advantages of the program WinSetupFromUSB is built-in BY to emulate computer hardware - QEMU. By using QEMU You can immediately, without leaving your current operating system, test a flash drive - either a regular bootable one or a multiboot one. At the bottom of the WinSetupFromUSB window, check the options box and click "Go".

A QEMU window will open, in which everything the same will happen as on the monitor screen after booting from the flash drive. The first thing we will see is the bootloader menu Grub4dos. Using the navigation keys or numbers according to the software serial numbers in the list, we can select one or another bootable media, Live-disk or operating system installation process.

Installation Windows drives will be combined into two sections. One will contain distributions Windows XP and older versions of the system, in the other – versions of Windows starting from Vista. Each section leads to an additional menu window for loading the corresponding versions and editions of Windows.

Good day... Free program WinSetupFromUSB designed to create a bootable USB flash drive. After you have recorded the image of the operating room Windows systems Vista/XP/7/8.1/10 using this program. You can later use it to install the operating system.
Program Works on all versions of the Windows operating system. It has an English interface. But figuring it out won’t be too difficult. DownloadWinSetupFromUSB can be found on the developer's website. this link. No program installation required. Unpack the archive and launch the program.
Creating a bootable USB flash drive using WinSetupFromUSB
Insert the flash drive into USB port Your computer or laptop. Then run the program. In the main window, select your flash drive. On which the operating system image will be written. Then check the “AutoFormat it with Finest” checkbox. The flash drive will automatically be formatted and will be ready to burn the image. Then select the file system in which you want to format the USB drive.
Now you need to specify the path to the Windows operating system image. For example, I will create a bootable USB flash drive for Windows 10. To the left of the “Windows Vista/7/8/10/Server 2000/2012 based ISO” checkbox. Then select the operating system image. To do this, click the button with the ellipsis to the right of the field. Click “GO”.
In the next window, click on the “Yes” button. Then click "Yes" again. The flash drive will be automatically formatted. Then you need to click on the “Ok” button. The process of creating a bootable USB flash drive has started.
After the process is completed, click on the “Exit” button. At this stage, the creation of a bootable USB flash drive is completed. By using free program WinSetupFromUSB You can create a bootable USB flash drive of any operating system for further installation on your computer.