You will also need drivers for devices installed in the computer (chipset, sound card, video card, webcam, etc.)
We write down the installation Windows disk XP
To record installation disk In Windows, we need a disk image, a disk burning program from the image, a CD burner, and the CD itself.
Download the Windows XP SP3 Professional disk image
Any disc burning program that supports burning from an iso image will do, for example Nero or DeepBurner, which can be downloaded for free.
So, we downloaded the disk image and installed the DeepBurner program. Now let's look at the disc burning process.
Insert a blank CD-R into the drive and launch DeepBurner. Once launched, DeepBurner prompts you to select the type of project to create.
Choose Burning an ISO Image and click Next.
I don’t know about you, but for me the project window opened in a compressed form. Therefore, you need to stretch it by grabbing the lower right corner with the mouse or expand it to the full screen so that it looks like in the figure below.

In the project window, click the button with three dots (Browse) and select the file of the downloaded iso image of the Windows XP installation disk. In our case this is the file ZverCDlego_9.2.3.iso.
Now you need to select the recording speed and press the button Burn ISO. In order for the disc to record better, the speed should be selected slightly less than the maximum. Now all you have to do is wait for the disc to burn. Once the Windows XP SP3 installation disc has been burned, the drive tray will eject itself. The disc is ready!
Windows XP(internal version - Windows NT 5.1) - operating system (OS) of the Windows NT family of Microsoft Corporation. It was released on October 25, 2001 and is an evolution of Windows 2000 Professional. The name XP comes from the English. eXPerience(experience).
Unlike the previous one Windows systems 2000, which came in both server and client versions, Windows XP is a client-only system.
According to web analytics, from September 2003 to July 2011, Windows XP was the most used operating system for accessing the Internet in the world. As of February 2013, Windows XP was in second place after Windows 7 with a share of 19.1%. The maximum of this value was 76.1% and was reached in January 2007.
How to install Windows XP from a disk via BIOS
Now it's time to look at the process itself installing Windows XP on a computer from a disk.
First of all, you need to configure boot from the floppy drive in the BIOS. To do this you need to go to the BIOS menu. How to do this may vary depending on the model motherboard. In most cases, this menu can be accessed by pressing the button Del(on some motherboard models you need to press the key F2) after turning on the computer (during the startup splash screen). It's better to press this key several times to be sure.
The BIOS menu differs depending on the manufacturer and version. There are two main types of BIOS: AMI and AWARD.
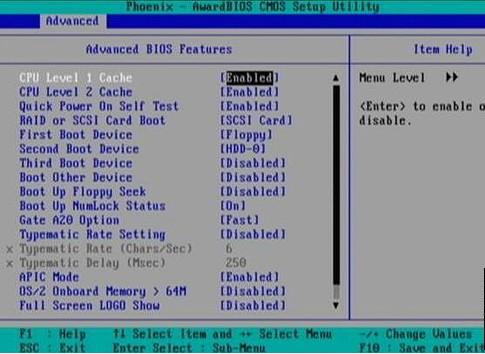
Below are screenshots of the AWARD BIOS. Need to go to the menu Advanced BIOS Features.

Here in the menu item First Boot Device press Enter and select CD-ROM

After that, press the Esc key to exit to the previous menus, where select Save and Exit Setup. That's it, now the first device to boot your computer will be the DVD drive. You can proceed to the process installing Windows XP from disk.
Now let's look at how to install disk boot in AMI BIOS
Select a tab Boot, and in it we go to the menu Boot Device Priority

Set the first boot device (1st Boot Device) to a CD-ROM or DVD-ROM (your drive model)

In some BIOS versions, the first device is selected after pressing the Enter key on the desired item and selecting a device; in others, devices are moved up and down using the F5 and F6 or + and - keys
After this, you need to exit to the main menu using the Esc key and go to the tab Exit. Select an item Exit and Save Changes to save changes and exit.
Now let's look at the process itself installing Windows XP from disk to computer.
Insert the installation disc into the drive and restart the computer. The disc menu below appears.

Select an item Microsoft installation Windows XP SP3 in manual mode and press Enter.
Please be warned that installing Windows XP SP3 on a computer takes about 40 minutes. So be patient.
On the first screen, press the Enter key to continue the installation.

In the next step, read the license agreement and press F8
Now select the disk partition where you want to install Windows XP. If hard drive new and not yet formatted, you need to create a partition by pressing the C key.
Select the section and press Enter. If the partition already existed, you need to confirm installation to this partition by pressing the key WITH.

At the next stage, the installation program prompts you to format the disk. Select an item Format partition to NTFS system(Quick) and press Enter.

To confirm formatting, press F
After formatting, the process of copying the necessary files to the hard drive will begin.

Once the files are copied, the computer will restart.
When you boot your computer, it will start again from the boot CD. In the disk menu, select the item
A window will open for selecting driver packages for unpacking and installation. These are built-in drivers for many devices included in this build. If you install Windows XP from a Microsoft distribution, this window will not appear.

Select the required driver packages by checking the boxes and click OK. If you don't know exactly which drivers are needed and which are not, select all. If you have disks with drivers for all devices (motherboard, video card, etc.), then uncheck all the boxes to speed up the OS installation process. In this case, you will need to install the drivers manually from the disks after Windows installation is complete. Read more here: How to install Windows drivers XP.
After clicking OK, the unpacking of driver packages will begin, and when it is finished, Windows installation will continue.
Next, the Regional and Language selection window will appear. If the distribution kit is the Russian version of Windows XP, then nothing needs to be changed here.


In the next window you need to enter your product key and click Next.
A window will appear in which you need to enter the computer name and administrator password. You don't have to change anything in this window. Then the administrator password will not be set.
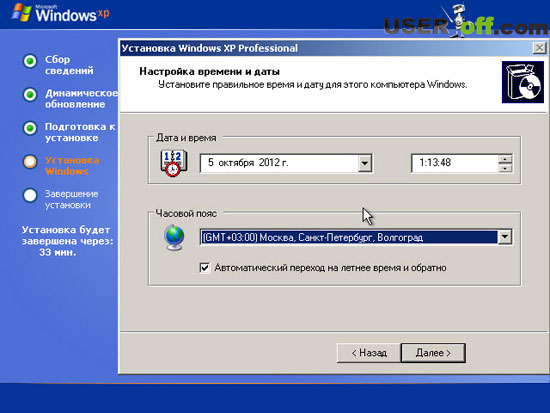
In the time and date settings window, set the correct date and time, as well as the time zone.

In the OS network parameters window, select Regular Options and click Next.

In the workgroup window, write the name of the workgroup or domain in which the computer participates. If you don't have a home or office network, you can leave everything unchanged and click Next.

After this, Windows installation will continue, after which the computer will automatically restart.
We go into the BIOS and set the first boot from hard drive, as described at the beginning of the article. We exit the BIOS and save the changes.
Now before that how to completely install Windows XP on a computer last minutes left.
When loading, the system will prompt you to automatically adjust the screen resolution. Click OK.
In the window Windows greetings XP click Next.

A window will appear asking you to select a Windows update mode.

Choose Postpone this action to turn off automatic update system and press the button Next.
The next window will ask you to set up your Internet connection. Click Skip.
We refuse the offer to register by selecting No, some other time and press Next.

In the final window, click Ready.
That's it! Now you know how to install Windows XP from an installation disk on your computer.

All that remains is to install drivers and programs, but this is beyond the scope of this article.
Preparing a disk with a distribution kit is the first stage of installing Windows XP. If you already have such a disk in your hands, you can skip this point, but if you downloaded a system image from the Internet in ISO format– will need help special programs(Nero Burning ROM, UltraISO and analogues) burn it to CD or DVD.
The Windows XP bootable ISO file is finished image system containing a complete set of installation data. It does not require any preliminary preparation, but is transferred to the CD unchanged.
Let's look at the process of burning a Windows distribution to DVD using UltraISO as an example.
- Launch the application.
- Press the key combination “Ctrl” + “O” and open Windows ISO image, which you have prepared to transfer to disk.
- Click on the “Burn CD image” icon in the toolbar at the top or press the F7 key.

- Place a blank or rewritable DVD in the optical drive.
- Make sure that the distribution you need is selected in the “Burn Image” window. Check the “Check” option if you want the disc quality to be checked after burning. Select the appropriate recording speed. Even though your laser drive can write to maximum speed, we recommend choosing medium or low. This will ensure good readability of your disk by any drive, including old ones.
- A rewritable disc must first be erased by clicking on the button of the same name, and you can immediately start writing to a blank disc by clicking “Record”.

After 20 - 30 minutes, depending on the speed of the drive, the preparation of the installation disk will be completed. You can move on to the next stage.
How to install Windows XP from a disc the traditional way
Traditional installation is a conventional system installation process that requires active user participation. Most often, Windows XP is installed in the traditional way.
At this stage, we have already prepared everything we need. In order to install Windows from a disk, we only need the disk itself and a computer with an optical drive on which the system will be installed. If you don’t have a drive, you can use an external one that connects to a USB port.

BIOS setup
To boot your computer from a CD or DVD, you need to set the CD-ROM drive as the first boot device in the BIOS Setup settings. To do this, enter the settings menu by pressing the designated key (Del, F2 - F12, etc.) immediately after starting the computer. Which one you can read at the bottom of the motherboard splash screen (displayed on the screen almost immediately after turning on the PC).
Once in the settings, go to the “Boot” or “Advanced BIOS Features” tab - in older versions of Award BIOS. Use the arrow keys to navigate to select the laser drive from the list of devices. In our example it is listed as CD-ROM Drive, but sometimes this list only lists hardware models.

After selection desired device press F10 (option to exit the BIOS menu and save settings).
Booting from disk and the Windows XP installation process
- Place the laser disc in the drive and restart your PC. System installation begins with boot Windows files XP in computer RAM.

- Next, Windows will greet you and offer you the option to continue the installation, exit the program, or restore itself using the recovery console. The second and third points do not suit us.

- By pressing Enter you will continue the installation. Next step you will be prompted to accept the Microsoft license agreement for using Windows XP.

- Next, select a location on the hard drive for the system partition. Click “C”, which means “Create partition”.

- Let's determine the size of the future drive C. In our example, it is maximum, but you can set anything, preferably at least 10 Gb.

- Now let's look at the list of hard drive partitions and agree to install Windows in one of them by pressing Enter.

- Let's format it new section in NTFS (quick formatting will suit us just fine).

- And wait until the installer copies the distribution files to the disk.

- Once the copying is complete, the computer will restart.

- Next Windows boot XP will no longer be run from a CD or DVD, but from a hard drive. This means that the system bootloader has been successfully created and is working correctly.

- From now on, our participation will be required again. Here we will have to specify the default system language, our location and additional languages if needed (although language packs can be installed later).

- Next – your name and organization. The name is required, the organization can be skipped.

- Entering the serial number of the Windows distribution during the installation process is voluntary. You can always enter it later.

- The computer name and administrator password also need to be specified now. The name will be suggested by default, but you can change it. The password can be left blank.

- The date, time and time zone are also set at this stage.

- We will not assign special network parameters; let them remain by default.

- Leave the workgroup name as it is. You can always change it after installation.

- At this point, the installation is almost complete. Next, the screen will be configured and one or more user accounts will be created, the first of which will be designated as the computer administrator. You will also be prompted to activate Windows XP right now.

But now it’s really almost everything. There are a minimum of settings left - and the system is ready to work.
Automatic installation of Windows XP
Creating an answer file using Windows tools
Agree, installing the system for about an hour without leaving the computer and constantly clicking “Next” will get boring for anyone. To simplify this work for those who have to do this often and for a long time, they came up with a way Windows installations without user intervention. To do this, a script is created in advance - a response file, which contains all the information necessary for the installer program.
The time has come for you and me to figure out how to create such scenarios. The Windows XP distribution includes a utility Setupmgr.exe, which is in the archive deploy.cab, stored in the SUPPORTTOOLS folder on the installation disk. Let's extract this utility from the disk and run it.
- The “Installation Manager” wizard will help us create the answer file. With its help, we can either create a new or change an existing script. Since we don’t have any preparations, we’ll select “Create”.

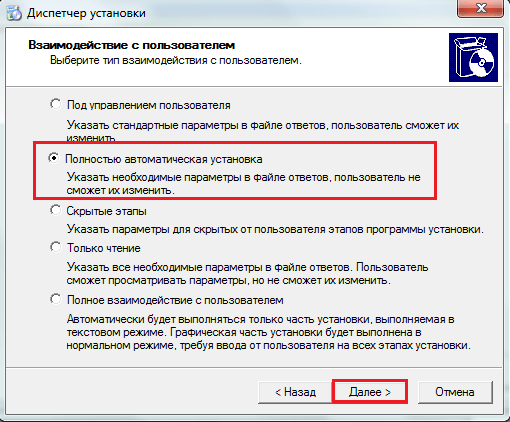
- We will leave the installation type as default – “ automatic installation”.

- Product version – Windows XP Professional.

- User experience – “Fully silent installation” (if we do not plan to change the parameters in the answer file).
- Next, select “Install from CD”.

- Let's accept the license agreement and proceed to filling out the same forms and fields that we filled out when installing Windows from disk. First window: “Name and Organization”.

- Screen options. They can be left as default (use Windows defaults).

- Time zone.

- Serial number (required!). Without entering serial number here, you will not be able to continue creating the answer file and installing the system.

- The names of the computers on which Windows XP will be automatically installed using this scenario.

- And also: administrator password, network components, the name of the workgroup or domain where this PC will belong, dialing code countries and cities, locale standards, language support, initial settings Internet Explorer, Windows installation folder, printers and a number of other settings - in separate program windows.
Upon completion of the wizard, a file will be created unattend.txt- this is our script, thanks to which we can install Windows XP completely automatically.
If you install the system from a CD, you need to rename unattend.txt to winnt.sif.
After you create your answer file, you can add your own commands to it, which you can learn about in this article.
That's probably all. As you can see, there is nothing difficult about installing Windows XP according to a script without your own active participation. All that remains is to save the resulting file in the i386 folder of the distribution disk - in the same place where winnt32.exe - the Windows installer - is located.
If your PC has a floppy drive, you can place the answer file in the root directory of a floppy disk and insert it into the computer during system installation. In this case, the installer will prioritize executing the script from the floppy disk, even if there is another one on the CD, in the i386 folder.
Automation of installation by alternative means
Windows' own tools are not the only tool that allows you to install it “in one click.” There are also third-party applications for this, for example, Advanced Windows Unattended Installer. Create scripts with this simple and free program much faster and easier than using Windows. The only drawback of Advanced Windows Unattended Installer is the lack of a Russian-language interface.
To use this tool to create a disk that allows you to automatically install on Windows computer XP, you only need to do three steps:
- Copy the contents of the Windows distribution to separate folder or mount its ISO image into a virtual drive.
This guide is intended for those who are interested in how to install Windows XP on their own on a computer or laptop, from a flash drive or disk. I will try to cover in as much detail as possible all the nuances associated with the installation operating system so that you don't have any questions.
To install we will need some bootable media with OS: you may already have a disk with a distribution kit or bootable flash drive Windows XP. If there is none of this, but there is an image ISO disk, then in the first part of the instructions I will tell you how to make a disk or USB from it for installation. And after that, let's move directly to the procedure itself.
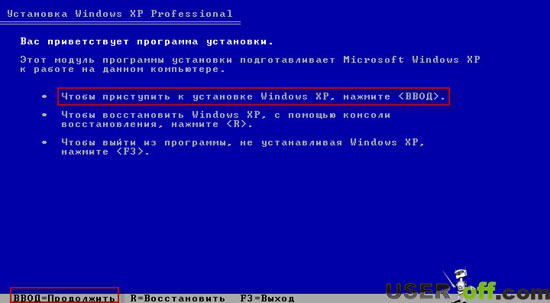
After booting from the installation disk or Windows flash drives XP, after a short setup process, you will be greeted by the system and prompted to press Enter to continue.

The next thing you will see is the Window XP License Agreement. Here you should press F8. Provided, of course, that you accept it.

On the next screen you will be asked to restore the previous Windows installation, if there was one. If not, the list will be empty. Press Esc.

Restoring a previous installation of Windows XP
Now one of the most important steps is to select the partition on which Windows XP will be installed. There are a variety of possible options, I will describe the most common of them:

- If your hard drive has been split into two or more partitions and you want to leave it that way, and you also previously installed Windows XP, then simply select the first partition in the list and press Enter.
- If the disk was partitioned and you want to leave it as is, but you previously installed Windows 7 or Windows 8, then first delete the “Reserved” partition of 100 MB in size and the next partition corresponding to the size of drive C. Then select the unallocated area and press enter to install Windows XP.
- If the hard drive has not been partitioned, but you want to create a separate partition for Windows XP, delete all partitions on the disk. Then use the C key to create partitions by specifying their size. It is better and more logical to install on the first partition.
- If the HDD has not been partitioned, you do not want to divide it, but Windows 7 (8) was previously installed, then also delete all partitions (including the 100 MB “Reserved” partition) and install Windows XP in the resulting one partition.
After selecting a partition to install the operating system, you will be prompted to format it. Just select “Format partition using NTFS (Quick).

Once formatting is complete, the files required for installation will begin to be copied. Then the computer will restart. Immediately after the first reboot you should install inBIOS boot from the hard drive, not from a flash drive orCD-ROM.
After the computer is rebooted, the installation of Windows XP itself will begin, which may take different times depending on the computer’s hardware, but at the very beginning you will see 39 minutes in any case.

After a short time, you will be prompted to enter your name and organization. The second field can be left empty, and in the first field, enter your name, not necessarily your full and real name. Click Next.
In the input field, enter the Windows XP license key. You can also enter it after installation.

After entering the key, you will be asked to enter the computer name (Latin and numbers) and the administrator password, which can be left blank.

The next stage is setting the time and date, everything is clear here. It is only advisable to uncheck the box next to “Automatic transition to daylight saving time and back.” Click Next. The installation process of the necessary operating system components will begin. All that's left to do here is wait.

After all the necessary actions are completed, the computer will restart again and you will be asked to enter the name of your account (I recommend using the Latin alphabet), and the records of other users, if they will be used. Click "Done".

That's it, Windows XP installation is complete.
What to do after installing Windows XP on a computer or laptop
The first thing you should attend to immediately after installing Windows XP on your computer is installing drivers for all equipment. Given that this operating system is over ten years old, finding drivers for modern hardware can be difficult. However, if you have an older laptop or PC, then it is quite possible that such problems will not arise.
Be that as it may, despite the fact that in principle I do not recommend using driver packs such as Driver Pack Solution, in the case of Windows XP, this is perhaps one of the best options for installing drivers. The program will do this automatically; you can download it for free from the official website http://drp.su/ru/
If you have a laptop (older models), then the necessary drivers can be obtained from the official websites of the manufacturers, the addresses of which you can find on the page.
In my opinion, I outlined everything related to installing Windows XP in sufficient detail. If you have any questions, ask in the comments.
Hello, dear reader! Today I would like to look at a “fundamental” area of computer knowledge, namely, to explain how to install Windows XP on a computer from a disk.
IN everyday life It is generally accepted that anyone who knows how to do this already definitely knows at least a little about computers. I cannot judge how true this statement is, but I have no doubt that this material can be useful to many.
Attention! If you need an original installation disk from Windows XP or any other version, then write to me by email [email protected]. Thus, you will receive an image without viruses and 100% bug-free.
Today we will learn how to reinstall the Windows XP operating system, or as they more often say “reinstall Windows”. Let me note right away that using this article, you can not only reinstall the OS, but also install it on a new hard drive or clean partition.
At the end of the article you can watch a video tutorial.
Quality installed system largely depends on the distribution you will use. I do not recommend using various assemblies like Zver DVD and similar ones.
The right choice would be a distribution that has had minimal changes. Ideally it is better to use official version. Depending on which distribution you choose, you may be missing some of the following items during the installation process. This does not affect the performance of the system in any way; their number is reduced specifically in order to simplify and speed up the installation process.
You can make an installation disk yourself, use pre-installed drivers (integrated), and also configure all settings so that they are not specified when installing Windows. I will definitely tell you how this is done in one of my next articles.
After installing this version of Windows, you will be able to install any! If you don’t believe me, you can read an article about installing other versions of Windows on the blog:
Steps before installing Windows XP
Before I start telling you how to install Windows XP on your computer from a disk, first you need to make sure that you have there is a license key suitable for the existing disk. It can usually be found on the surface of the disc, on the box, on system unit(if you bought a computer with Windows installed) or in text file called "serial.txt" or "s/n" on the disk itself.
In the latter case, the disk must be started before reinstalling the OS and the key must be copied onto a piece of paper. Another option is possible - the license key may be located where you downloaded the disk image.
Before you begin the installation, copy all data from the system drive “C:/” to another partition, for example, “D:/”, a portable hard drive, or a flash drive.
Preparation
Before starting the installation, you need to force the computer to turn on not the hard drive, but the optical drive(into which you have already inserted the Windows XP installation disk).
This can be done in two ways: the first is to force the computer to access the drive optical disks once during installation, the second time to make sure that the computer always checks for the presence of a disk in the drive.
To implement the first method, you need to go to the boot menu " Boot menu" and select " " from it. To do this, after turning on the computer, PRESS the “F8” or “F12” button. You must not just press and hold the button, but repeat the presses.
To implement the second method, you need to go to the “BIOS” setting - “BIOS Setup”. To do this, when booting the computer, press the “F2”, “F10” or “Del” key.

In the BIOS you need to find a setting indicating the boot order of devices; it will be called something like this: “Boot device priority”.
This can be presented in the form of several items: the first boot device is “First boot device”, the second is “Second boot device”, the third is “Third boot device”, etc.

To find out which button you need to press to BIOS boot, you need to look carefully at the screen - there will be hints at the bottom. The button for the first method will be labeled “Boot menu”, and for the second “Setup”, “BIOS” or “BIOS Setup”.

The first method is more suitable for beginners, as it will not lead to anything bad. Unlike the second, where the user can make a mistake when setting up the BIOS. In addition, after successful installation of the OS, the settings made in the second method must be returned to their original position, which is not required in the first method.
Launching and installing Windows XP
Once the steps above have been completed and the computer boots from the disk after turning on the power and the installation disk is inserted into the drive, you can continue with the installation.
In principle, I have already talked about the nuances of how to install Windows XP on a computer from a disk. But in order for the article to be complete, so to speak, we will complete the Windows installation.
After you restart or turn on your computer, you will be asked to click " Press any key to boot from CD…", which means "Press any key to boot from disk." Accordingly, when we see the message, press any button. I usually press Spacebar (it's hard to miss).

If everything is done correctly, you will soon see the screen shown in the following figure, which indicates that the installation program has begun its preparation procedures.

If you are installing to a hard drive that already contains installed version Windows XP, you will be prompted to restore it using the “Recovery Console”. Since we have firmly decided to reinstall the system, press “Enter”.
The next step is to demonstrate license agreement Windows XP. Of course, we agree with him, so we press “F8”.

If your computer already has installed Windows, a proposal to restore the system will appear indicating the location of its installation. We refuse, press “Esc”.
 The next step is to select a location for installation new system. Here the installer will show a list of your hard drives and sections on them.

If you are reinstalling the OS, then you need to select the partition with the letter “C:” (it is assumed that this is where the old OS is installed) and press “Enter”.
If the installation takes place on a blank hard drive, then instead of a list of partitions it will be written “(some) MB”. In this case, you first need to create a partition for the system; to do this, press the “C” key.

On the screen that appears, you need to specify the size of the partition to be created in megabytes. By modern standards, for comfortable work, the system partition should be made 30-50 GB in size, that is, you need to specify a figure from 30,000 to 50,000 at your discretion. If you play modern games on your computer, then you need to create a partition from 50,000 to 100,000 MB.
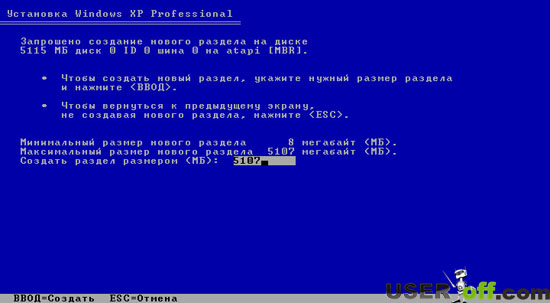
Upon returning to the previous screen, the created partition will be assigned the letter “C:”. Select it and continue by pressing “Enter”.

If you are performing a reinstallation, that is, you are installing the system on a partition with an installed OS, then the program, suspecting that you intend to install two copies of Windows in one section, will warn that this is not recommended. Press "C" to continue.

After this, we will be warned that during the formatting process all data on the selected partition will be lost. But we were ready for this, and before reinstalling, we copied all the valuable data from the “C:” drive (after all, we copied it, right?). Select “Format partition using NTFS (Quick)” and press “Enter”.

When asked by the system, press the “F” button.

Ahead of us are two screens that do not require user intervention. The first of them is the progress of the formatting procedure, the second is the process of copying files to the hard drive.

Copying data.

After completing these steps, the computer will restart. He will wait 15 seconds, you can hurry him up by pressing the “Enter” button.

Important point! After the reboot, you no longer need to boot from the disk; the further installation procedure will continue using the files copied to the hard drive. That is, you ignore the sentence “Press any key to boot from CD...” (if it appears). You just don't press anything. The disc remains in the drive.
Next appearance has a more pleasant and familiar graphical interface. Dialog boxes will appear from time to time. I will note right away that the time until the installation is completed, indicated at the bottom left, is very different from the truth and depends most of all on the performance of the computer; the speed of the hard drive is also important.

First dialog box will be "Region and Language". There is no need to change anything in it, but if you want, you can click the first and second “Customize...” buttons and select the desired parameters at your discretion.
Select the country you are in and click “Next”.

In the next window you will be asked to introduce yourself. Feel free to write your name or nickname here.

Next step - input license key. It needs to be prepared in advance, as mentioned above.

A friendly name is required if the computer is running in local network(even at home from 2-3 PCs). Otherwise, you don’t have to bother. It is recommended that you set the administrator password and write it down in a safe place for security reasons. However, if you have any doubts due to forgetfulness, you can leave the field blank.

Choose current date, time and time zone.
In the next window, leave the default settings and click “Next”.


When the computer starts to restart, you can remove the disc from the drive since Windows XP is already installed on the computer.
In the “Display Options” message, click “OK”.
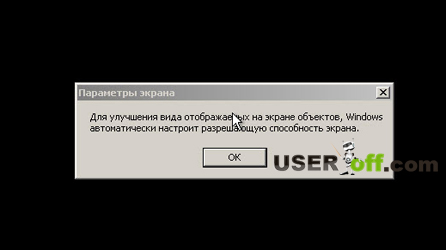
The following message is a screen health check, if you see this message, click “OK”.

After this, the “Welcome” screen will appear, click “Next”.


When checking your Internet connection, click the “Skip” button.

Select “No, some other time”, click “Next”.

Afterwards you will be asked to specify the users who will work on this computer. A separate one will be created for each account. If you will be the only one working, enter your name and click Next.

On the last screen you will be informed that the installation is complete and will say “Thank you”, all you have to do is click the “Finish” button.

If all the steps described in the article were performed correctly and the process was successful, congratulations, now you know how to install Windows XP on a computer from a disk.
The next step is to install drivers for your devices. To find out how this is done, read the article: “”. And about the software that will be useful after reinstalling the OS, you can read in the article: “”.
See you soon!
P.S.: I recorded a video tutorial where you can clearly see how to install WIndows XP on your computer from a disk.
Installing Windows XP is easy! In this article, we provide step-by-step instructions for installing the operating system for beginners.
An illustration of each step will help you quickly master the process of installing the Windows XP operating system from a disk.
What is Windows XP?
Windows XP is an operating system (OS) produced by Microsoft, released at the end of 2001. Windows XP can be called improved Windows version 2000 Professional. After XP came Vista (in 2007) and Windows 7 (at the end of 2009).
By the beginning of 2011, Windows XP is the most popular operating system in the world and in Russia.
Windows XP has 3 official add-ons, the so-called SP (Service Pack) 1,2,3,4. They added and improved basic version programs.
Compatible with XP operating system greatest number different programs and utilities.
Why install Windows XP?
Why do you need to install Windows at all? In what cases is this necessary?
Typically, Windows XP installation occurs for two reasons:
1. You bought a computer without a pre-installed operating system.
You won’t be able to work on such a computer, since you simply won’t find the folders, pictures and files that are familiar to our eyes, but only a blinking cursor, and the BIOS.
2. You are not satisfied with your current operating system.
- You want to install a clean system to get rid of system errors, all kinds of garbage, viruses, rubbish in the form of remnants of programs that have not been completely deleted.
- You prefer Windows XP to all other operating systems due to its unique features.
How to install Windows XP?
Windows XP can be installed in several ways: from a floppy disk, from a CD/DVD disk, from a flash drive. We will look at the classic installation of an operating system from a disk.
Installing Windows XP is easy! Our step by step instructions will help you with this.
1. Preparation.
Prepare: a multiboot disk with Windows XP, a set of drivers for your equipment.
2. The installation process takes place in several stages:
First stage: BIOS
BIOS is basic software, which starts the computer to boot.
How to enter BIOS: when you turn on the computer, press the DEL button (sometimes the F2, F10 or F12 keys, mainly on laptops)
BIOS setup: you need to boot from CD-ROM. BIOS language is English.
We find the Advanced Setup section, then set First Boot Device from CD-ROM(on the right are hints on which buttons to use to change the position of the devices)
Saving changes to BIOS: Press the F10 button and select Y (Yes). The computer will restart, but with the changed settings.

Press F8 to agree and continue installing licensed Windows XP
Select the partition on which you want to install Windows.

To create a new partition, use the C key and set the desired size (for XP, the optimal size is at least 15 GB.)
To delete the highlighted partition, use the D key.

Quickly format your partition by confirming your decision by pressing the F key. Formatting in NTFS will rid you of all entries on the selected one hard section disk.
Warning! Formatting deletes ALL data from your disk.
Be careful and save the documents you need in advance.


After hard formatting disk and file copying, the system components are unpacked and installed. During the installation process, the computer will restart several times.
At the 33rd minute you set Regional and Language Options, assign a name and name of the organization (any) 
enter from the sticker, case insensitive

Stage three: Complete the installation of Windows XP.
Let's set it up now workgroup and domain. 
Setting up Windows XP

