Let's start with the fact that you need Linux. In Windows, you can only disassemble the firmware, but you won’t be able to put it back together for purely technical reasons. Now about the firmware. They are usually distributed in the form of ZIP archives flashed through custom recovery. It is one of them that we will need for experiments. I recommend starting the Romodel journey with some custom firmware that is as close as possible to AOSP, because it is often easier to understand than the stock one.
- Unpack the archive with the firmware into any folder.
- Download the script from the link and unzip it into any folder.
- We launch the ext file (if it complains about the lack of Java, just skip by pressing y; Java is only needed for packaging).
- Now select unpacking by pressing button 1 and then Enter.
- A new folder named extract_* will appear next to the ext file and the tools folder. Copy the files system.new.dat and system.transfer.list into it.
- After copying the files, press Enter and wait. After a while, you will need to press Enter again, enter the administrator password and press Enter again.
- Ready. The contents of system are in the extract_*/output folder.

Manual method
Unpack the archive with the firmware into any folder (for example, rom):
$ mkdir ~/rom $ unzip path_to_archive -d ~/rom/
Download the tools we need into this folder:
$ cd ~/rom $ wget https://github.com/xpirt/sdat2img/raw/master/sdat2img.py
Let's run the script:
$ chmod +x sdat2img.py $ ./sdat2img.py system.transfer.list system.new.dat system.img
It converts the system.new.dat file into a raw image called system.img . Mount the image to the mnt subfolder:
$ mkdir mnt $ sudo mount -t ext4 -o loop system.img ~/rom/mnt 
Android Directory Structure
After unpacking system, the following directory structure will appear:
- app- pre-installed applications with standard privileges;
- priv-app- pre-installed applications with elevated privileges, including some system components;
- bin- binary files in ELF format, an analogue of the /bin and /usr/bin directories in Linux. Contains various system components used by higher-level system components;
- etc- settings files. A complete analogue of /etc in Linux, used, however, only by those same system components. Android Applications store individual settings in the /data/data/ directories;
- fonts- fonts. By default, it contains only Roboto branded fonts;
- framework- libraries of Java classes used by the system and applications. There is also a file framework-res.apk containing full description interface operating system, including all graphic files;
- lib And lib64- Linux libraries used by low-level system components. Analogue of the /lib and /usr/lib directories in Linux, including the following standard libraries, like libc, libz, libssl. On devices with ARMv7 architecture and lower, the lib64 directory will be missing;
- media- media files: ringtones, notification sounds, interface sounds and OS loading animation;
- tts- files needed by the speech synthesizer;
- usr- a directory that usually contains files necessary for running applications from the bin directory. Essentially an analogue of /usr/share ;
- vendor- files supplied by the device manufacturer. Usually contains binary firmware for various hardware components, for example a Wi-Fi module;
- xbin- optional directory; custom firmwares use it to store things like the bash interpreter, SSH, PowerTOP, BusyBox, and other useful tools;
- build.prop- a file containing information about the assembly, as well as various low-level settings;
- addon.d- contains scripts that are launched after installing the firmware. GApps also write their own script here, thanks to which they are revived after reinstalling the firmware.
Now that we're familiar with the basic structure of Android, let's start making changes.
Removing and adding applications
All preinstalled programs can be found in two folders:
- /system/app/;
- /system/priv-app/.
They differ from each other in access privileges. If programs from app have the same permissions as third party programs(for example, installed from the Play Store), then applications from the priv-app can use privileged APIs (privileged rights). You can learn more about this from.
To preinstall an application into the firmware, simply drop its APK file into /system/app/ . You can, of course, create a separate folder, but in our case this makes no sense, because the folder is used to store libraries and odex files, which we simply do not have. To remove it, simply delete the folder with it.
You can go further and replace stock applications with analogues. For example, to replace the calendar, delete the folder Calendar and copy our favorite com.rpagyc.simplecalendar.apk to /system/app. And you don’t have to copy it. Then the firmware will be without a calendar.
The main thing to remember: stock programs may be related to each other. Therefore, deleting one program may well lead to the complete inoperability of another (for example, CalendarProvider and Calendar: by deleting the first, you will make not only the stock calendar inoperable, but also any other calendar). Fortunately, in pure AOSP firmware there are not many interconnections.
Changing the loading animation
The animation is stored as PNG images, packed into the archive /system/media/bootanimation.zip without compression. Inside the archive there are:
- desc.txt- a file describing the animation;
- part0- a folder with animation files that are played first;
- part1- a folder with animation files that are played second;
- part?- the last folder, the images from which are played back at the end.
The desc.txt file might contain something like
1920 1080 60 p 1 0 part0 p 0 0 part1
The purpose of these lines is intuitive: 1920 × 1080 is the image resolution, 60 is the number of frames per second. Part0 and part1 indicate the folders from which the animation will be played and the playback sequence. In general, there can be either one part or several (three or more).
The images located in the part folders are numbered with five numbers in playback order: 00000.png, 00001.png, 00002.png... These images can be replaced with your own, thereby creating an original animation. Or you can simply delete the bootanimation.zip file. Then the device will show animation from standard Android. Or use a ready-made collection of animations on w3bsit3-dns.com.

Changing the sound design
In fact, all the sounds that the system plays are stored in the /system/media/audio folder. Inside it you will find the following folders:
- alarms- alarm clock melodies;
- notifications- notification sounds;
- ringtones- ringtones;
- ui- system sounds, such as low battery, camera focusing, selection of interface elements.
In alarms, notifications, ringtones you can add as many melodies as you like. You can take them, for example, here:
- standard ringtones from different Nokia phones and smartphones;
And a little life hack: deleting files from the ui folder will not lead to failures and errors, but to disappearance system sounds. Therefore, you can easily turn off the sound of taking a picture from the camera, taking a screenshot, simply by erasing the files containing these sounds (their names are intuitive).
Adding fonts
Fonts are stored in fonts . You can find archives with font files on w3bsit3-dns.com and XDA. To install, just copy and replace the ttf files from the archive to the fonts folder.
Changing system settings (build.prop)
The system image has an interesting build.prop file containing many useful information about the device hardware and default settings for various stock applications. To be fair, I note that this is not always the case. For example, in Gigaset ME and ME Pro build.prop is divided into two parts. One part contains settings for Gigaset ME, and for ME Pro some lines are duplicated, but the keys (smartphone name, etc.) are different. This was done to ensure more or less correct operation of the same firmware on different devices.

Build.prop contains (or may contain) huge amount settings. Some of them do not change anything, some improve one thing at the expense of another, but there are those that are really useful:
- ro.product.model And ro.product.manufacturer- smartphone model and manufacturer's name. By replacing these lines, you can make the Play Store think that you have a different smartphone, which will open access to more software. For all those little known Chinese smartphones these lines can become life-saving;
- hw.qemu.mainkeys- takes only two values: 0 - show on-screen navigation keys, 1 - do not show buttons. The absence of a line corresponds to 0;
- debug.sf.nobootanimation- value 1 disables loading animation, which slightly increases its speed. Setting it to 0 or deleting the line returns the animation to its place;
- ro.telephony.default_network- tells the system which mode it should be switched to mobile network when loading;
- ro.sf.lcd_density- Display DPI, most exact value for display can be calculated through a convenient website. But no one forbids setting a higher or lower value to your liking: higher values make the interface elements larger, lower values make the interface elements smaller;
- ro.config.vc_call_vol_steps- number of volume steps during a call (default 8);
- ro.config.media_vol_steps- number of media volume steps (default 15).
We implement Google Apps in the firmware
Almost always custom firmware comes without Google services and application store. The developers suggest that we install them separately using the GApps package. However, it can be integrated directly into the firmware.
First you need to download the GApps package. I recommend taking the Open GApps archives. You choose Android version, processor architecture and configuration option (Pico, Nano, Stock...), which determines how many different Google applications contains an archive. I recommend downloading the Pico version. It contains only the Play Store and a set of libraries necessary for its operation.
Integrating GApps into the firmware is done like this:
- Unpack the GApps ZIP archive using any archiver.
- Go to the Core folder.
- We see many archives with the extension .tar.lz. Extract using lzip.
- After unpacking, copy the files from the folders to the corresponding folders in the system. It’s easy to guess what to throw where from the directory structure in the archive. For example, configupdater (from the screenshot) needs to be placed in the priv-app folder.
- Go to the GApps folder (located next to Core) and follow steps 3 and 4 for the files in it.
- That's it, we have integrated GApps into our firmware!

Free space
It is necessary to understand that the space for installing firmware is limited. You cannot install firmware whose size exceeds the size of the system partition of the device. You can view its value using:
$ adb shell df /system 
Second option: put a terminal on the device and type the command
$df/system
You can find out the partition size in bytes by installing BusyBox on your smartphone and running the command in the terminal
$ busybox df -B 1 /system
Or the same with ADB:
$ adb shell busybox df -B 1 /system
The space occupied by the firmware will be approximately equal to the size of the system when unpacked. In general, when creating firmware, it is necessary to take into account that the user can also flash various modifications on top of it (SuperSU, Xposed) or transfer applications to the system section. For example, Google's minimum application package (Pico) requires a minimum of 150 MB of additional installation space.
If necessary, the size of the firmware file can be reduced by deleting not only unnecessary programs from /system/app (/system/priv-app) and call sounds from system/media/audio and bootanimation.zip , but also:
- /system/tts/lang_pico- languages of the primitive voice engine Pico TTS, Google voice engine will not be affected;
- /system/usr/srec/config/- offline languages. You can download it online later if needed.
Assembly
After making changes, you need to put everything back together. First, let's pack the system section into system.new.dat . Download the tools we need:
$ wget https://github.com/xpirt/img2sdat/raw/master/img2sdat.py $ wget https://github.com/xpirt/img2sdat/raw/master/blockimgdiff.py $ wget https://github. com/xpirt/img2sdat/raw/master/common.py $ wget https://github.com/xpirt/img2sdat/raw/master/rangelib.py $ wget https://github.com/xpirt/img2sdat/raw/ master/sparse_img.py $ sudo apt-get install android-tools-fsutils
Let's convert our folder back to a RAW image. Let's call it system_new.img:
$ sudo make_ext4fs -T 0 -S file_contexts -l 1073741824 -a system system_new.img output/
1073741824 is changed to the size of the system partition in bytes. It would be advisable to even make it a little smaller. We make a sparse image from the RAW image:
$ img2simg system_new.img system_snew.img
Let's convert our image into system.transfer.list and system.new.dat, which should be thrown into the archive with the firmware, but first we'll delete the old files:
$ rm -rf system.transfer.list $ rm -rf system.new.dat $ rm -rf system.patch.dat $ chmod +x img2sdat.py $ ./img2sdat.py system_snew.img
Let's separate the firmware files from the excess husk (files that we downloaded for work. For this it is convenient to use the archive with the firmware). Deleted? Now you need to pack the firmware into a ZIP archive (with any archiver).
All that remains is to sign the archive. This can be done both on Android itself using ZipSigner, and on a PC (you will need Java installed):
$ wget https://github.com/appium/sign/raw/master/dist/sign.jar $ java -jar file.zip
Pitfalls
While building system.new.dat, you may encounter several problems caused by constant changes in the mechanisms for generating Android firmware. The method described above should work well in the case of firmware based on Android 5.1; newer ones may have difficulties, so you will need to use other versions of the build tools. Unfortunately, we cannot describe all the nuances of the assembly, so you may have to Google it.
Installation
To install custom firmware, you need a custom TWRP recovery, which allows you to install unsigned or signed firmware with a test key (this is exactly what we created). In the magazine, we have repeatedly described the process of installing it, and in the forum threads dedicated to your device, there is usually enough information to do this.
 TWRP
TWRP Conclusions
This article describes only the tip of a huge iceberg called “firmware modification”. “Serious” firmware not only complements the kernel and the firmware itself with stock applications with many functions (which are often taken from other kernels and firmware), organizing or even changing the principles of their interaction, but can also radically change the operating principles of the OS. True, such a hack is no longer Android, but a separate OS, even if Play services can be installed there (by the way, such actions, to put it mildly, are not encouraged by Google). Well, don’t forget: all shells from manufacturers - TouchWiz, ZenUI, HTC Sense and so on - are just ordinary custom ones, maximally tied to the hardware of the device and to each other.
Need to flash Android using FastBoot, but don't know how? This article gives detailed instructions on using the FastBoot utility, how to use it, where to download it from and how to flash an Android device.
This manual will fully explain how to use FastBoot! How to use Fastboot to clean partitions, flash IMG files, reboot and many others.
Downloading and installing FastBoot
Before flashing Android using FastBoot, you need to download this utility and install it on the desired computer:
- You can download FastBoot from the Android developers page included platform-tools .
- Or use the program Adb Run, more precisely better , in which everything is included, and also knows how to unlock the Android pattern.
Why is ADB RUN better?
Launching the Fastboot utility
Depending on what you chose, downloaded the fastboot utility separately or selected adb run, the launch may differ!
If you downloaded Separately Fastboot
Extract the files:
- adb.exe
- AdbWinApi.dll
- AdbWinUsbApi.dll
- fastboot.exe
- libwinpthread-1.dll
Move them to the C:\ drive, Windows folder. You have successfully installed ADB and Fastboot on your computer!
After you have downloaded and installed FastBoot, open the " Command line".
Launch example command line Windows
Example ADB installations and Fastboot.
If you downloaded ADB RUN
If your choice fell on a proprietary program ADB RUN, then run it, type A and press Enter. 
It is advisable to place the files that need to be flashed in the same folder as the Fastboot utility.
Instructions on how to flash Android using FastBoot
It is very important to write commands and firmware files as they are specified!
If you have the command:
fastboot flash cache NazvaniAFiLe.img
then you need to write exactly this way, and not any other way. In other words case is important otherwise you will get - there is no such file.
Reboot Commands
Fastboot to firmware mode (bootloader)
- To start working with Android device Using Fastboot, first you need to put your smartphone or tablet into bootloader mode using adb:
adb reboot bootloader
- Reboot Android from firmware mode (bootloader) to the same mode:
fastboot reboot-bootloader
- Reboot Android from bootloader firmware mode to bootloader mode:
fastboot reboot-bootloader
- Reboot Android to normal mode from bootloader firmware mode:
fastboot reboot
The command "sees" your Android PC
Make it a habit before doing anything in Fastboot to check if there is a connection between your computer and Android:
- Checking whether the PC “sees” your Android:
fastboot devices
This command must be executed when the device is already in firmware mode (bootloader)
Commands for unlocking and locking Google Pixel, Nexus bootloader in Fastboot
- Unlock bootloader for Pixel, Nexus:
fastboot oem unlock
fastboot flashing unlock
- Lock bootloader for Pixel, Nexus:
fastboot oem lock
Command to find out bootloader version
Shows the bootloader version number installed on Android:
fastboot getvar version-bootloader
Commands for formatting a partition in Fastboot
Before flashing any partition in Android, you must first format it so that there are no problems with operation
fastboot erase Imya_razdela— erase partition: boot, radio, recovery, system, userdata and others.
- Erases the Cache partition in Fastboot:
fastboot erase cache
- Erases the Date section (Data/UserData) in Fastboot:
fastboot erase userdata
- Erases the System partition in Fastboot:
fastboot erase system
- Erases the Recovery partition in Fastboot:
fastboot erase recovery
Commands for flashing Android partitions in Fastboot
After you have formatted the Android partition or partitions, you can proceed to next step, firmware:
fastboot flash Imya_razdela imya_file.img— firmware of the selected partition: boot, radio, recovery, system, userdata and others.
- Flash the system partition:
fastboot flash system imya.img
- Flash the cache partition:
fastboot flash cache imya.img
- Flash the Data section:
fastboot flash userdata imya.img
- Flash the Recovery partition:
fastboot flash recovery imya.img

- Flash all partitions (boot, recovery and system):
fastboot flashall
Command to install update.zip
Flashes an update archive on Android in the update.zip format - a ZIP archive with IMG images of various sections:
fastboot update filename.zip
For Sony devices
Checking the connection of the Sony device, if the answer is 0.3 device, then it is connected:
fastboot.exe -i 0x0fce getvar version
Unlock bootloader
fastboot.exe -i 0x0fce oem unlock 0xReceived_Key
More detailed information to unlock Bootloader Sony - How to unlock Bootloader Sony
Waiting for Device error
If you have the following message on in the command window for a long time: waiting for device- Means:
- The driver is not installed or installed incorrectly - reinstall or install
- Android device is not in Bootloader mode - translate
- Incorrect connection to USB port- use the rear ones USB ports 2.0 computers, do not use USB hubs
Video example of working with the Fastboot utility
For those who don't understand anything!
For those who don’t understand anything, then use the proprietary application ADB RUN, this program contains almost all the commands that are needed for FASTBOOT!
Below is an example of how ADB RUN works - how to quickly flash a Recovery file using ADB RUN in less than 5 seconds (just don’t forget to switch to bootloader mode first)! 
That's it! Read more articles and instructions in the section Articles and Android Hacks. Stay with the site, it will be even more interesting!
Interpolation, interpolation- in computational mathematics, a method of finding intermediate values of a quantity from an existing discrete set of known values.
Many of those who deal with scientific and engineering calculations often have to operate with sets of values obtained empirically or by random sampling. As a rule, based on these sets, it is necessary to construct a function into which other obtained values could fall with high accuracy. This task is called approximation. Interpolation is a type of approximation in which the curve of the constructed function passes exactly through the available data points.
There are many finite difference interpolation methods. Most
Newton's method for forward interpolation (Newton-Gregory method) is common. The interpolation polynomial in this case has the form:
We find coefficients C using the formula:
Implementation of the program in C#:
using System; namespace Interpolation ( class Program…
Visualization of sorting algorithms
The program is divided into two threads in one of which sorting is performed, and in the other the graphical interface is redrawn. After clicking on the “Sort” button, the program calls the “RunSorting” method, in which the sorting algorithm is defined and a new thread is created with the sorting process running in it.
private void RunSo…
Kacher Brovina on KT819G
Today I want to show my Kacher, which I made last winter holidays. I will not describe the entire manufacturing process, since there are many articles on the Internet. I will write only about its main parameters.
Below are a few photos taken during assembly of the device.
The coil is wound with approximately 2000 turns of 0.08 mm wire on a PVC pipe with a diameter of 50 mm and a height of 200 mm.
A plate made of old tough disk. Everything else was assembled according to the diagram located at the very bottom of the page.
The first option was powered from the power supply of an old computer, with a voltage of 12 V. Then a separate power supply was made, with a voltage of 30 V and with built-in cooling.
Device diagram:
What is CORS and how to use it
Cross-domain resource sharing (CORS) is a W3C specification that allows cross-domain communication in the browser. By building on top of the XMLHttpRequest object, CORS allows developers to work with the same idioms as requests with the same domain. The use case for CORS is simple. Imagine that alice.com has some data that bob.com wants to obtain. This type of request is traditionally not allowed under the same browser origin policy. However, by supporting CORS requests, alice.com can add some special response headers that allow bob.com to access the data. As you can see from this example, CORS support requires coordination between the server and client. Luckily, if you're a client-side developer, you're protected from most of these details. The rest of this article shows how clients can make cross-origin requests and how servers can configure themselves to support CORS. Continued…
For those who want to start the journey of creating their own firmware for Sony based on official ones, you need to know how to unpack Sony firmware in FTF format.
What is needed?
1. Computer
2. Download latest version not an official flasher FlashTool and install
3. Download Unix image manager ext2explore.exe
3. Download and install the free 7-zip archiver
4. Sony firmware in FTF format
Instructions on how to unpack Sony firmware in FTF format
1. Right-click on the FTF firmware - open the archive or unpack from the archive
2. After installing FlashTool, go to the path C:Flashtool  3. Launch the FlashTool program and select the menu in the panel Tools -> Sin Editor
4. Select the sin file extracted from the ftf firmware in the Sin Editor and click Extract data. After this, the process of converting the firmware file into readable form will begin.  5. As a result, you can get a new file with the extension yassf2 or ext4 or elf
If the file *. yassf2
Select Tools -> Yaffs2, after which a window will appear to select a file, select a file with the extension *.yasff2

In a couple of minutes you will receive a folder with files that were in the firmware

If the file is *.ext4 or *.elf
1. If you have a file with the extension *.elf, then rename it to *.ext4
2. Run the previously downloaded ext2explore program, select the firmware file, after which the contents of the firmware will appear in the window, now you can save the contents. 
What's next?
If you plan to create a flashable update.zip in the future, then you should go to the article - creating an Updater Script
How to correctly extract the kernel from FTF firmware?
In order to get the “correct” kernel for flashing using update.zip, you will need the same Flashtool.
1. Open the FTF firmware with an archiver and extract kernel.sin 
For each smartphone or tablet, there are both official and custom firmware. Their installation is carried out in different ways: OTA updates arrive by air, firmware in ZIP archives are installed manually via CWM, TWRP Recovery or application ROM Manager using a computer, you can flash Android using the Fastboot and SP utilities Flash Tool.
After Android firmware, all data from internal memory will be erased, so to save contacts, settings and applications, first .
Android firmware via Recovery
Unofficial firmware in ZIP format, such as CyanogenMod, can be installed through custom Recovery: CWM or TWRP, as well as applications that use Recovery, for example, ROM Manager. Cores and patches are sewn in the same way. To download the official “Update.zip”, the capabilities of the standard recovery mode are enough, for more details, see the article at the link above.
Install the ZIP file in CWM
All devices out of the box have stock Recovery from the manufacturer; instead, you need to install CWM using . Then find and download the ZIP archive with the firmware. Please note that firmware of other formats cannot be installed via CWM.
1. Now go to Recovery. To do this, turn off the device and press a certain combination of buttons. Depending on the manufacturer, the key combination differs, all are presented below possible options(the new one says how to enter Recovery on specific models):
- Volume up + power button
- Volume down + power button
- Volume up/down + power button + “Home”
- Volume up + volume down + power button
Great, you are in Recovery. Movement is carried out using the volume buttons, and confirmation of the choice is done with the power button.
2. Before installing the firmware, you must first reset the settings: select “wipe data/factory reset”.


4. Great! Return to the main menu and select "install zip".

5. After that “Choose zip from /sdcard”.

6. Navigate to the folder where you saved the firmware and select it.

7. A confirmation message will appear. Click “Yes – Install...”.

8. The firmware installation process will go through and at the end the message “Install from sdcard complete” will appear at the bottom of the screen.
Great, Android is flashed. Returning to the main menu CWM Recovery and reboot the system. To do this, select “reboot system now”.

How to install firmware via TWRP Recovery
If you prefer TWRP Recovery rather than CWM, flash it using . You can also install firmware from a ZIP archive through it:
1. Download the firmware and place it in any convenient place in the smartphone's memory.
2. Go to TWRP. This is done in the same way as CWM.
3. Now you need to reset the system. To do this, select "Wipe" from the main menu.

4. To initiate a factory reset, drag the slider to the right.

5. When you finish cleaning your smartphone or tablet, press the “Back” button.

6. You will be returned to the main TWRP Recovery menu. Now let's move directly to the firmware itself. To do this, select “Install”.

7. Navigate to the location in memory where the firmware is saved. Click on it.

8. Drag the slider to the right to begin installing the firmware.

9. The process will begin. It usually lasts 2-3 minutes.

10. At the end, a message indicating the successful completion of the firmware will appear. Click on "Reboot System" to boot into Android.

Considered another way to flash Android using a ZIP update. You can also use a special application. More on this below.
Using ROM Manager
The ROM Manager application allows . By the way, I advise you to make a backup of the internal memory before flashing the firmware in order to restore the data later. Now we will use another function of the program: flashing the phone using ROM Manager.
Utilities are needed to work root rights– they are obtained using exploits: , or .
A custom Recovery must be installed (essentially, using ROM Manager you flash the device through it, but at the same time you work with a simple and clear application interface, not Recovery). Links to instructions are in the previous paragraphs.
So, install ROM Manager, find and download the required firmware for your device. Open the application and follow the instructions:
1. Place the .zip archive of the firmware in the memory of your Android phone or tablet.
2. In the ROM Manager menu, open the “Install ROM from SD card” item.
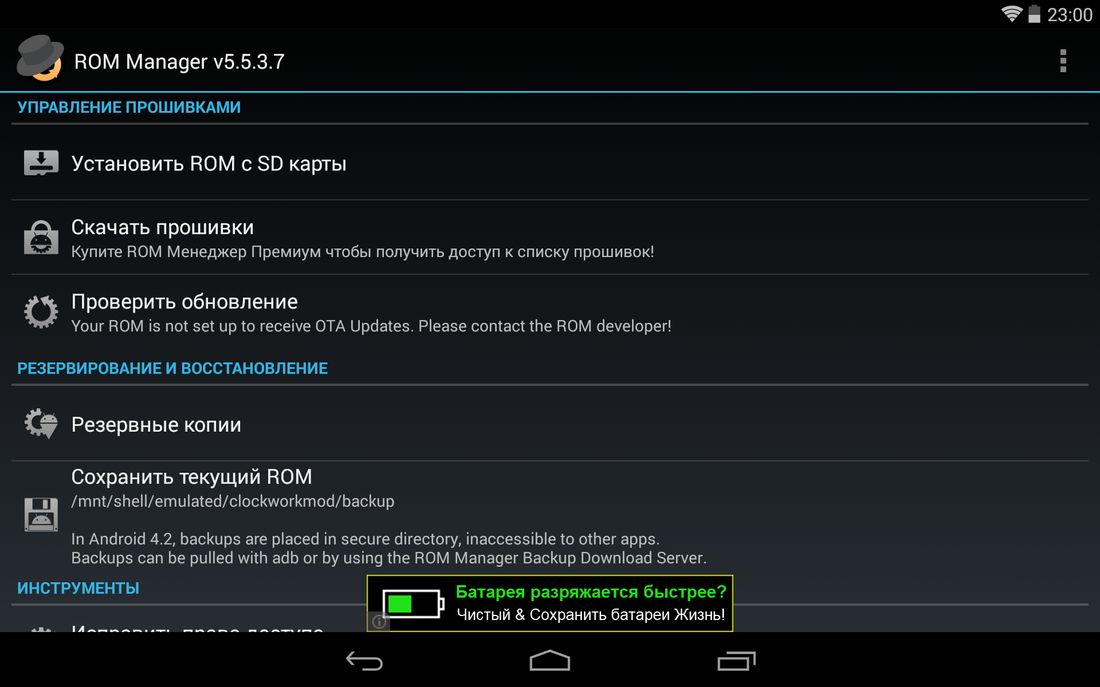
3. Find the archive and click on it.

4. In the menu that opens, select “Reboot and Install”. I advise you to check the box next to “Save current ROM” so that you can restore the system if necessary.

5. In the next window, click “OK”, after which the device will boot into Recovery mode and the firmware process will begin.

ROM Manager also has a function to search for ROMs for a device. In the main menu of the program, select “Download firmware”. Some of them are only available in the premium version of the program.

Above I talked about three ways to install firmware from ZIP archives on the device itself. Next will be information about updating Android firmware using a PC.
How to flash Android via computer
Many mobile devices are flashed using special utilities for PC: below are instructions for working with Fastboot and SP Flash Tool. Through the second program various manipulations are carried out with Chinese phones based on Mediatek processors.
Fastboot: instructions for flashing phone firmware
Many firmwares must be installed from a computer using the Fastboot utility, rebooting the mobile device into the mode of the same name. The program is included in the Android SDK Platform Tools, the installation of which is described in. In addition, you will need drivers (all information is available at the link).
Also, on devices from some manufacturers, you must first unlock the Bootloader:
- How to do it on HTC:
Next, download the archive from the required firmware and unzip it in the “platform-tools” folder, which contains “ADB” and “fastboot”. It should look something like this (I have the necessary components in separate folder"adb")

Then we connect Android to the computer via USB and put the smartphone or tablet into fastboot mode. The easiest way to do this is as follows:
- Turn on
- On the computer go to the command line
- We enter the commands sequentially and after each press “Enter”:
CD path to the "adb" file
For example, it is located in "C:\Program Files (x86)\Android\android-sdk\platform-tools". Then the path will look like this:
cd Program Files (x86)\Android\android-sdk\platform-tools
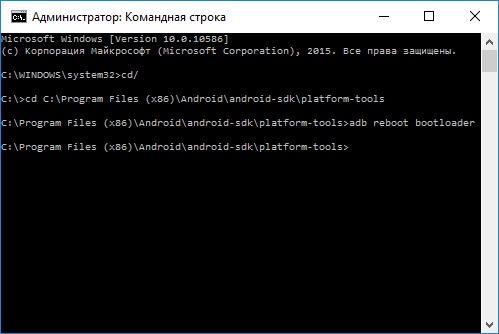
Then the Android gadget will reboot into fastboot mode.

Before flashing any partition of the system, you first need to format it so that there are no problems with operation. To do this, use the commands (after entering each one, press “Enter”):
fastboot erase boot
fastboot erase userdata
fastboot erase system
fastboot erase recovery
fastboot erase cache
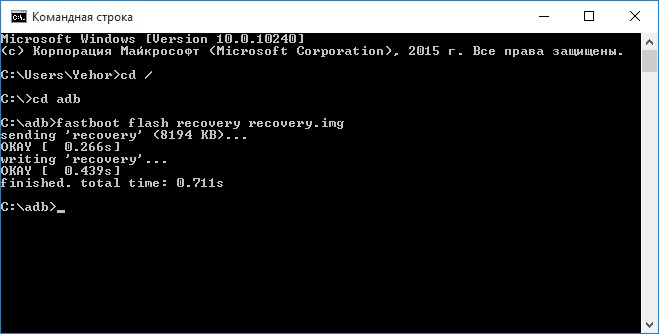
After cleaning the partitions, you can flash them. Enter the commands (there may be more of them - it all depends on the presence of certain files in a particular firmware; below is a set of basic ones):
fastboot flash boot imya-fayla.img
fastboot flash userdata imya-fayla.img
fastboot flash system imya-fayla.img
fastboot flash recovery imya-fayla.img
fastboot flash cache imya-fayla.img
“Imya-fayla.img” is the name of the corresponding firmware file. For example, since in my case Recovery is being created and its image is called “recovery.img”, I enter:
fastboot flash recovery recovery.img
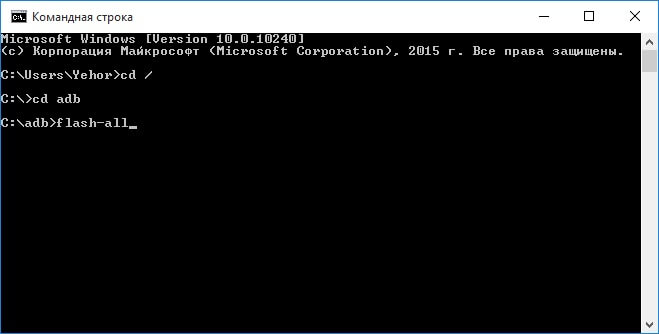
Usually the firmware can be installed in its entirety, that is, flashing all the files at once. To do this, “flash-all.bat” must be located in the folder with the firmware files. If it is, then simply enter this command and the firmware installation process will begin:
As a result, at the end a message indicating the successful completion of the firmware will appear.

You can boot the system. To do this, you need to exit fastboot mode on the device itself or using a computer. In the second case, you need to enter another command:
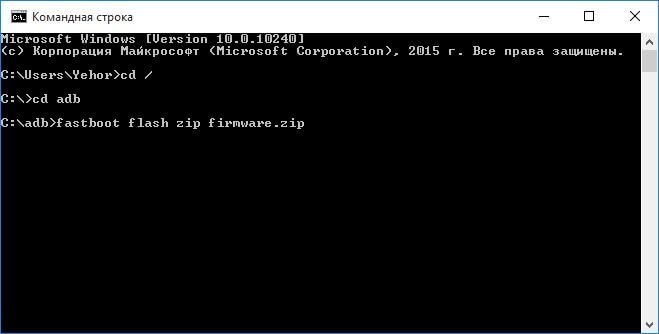
Installing ZIP updates in Fastboot
Using Fastboot you can install ZIP firmware. To do this, download and place the firmware in the folder where “ADB” is located. Put your smartphone or tablet into fastboot mode and enter the command:
fastboot flash zip imya-fayla.zip
“Imya-fayla.zip” is the name of your firmware, replace it with your own.
Wait for Android installation to complete and reboot your device.
SP Flash Tool: flashing Chinese Android smartphones on MTK
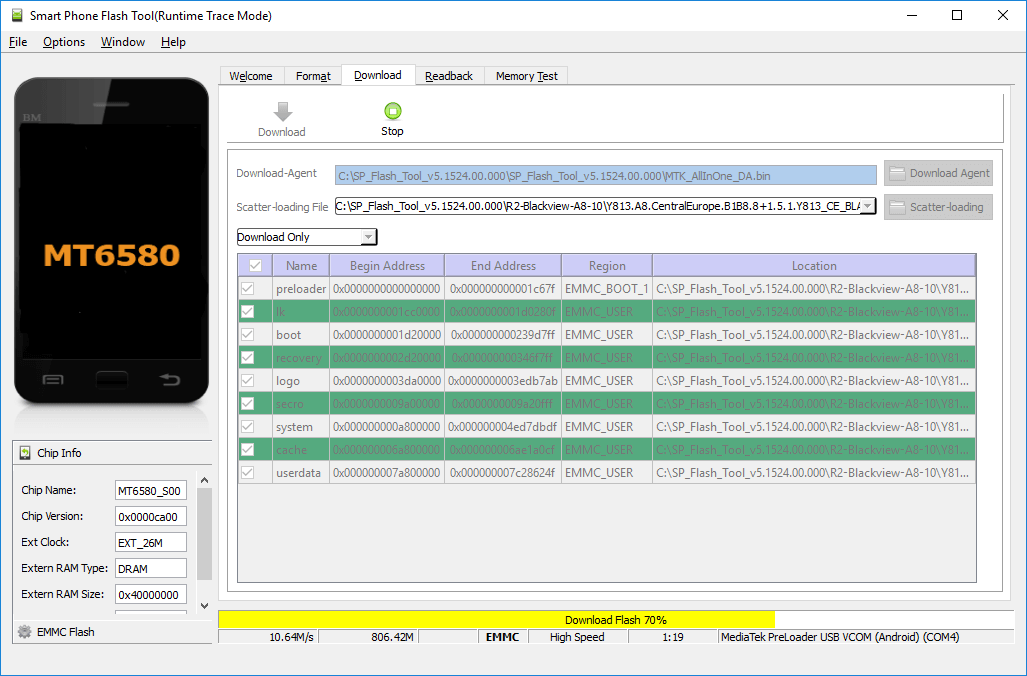
Chinese Fly smartphones, Lenovo, Xiaomi, Meizu, ZTE, Doogee, Bluboo, UMI, Elephone, Oukitel, Blackview and others running on MTK processors are flashed special utility SP Flash Tool. She can sew individual sections, format the system and create backups. Models based on MT6572, MT6577, MT6580, MT6582, MT6589, MT6592, MT6750, MT6737, Helio P10, Helio P20, Helio X10, Helio X20 and other less popular chips are supported.
The current version of the program is available on the website: http://spflashtool.com/. Before starting the process, install USB drivers for the MTK processor (the link to the FAQ is in the “Fastboot” paragraph of this manual).
1. Unzip the SP Flash Tool folder on the “C:\” drive and place the firmware next to it. The path to the files must not contain Cyrillic characters.
2. The folder contains the file “flash_tool”. Launch it.

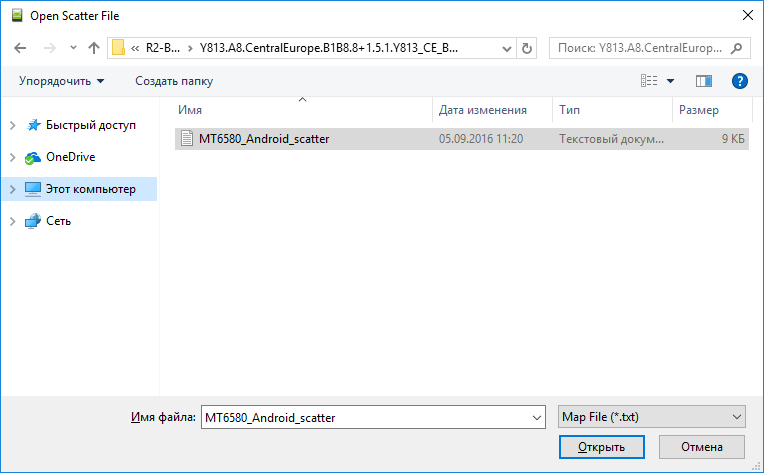
3. In the “Download-agent” field the path to “MTK_AllInOne_DA.bin” will already be indicated. Next, you need to click “Scatter-loading” and select the scatter file in the folder with the firmware.

4. Leave the switch on “Download Only” and mark which partitions need to be flashed (by default, all are selected).

5. Click “Download”. Then turn off the phone, remove the battery for a few seconds, insert it back and connect the switched off Android smartphone to a computer via USB.

6. First the red bar “Download DA 100%” will appear.

7. Then yellow with the firmware process. The percentages indicate how close the installation is to completion.