To remove or reset the password when entering, you will have to arm yourself with certain knowledge. This article will discuss a solution to this common problem with an example latest versions operating system.
Remove password in Windows 7
Read also: How to set a password for a Windows folder? | 7 Best Ways and Programs for Encryption | 2019
First of all, let's decide how to remove the password when entering Windows 7.

Each time you log in, a password window appears., where you need to enter a previously invented combination of letters and numbers.
But if you enter it, and the system writes that the password is incorrect, this means only one thing - your memory could not store this important amount of information in itself.
However, in order to recover the password in the "seven" you need at least a flash drive with special data to reset the password. What if you simply don't have such a flash drive?
For these purposes, you will have to use the theme boot disk from which the operating system was installed on your Personal Computer.
Entering the computer BIOS
Read also: How to enter BIOS? All possible ways to log in on a PC and laptop under Windows
The next step is to reboot the computer in order to be able to enter it (Basic Input / Output System), which is nothing more than the basic input and output system.

In order to enter this very BIOS, you need to press a certain key combination in the first seconds of starting the operating system.
In most cases, this combination is the Del and F2 keyboard shortcut.
If you do everything correctly, a blue BIOS window will open in front of you.
Remember that you will not be able to navigate through the tabs available in the BIOS using a computer. In this case, you will have to use the arrow keys on the keyboard.
Use the arrow key to navigate to the Boot tab, which contains a list of all boot devices available on your computer.
It is worth noting that in some BIOS versions the Boot tab may be named Boot Sequence.
Going to the Boot menu window, you will see a list of available devices from which you will need to select CD-Rom Drive.
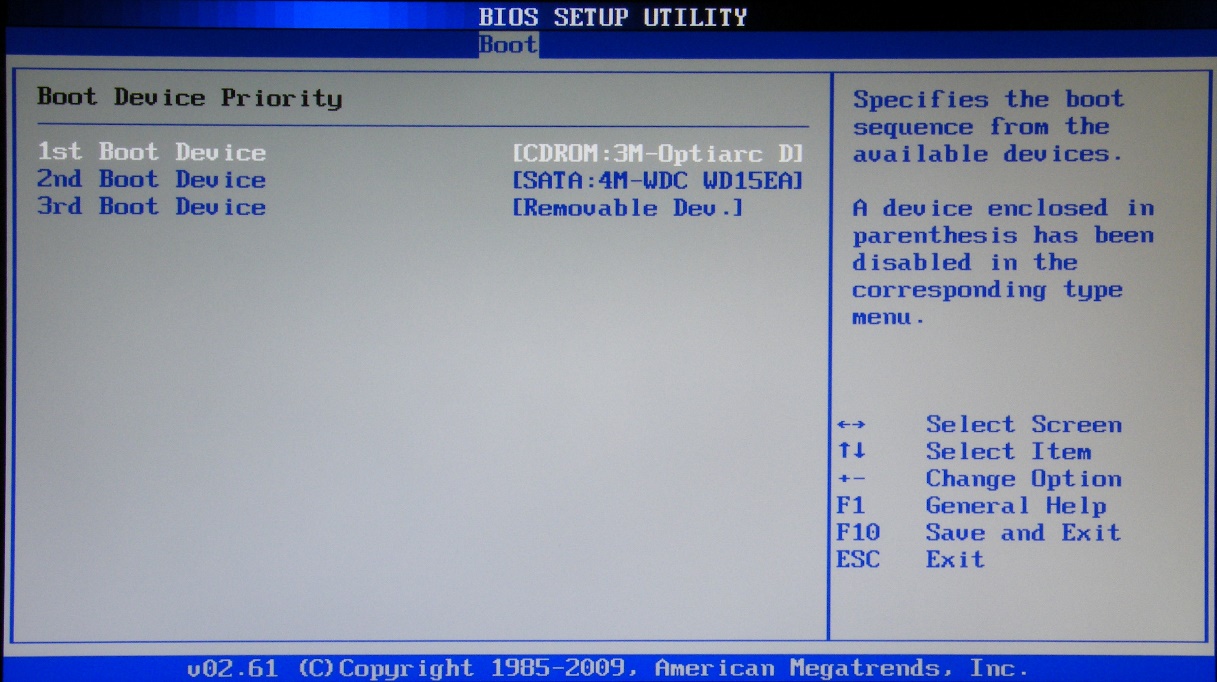
In this case, you will indicate to the system that the CD-ROM is a priority at startup and that it will be done from the disk.
After that, press the F10 button, after which the changes made will be saved, the BIOS exited and the computer rebooted.
During the reboot process, the installation disk, which will open the Windows7 Installer window.

From the list presented, select the item with system recovery and wait until the search for Windows systems installed on the computer ends.
On the page of the operating system found, select the lowest item - " Command line ”, After which the Administrator window will open.

It is necessary to register the path to the registry editor:
- C: \ Windows> regedit
- C: \ Windows
After the window of the registry editor opens, select the item in the left part of the window from the list « HKEY_LOCAL_MACHINE» .

After that, at the top of the window, click on the menu " File"And indicate in the drop-down list -" Upload bush».

Thus, you will create a new section, during which you will be required to enter its name - this is not so important, so enter anything you want (for example - 000) and click to confirm on the button " OK».
After the section with the name you specified is created - it will appear in the list HKEY_LOKAL_MACHINE in the form of a familiar folder.
By clicking on this folder, you will open its contents, in which you will need to select the item Setup.
When you select this item, a list of files will be displayed on the right side of the registry editor window, among which there will be CmdLine.
Click on it with the right mouse button and in the pop-up window select “ Edit". Then - in the window that opens, change the string parameter in the line “ Value"Register cmd.exe and confirm it using the button" OK».
After that, it is also necessary to change the value of the SetupType parameter in the same way as CmdLine, but with only one difference - in the window “ The values»Enter a number 2 and click " OK».
After making the changes, go back to the menu " File"And select the item" Unload the bush».
In the opened confirmation window for unloading the bush, click on the button " Yes"And close all windows on the screen - giving the command to restart the computer.
At the beginning of loading the operating system, the cmd.exe administrator window will appear, in which you must enter a new username and.
The line will look like this:
C: \ Windows | system32> net user Admin pass
If you did everything correctly, a message will appear under this line stating that the command was completed successfully.
After that, in the next line, you must give the command to exit.
This is how this procedure will look like:
C: \ Windows | system32> exit
After that, the administrator window can be closed, and in the password entry field when entering Windows 7, enter its new value.
Reset password in Windows 8
Read also: [Instructions] What to do if a folder on a Windows computer is not deleted? | 3 solutions
After you install the operating system on your computer Windows systems 8 - you will face the annoying requirement to enter a password each time you log in to the system.

Not everyone likes the constant entry of their password, therefore, quite often a quite reasonable question arises - how to remove the Windows 8 password at the entrance, because it is much more pleasant to enter the system without any delay.
For these purposes, you will need to perform a number of specific actions:
First, you need to start your computer and log in to the system using your account.
After that, move the mouse cursor to the extreme right position of the screen so that the standard sidebar appears.
On it, you will need to select the search icon, which is located at the very top of the panel.
In the search window that opens, enter the search phrase " Computer settings", During which two menus are immediately displayed -" Computer settings"And" Control Panel».
Your task will be to turn to the item of parameters, after which the window of the same name will be transferred to Windows 8.
On the left side of this window - under the computer settings label - there is a list of all available parameters, among which there is the one that you need - “ Accounts».
Going to the accounts window, you will need to select the line - " Login options».

All existing parameters will be displayed on the right side of the window - namely:
- Login required;
- password;
- pin;
- graphic password.
To completely remove the password requirement, you will need to click on the " Edit"Located under the item" Password».
After clicking this button, an informational pop-up window will appear, which contains a warning that the setting you are changing affects all accounts on this computer.
If you are not at all worried that anyone will be able to log into the computer due to the lack of a password, feel free to press the button "Change".
By completing this procedure, you will save yourself the trouble of entering a password each time you log on to the system.
Resetting a lost password in Windows 8
Read also: [Instructions] How to create an ISO image: TOP-3 best programs for Windows 7/10
The next option allows you to reset a forgotten or lost password in Windows 8.
Let's say you forgot your password and can't log in in any way. Then you need in the menu " Start"And go to the choice of action, the list of which contains the functions" Proceed», « Diagnostics"And" Shutting down your computer».

In this case, you will need to select the item " Diagnostics».
In the diagnostic window that opens, you will see three new items:
- restore - when you select it, all your files will remain intact;
- return to its original state - this item means deleting your files;
- Extra options.
To reset your password, you need to refer to the item " Return to original state”, During which all your personal files and applications will be deleted.
During this procedure, all computer settings will be returned to their default values.
After the 1809 update, a very interesting thing appeared in the top ten. When you set a password when installing Windows, you are asked three security questions. They are needed so that in the event of a non-standard situation, you can reset the password.
We just have to remember the answers to these questions, since the first method is based on them. Basically, if you know the answers well, then there will be no problems with the reset.
Here's what you need to do:
We start the computer and wait for the screen for entering the password to load. When it appears, you need to click on the link "Reset the password"(or "I forgot my password" in the English version of the OS).

This will take you to your desktop and your password will be reset. This is the easiest and most reliable way. But it also happens that the user does not remember the answer to the questions. What to do in this case? There is also a way out in this situation.
Command line and bootable USB stick
Read also: [Instructions] Installing Windows 10 from a USB flash drive: a description of the process from creating a bootable image to completing the OS installation
This method is rather complicated. And it will require a bootable USB drive with the Windows 10 distribution. Only then will our efforts be crowned with success. If the flash drive is suddenly not at hand, then the disk with the distribution kit will do.
The main thing here is not to confuse anything. Working with the console requires concentration and some free time. Be that as it may, if everything is followed according to the instructions, then nothing terrible will happen.
And here is the instruction itself:
We insert the USB flash drive into the port and boot from it. When choosing a language and region, press on the keyboard "Shift + F10"... This command will load the console. Then enter the commands in the console "Diskpart" (1) and "List volume" (2)... After each of them we press Enter. In the list of disks, you need to remember the one on which Windows is installed. In our case it is "C" (3). After that, we type the command "Exit" (4) and click "Enter" on keyboard.
Now we sequentially enter the commands "Move c: \ windows \ system32 \ utilman.exe c: \ windows \ system32 \ utilman2.exe" (1) and "Copy c: \ windows \ system32 \ cmd.exe c: \ windows \ system32 \ utilman.exe" (2). Do not forget to press after each Enter. Note that your command may have a completely different drive letter. Be extremely careful with this.
After that, all that remains is to reboot the machine and boot from the system disk.
The login password will be reset. It should be noted that this method works exclusively for local accounts. It can't handle Microsoft accounts.
The G8 has one cool feature - saving user settings and synchronizing them with a personal Microsoft account. It is very convenient. For example, when reinstalling the OS, you do not have to re-install them - you just need to restore using your own account.
But there is also a minus - due to the excessive "care" of the developers, the system constantly requires a password when entering Windows 8. And this is annoying. Especially if only you use a laptop or computer, and there is no need for such protection. It is logical that in such a situation you would like to remove the password when entering Windows 8.
The first way is to disable the password (password) via the command line
This is done as follows:

Then open "Computer Settings", find the "Login Options" item and in the "Policy" section click on the "Change" button.

This is how you can remove your password when you log on to Windows 8. This is the classic method that should help in most cases.
What if Windows 8 asks for a password upon login, as before? Try the next option.
Here the instruction is also simple. To remove the password when turning on Windows 8, do the following

You can now log into Windows 8 without a password.
This method implies the rejection of accounting. recording and switching to local. Thus, you are deprived of the advantages that the first option gives. Of course, in this way you can turn off the password prompt when starting Windows, but it is still not recommended to use it. Better try again the standard method above.
For many, it is no secret that a characteristic feature of windows 8.1 is linking to a Microsoft account. Although it is not mandatory, nevertheless, if during the installation of windows 8.1, the Internet is connected to the computer or laptop on which it is installed, then you will have no choice but to log into a Microsoft account or create a new one.
This means that at each booting windows 8.1 you need to enter a password. You will learn how to get rid of this password and disable it when entering windows 8.1 in this article.
So, first you need to move the mouse cursor to the lower right corner of the desktop until the panel with the "Options" button appears.
Switching to Windows 8.1 settings mode
After clicking on "Options" select "Change computer settings".

Change settings windows computer 8.1
In the window that appears, in the menu on the left, select "Accounts".

Account Management in Windows 8.1
In the account administration window on the left, select "Your account" and in the window on the right under the email address, click the "Disable" button.

Disable Microsoft account
A window will appear in which the password from turning on the computer will be requested for the last time in order to make sure that the password is removed by the one who has access to the computer.

Entering a password to disable your Microsoft account

Setting the name of the local account in Windows 8.1
And at the end, you will be prompted to log out and log into it already under a local account without a password.
It's worth noting that all of your data won't go anywhere. Everything that was on local drives, as well as on the desktop and in the user's documents will remain in the new account.

Final stage when password is disabled at login
The best way thank the author of the article - repost to your page
More and more users are buying laptops with installed. Along with the increasing popularity of this system, the number of questions related to the use of the new Windows interface is increasing. In this article, we will answer one of these questions, namely, how to disable the password in Windows 8.
How to turn off Windows 8 password prompt
There are several ways to disable password in Windows 8. The first option we will consider is disabling the password prompt on system boot.
Open the starter Windows screen 8 and enter the netplwiz command.
Thereafter operating system Finish the search - run the netplwiz program.

In the window that opens, you need to uncheck the box next to the "Require username and password" function. When you close the window, the system will ask you to enter the current account.

After these steps, we restart the computer. After rebooting, the operating system will no longer require you to enter a password. Your account will be logged in automatically.
This method does not remove the password, but only disables its request when the computer starts up. In other situations, for example when changing a user, you will have to enter a password.
How to completely disable password in Windows 8
In order to completely disable the password in Windows 8, you need to delete it. To do this, open the Windows 8 start screen and launch the interface Windows settings by clicking on the link "Changing computer settings"

In the window that opens, open the "Accounts" section, and then "Login Options".

In the window that opens, click on the "Change" button in the "Password" section.

After that, you need to enter your current password and click on the "Next" button. The last step is the Change Password window.

Here you need to leave all fields empty, to do this, just click on the "Next" button. That's it, after that the password will be completely removed, and you can use the account without entering a password.
In the process Windows installations 10 on a computer voluntarily / compulsorily required to come up with a PIN code to log into the account. You won't be able to skip or ignore this installation step, but luckily the annoying pin code can be removed later. Although I would not recommend leaving your computer unprotected if there is any important data stored there. But this is a completely separate topic, and today we will find out how to remove pin and password in Windows 10.
How to remove a pin code in Windows 10
You can, of course, remove the pin code in Windows 10 different ways(although not a fact, I just do not exclude it). But I'll show you how I did it. You should like this method because it is simple and straightforward.
However, it is worth reminding you once again that by removing the pin code from your computer, you leave it practically defenseless. On the other hand, if you are sure that no one else but you will have access to it, then why not? But you can save a little time by not entering the PIN code every time you turn it on.
Step-by-step instructions on how to remove a pin code inWindows 10:
We figured out the PIN-code, but there is one more small nuance left. Now Windows 10 will ask you for your account password at startup. And the password, by the way, is even less pleasant and time consuming to enter than the PIN code. Therefore, further we will show you how to disable the password at login in Windows 10.
How to disable password in Windows 10
Before turning off the password in Windows 10, make sure that you have it written down somewhere or you remember it well. Because if you rarely use your password, you can easily forget it. And then, when you need it to confirm any changes to the settings in your Microsoft account, you will not be able to remember the password. Of course, it can be restored, but these are unnecessary chores that no one likes.
Disable passwordWindows 10 at logon:
- First, press Windows + R. In this case, Windows is the key on your keyboard with the Windows logo.
- In the window that appears, enter the phrase netplwiz to call up the account settings item we need.
- Directly in the "User accounts" settings window, uncheck the "Require username and password" checkbox.

Then click OK and restart your computer to make sure everything is applied. Oh yes, I almost forgot to apply these settings, you will need to enter your password two more times to confirm that it is you who are currently controlling the computer.
Personally, everything worked out for me. I'm pretty sure you have too. Now Windows 10 will not ask for a password or pin code when turning on the computer. If something went wrong with you, write in the comments below, let's try to figure it out. If you managed to mess up very much, then use it to return the previous state of your operating system.
Have you read to the very end?
Was this helpful?
Well no
What exactly did you dislike? Was the article incomplete or false?
Write in comments and we promise to improve!