Once you're comfortable with the Arduino software and have a good grasp of the standard features, you'll probably want to extend the capabilities of your Arduino with additional libraries.
What is a library?
A library is a set of functions designed to make it as easy as possible to work with various sensors, LCD screens, modules, etc. For example, the built-in LiquidCrystal library allows you to easily interact with character LCD screens. There are hundreds of additional libraries that can be downloaded from the Internet. Standard Libraries Arduino and a number of commonly used additional libraries are listed in the help. But before using additional libraries, you must first install them.
How to install the library
Most often, libraries are laid out in the form of a ZIP archive or just a folder. The name of this folder is the name of the library. Inside the folder there will be a file with the extension .cpp, file extension .h, as well as text file keywords.txt, example folder examples and other files required by the library.
Automatic installation
Starting from version 1.0.5, third-party libraries can be installed directly in the development environment.
Do not unpack the downloaded archive with the library - leave it as it is.
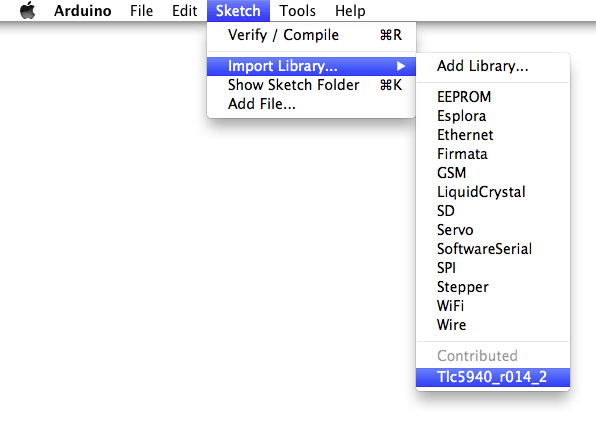
In the Arduino development environment, select the menu Sketch > Import Library. At the very top of the drop-down list, select Add Library(Add library).
A dialog box will appear prompting you to select the library you would like to add. Navigate to the downloaded zip file and open it.

Open the menu again Sketch > Import Library. You should see the new library at the very bottom of the drop down list. Now the library can be used in programs.
zip file will be already unpacked in the directory libraries inside your working folder Arduino.
Note: after performing these steps, the library can be fully used in your programs, however, examples from the installed library will appear in the menu File > Examples only after restarting the Arduino environment.
Manual installation
Before installing the library, close the Arduino development environment.
Then unpack the ZIP archive with the library. Let's say you install the "ArduinoParty" library - extract the file ArduinoParty.zip. It should contain a folder Arduino Party with files ArduinoParty.cpp and ArduinoParty.h. (If the files with the extension .cpp and .h are not in a folder, you need to create it. In this case, you need to create a folder named Arduino Party and transfer all files from the ZIP archive to it, for example - ArduinoParty.cpp and ArduinoParty.h).
Drag folder Arduino Party to the Arduino libraries directory. On Windows, it will be something like this: "My Documents\Arduino\libraries", for Mac users it is here: "Documents/Arduino/libraries" and on Linux systems the directory is " libraries" will be inside the working folder with sketches.
After moving your libraries directory should look something like this (under Windows):
My Documents\Arduino\libraries\ArduinoParty\ArduinoParty.cpp My Documents\Arduino\libraries\ArduinoParty\ArduinoParty.h My Documents\Arduino\libraries\ArduinoParty\examples ....
or like this (on Mac):
Documents/Arduino/libraries/ArduinoParty/ArduinoParty.cpp Documents/Arduino/libraries/ArduinoParty/ArduinoParty.h Documents/Arduino/libraries/ArduinoParty/examples ...
and similarly on Linux.
Beyond Files .cpp and .h there may be other files here - just make sure they are all here now.
(If the files .cpp and .h located in the root of the "libraries" folder or nested inside another folder, the downloaded library will not work. For example:
Documents\Arduino\libraries\ArduinoParty.cpp and Documents\Arduino\libraries\ArduinoParty\ArduinoParty\ArduinoParty.cpp
Not a working example.)
Restart the Arduino environment. Make sure the new library appears in the menu Sketch->Import Library.
That's all! You have installed the library!
The text of this manual is published under the Creative Commons Attribution-ShareAlike 3.0 license. The code examples found in the manual are free content.
One of the reasons for the popularity of Arduino is the ease of use of a variety of peripheral devices (modules): displays, motor drivers, modules wireless communication(Bluetooth, wi-fi, XBee or ISM), etc.
The Arduino Software Environment (IDE) includes many useful features, facilitating the creation of programs for new projects. But, unfortunately, it cannot have built-in support for every newly appeared new hardware (module) or software component.
Instead, "libraries" are supported, which are self-contained modules designed to extend the software environment, add specific features, or add hardware support.
The main source of libraries for Arduino are hardware manufacturers who create them to provide support in the Arduino IDE.
Where can I find libraries for Arduino
If you need Arduino support for a particular piece of hardware (module), try looking at the module manufacturer's website. You can also visit the Arduino website, which has a collection of popular libraries.
Otherwise, try a Google search, such as "Arduino library" followed by the name of your hardware.
As mentioned above, the Arduino development environment has pre-installed libraries. In order for the library functions to be available in our program, you first need to connect it. For this, the #include directive is used.
Connecting the built-in library is called from the menu "Sketch - Connect Library - ...", then select the required library (in our case, "Servo").
When you select a library, the Arduino IDE will automatically add the appropriate #include directive to your code.
#include
If the IDE does not have the required pre-installed library, then you need to install it yourself. There are 2 ways to do this.
First way: Adding a library from the Arduino repository.
The creators of Arduino posted a database of various libraries on the Internet. If you are missing some library, then you can look for it in the repository. To do this, select Sketch - Connect Library - Manage Libraries from the menu.

In this window, you can download a new library from the Internet or update an existing library. 
Second way: Adding a library downloaded from the Internet.
Since almost everything in the Arduino environment is easy and simple, installing additional libraries is also not very difficult. As an example, we will show the installation of the library for working with the radio module of the NRF24L01 wireless communication system from Nordic Semiconductor.
Arduino libraries for the most popular modules are available at http://arduino.cc/libraries. Software(libraries) for less popular modules, as a rule, are located on the websites of the manufacturers of these modules.
In the case of the NRF24L01 radio module, the library for supporting this module in the Arduino environment was created based on the library developed for AVR microcontrollers. The documentation for this library and the library itself can be downloaded from https://github.com/stanleyseow/arduino-nrf24l01
After you have downloaded the arduino-nrf24l01-master.zip library archive, you need to install it in the IDE. To do this, go to the menu "Sketch - Include Library - Add ZIP Library"

Then specify the location of the downloaded arduino-nrf24l01-master.zip file and click the Open button.

After that, as a rule, we have the installed library. But, unfortunately, it often happens that the Arduino signals the error "The selected folder / zip file does not contain the correct libraries"
In this case, the library can be installed manually. To do this, you need to unpack the downloaded arduino-nrf24l01-master.zip file and copy the “Mirf” folder to the “libraries” folder. Or you can put the "Mirf" folder in C:\….\Documents\Arduino\libraries (then the library will be available from different IDE versions).
After restarting the Arduino IDE, we can connect this library, as well as use the examples for the NRF24L01 radio module

How to delete a library in Arduino
If you figured out how you can install a new library in the IDE, then it will not be a problem for you to remove it (if necessary).
All you have to do to remove a library is to remove the library folder from the "libraries" directory in the IDE or (if the library is installed in "Documents") from the C:\….\Documents\Arduino\libraries directory
Installing and connecting the library to Arduino
- a fairly common operation for those who work with this platform. They store various methods and data structures that are needed to simplify the work with sensors, indicators, modules and other components. This is necessary in order not to delve into the architecture of the plug-in and focus on creating the main program.
Before you start using the methods and functions of libraries, you need to download it to your computer, place it in the right folder and connect it to the program (insert the text #include<файл.h>in sketch).
Exist some ways to add third-party libraries:
- specifying a zip archive
- manual placement in the library directory
- installation from off. repository
Each installed library contains one or more examples to work with. They are used to check the functionality of the connected module and display its capabilities. To do this, select File in the Main Menu, then the Examples tab:

Library download.
To date, there are a huge number of libraries that can be downloaded on the Internet. Most of the libraries are available on the Github site. Once downloaded, it is important to add it to the correct folder. The library is downloaded as a ZIP archive.
to installwithout uploading it from the archive, you need to go to the menu Sketch - Include Library - Add .ZIP Library.

When the window opens, select the folder where the archive with the library was saved:

Then you need to select the downloaded file and click "Open":

If during the process the program did not give any errors related to the archive, then the library is installed and can be used.
Manual installation from .ZIP archive.
You must exit the Arduino IDE before starting the installation. The downloaded archive needs to be unpacked. The output will be a folder in which the library files with the .cpp and .h extensions and additional directories are located. The folder should be placed in /Documents/Arduino/libraries.

Next, launch the Arduino IDE, the downloaded library will be available through Sketch - Connect Library.
Adding a library from the official Arduino repository.
To do this, open the Arduino IDE - sketch - Connect library - Manage libraries.

In the search box, enter a search query, for example DHT22.

Editing libraries or a sign of good manners.
In the process of assembling various projects, the number of connected libraries grows exponentially. To optimize the process of compiling a program, you can add .cpp and .h library files to the folder with each individual project, which are necessary for working with connected modules:

After starting the program, the tabs will contain library files available for editing.
DLL is a file extension which is a kind of reference materials while running certain programs. The name of the file type will be decrypted as " dynamic link library". These dynamic libraries can be used by different applications at the same time. In a way they are also similar on executable files , but differ in the meaning of some fields. The most striking example is driver files, which describe the rules of interaction between the device and the OS.
How to open DLL
Before telling how to open these files, you should draw the user's attention to the fact that there is not much point in opening this type of library. They contain information necessary program for execution. It is extremely rare that important variables (and not the way they are called) or data are stored in this type of file. Although, in fairness, we note that there are a number of companies that still managed to locate the information necessary for the programs to work in dll.
True, dynamic libraries are sometimes subjected to decompilation to obtain the rules and principles of work stored in them. For this, there are several special programs.
The advantage of the program is also the ability to work with different types file libraries and even edit some of them. But it is worth repeating once again - this information filed exclusively for acquaintance, trying to change files with the .dll extension is one of the worst ideas that a user can come up with.

Does this program have dignity? Great amount- the range of work that can be done on it is limited only by the imagination of the owner. AND flaw only one, but significant - annual subscription is about $500.
System installation method
But if we don’t have to write and edit libraries, how ordinary users, then knowing about their installation can be useful. The fact is that not all programs are supplied with a complete set of necessary libraries and it is understood that individual components are installed along with them (a very common detail when installing games), which were forgotten by the user. Then it is required set, or rather register dll files.
First you need to find the file itself. Fortunately, with a thorough search, this is not so difficult, and the necessary libraries are found quite often, even separately from the package, which does not interfere with their work. It is worth noting that in the case of games, these are d3dx.dll which can absent in the system - in this case it is better to install the DirectX package, and not install 150 libraries manually.
But if needed register new dll to run the program, it is better to place it in the directory with the program. In Windows 7 and above, it is possible to open command line from the catalog, in other cases it is necessary open command line and using the command cd get to the correct directory.
For the specified OS versions, it is enough open the desired directory and holding the shift click on an empty space right click mice. In response to us will emerge context menu, of the following form: 
Click on " open command window". Before us will appear command line where we need to write the following:
regsvr32 dllname.dll
This command will add the library to the list used by the system, saving time on other installation methods. To cancel registration, use the following command:
regsvr32-u dllname.dll
It is important to note that dllname.dll is entered as an example and instead of everything that is written to the left of the dot (that is, instead of dllname), you should enter the name of your file. The image shows the addition of a dll file from directX8 to Windows 10. 
In this simple way, you can install the library on the system. However, if the slightest failures or errors are observed, then you should immediately execute another command, remove the registration, and contact a specialist with the problematic program.
The library already has most of the code that you will not need to write, the library makes it easy to work with a specific module or one of their types and it just needs to be included in your sketch.
For example, if you want to display text on an LCD display without connecting a library, then you need to transfer several bytes of commands and data to it, which will take several lines of code, and most importantly, you need to know the type of microcontroller under which the LCD operates, the assignment of commands to which it is controlled, know the architecture of its memory, addresses and purpose of registers, for which you will need to find and re-read its datasheet.
Whereas when writing code using a library (for example, LiquidCrystal_I2C.h) you can display text by calling just one library function:
lcd.print("my text");You can include any library with the following command:
"#include<файл.h>"
<файл.h>- this is the very library that we connect.
You can also see an example of connecting the library
Before you start using the methods and functions of the library, you need to:
- download (download to your computer)
- install (place in the correct folder),
- to plug (insert text “#include<файл.h>” to the sketch).
Each library must contain 2 files with extensions .h and .cpp.
The files of the first type contain:
- class description,
- constants,
- variables.
The second type contains method codes.
Additionally, you need to understand that the files .h and .cpp may not lie in the root of the downloaded archive. They can also go with the main files "keywords.txt" and a folder with examples (examples).
How to install the library?
After you have downloaded (downloaded) the library to your computer, you need to install it. You can install the library manually or do it using the Arduino IDE:
Installing the Library Using the Arduino IDE
We will do this through the menu. Enter the menu:
Sketch - Connect library - Add .zip library
In the window that appears, click on the "This PC" icon and select the "Downloads" folder. If when downloading a ZIP archive from the site, you specified the path to save the file, then instead of the "Downloads" folder, specify the path to the file.

Select ZIP file library you have downloaded. The file name may not match the library name. Then click on the button " Open » ( open ).

This completes the installation of the library, you can start connecting it to the sketch.
Important! After Arduino setup IDE on the computer is created separate folder to store all libraries. For Linux OS "Scetchbook", located in /home/. For OS Windows folder"Arduino", located in /My Documents/.
Installing the library manually
Unzip the ZIP archive you downloaded and place the folder (the folder name usually matches the name of the library) from this archive into the folder:
This computer → The documents → Arduino → libraries

If the Arduino IDE was running (open) during copying, then you need to close all the windows of this program, then start (open) the Arduino IDE and you can start connecting the library to the sketch.
The fact is that the program is constantly evolving and the number of its versions is constantly growing. If you would like to install new version Arduino IDE, then the libraries located in the folder ( This PC → Documents → Arduino → libraries) will be available in both the old and the new (installed) versions of the Arduino IDE, and the libraries located in the folder libraries Arduino IDE programs old version(which was installed earlier) will be available only in it (until you copy them to a new one).
Where can I find the required library?
For convenience, our website has a whole section, which is called -. Most libraries can be found on the Internet in the public domain.
Also a number standard sets can be found on the official Arduino website: arduino.cc.
What libraries are already installed?
As we have already discussed - the IDE itself already comes with some .
There are two ways to view installed libraries.
Method 1
To see which set is already installed, you need to go to the tab:

Method 2
The second way is to use the "Sketch" menu and the "Include Library" submenu. This way you can also see the list of libraries.
Go to Sketch and select Include Library:
Sketch → Include Library

Possible mistakes
Sometimes when installing libraries or in the process of using them, some errors may occur. Below we will analyze the main ones.
'xxxx' does not name a type
The error appears when the library is not yet installed.
Also, an error occurs if the folder or library has the wrong name.
The folder location address may be incorrect, or the Arduino IDE may not have been restarted!
Wrong folder location
Check if all libraries are at the right address. Folder addresses for different operating systems we cited above.
Wrong library name
The error appears when the name after the #include tag does not match the name of the library.
incomplete library
Everyone is missing desired files and folders.
Library dependencies
It is necessary to connect additional dependent libraries without which correct/correct work is impossible.