IPhone is, first of all, a phone with which users make calls, send SMS messages, work with social media through mobile internet... If you've purchased a new iPhone, the first thing to do is insert a SIM card.
You probably know that SIM cards come in different formats. Until a few years ago, the most popular option was a standard (or mini) size SIM card. But in order to reduce the area that it will fit in the iPhone, the format has decreased over time, and today the current iPhone models support the nano size.
The standart-SIM format was supported by devices such as the first generation iPhone, 3G and 3GS. Popular iPhone 4 and 4S models are now equipped with micro-SIM slots. And finally, starting with the 5th generation iPhone, Apple finally switched to the smallest version - nano-SIM.

Insert the SIM card into the iPhone
From the very beginning, regardless of the SIM format, Apple kept the same principle of inserting the card into the device. therefore this manual can be considered universal.
You will need:
- SIM card of a suitable format (if necessary, today any mobile operator makes its instant replacement);
- A special paper clip supplied with the phone (if it is missing, you can use a paper clip or a blunt needle);
- Directly the iPhone itself.


If you did everything according to the instructions, but the phone still shows a message "No SIM card", check the following:
- Correctness of installation of the card into the smartphone;
- The operability of the SIM card (especially when you cut the plastic to the desired size yourself);
- The health of the phone (much less often there is a situation when the smartphone itself is faulty - in this case, no matter what card you insert into it, the operator will not be detected).
It's easy to insert a SIM card into an iPhone - see for yourself. If you have any difficulties, ask your questions in the comments.
So, your dream has finally come true: you are the proud owner of the beautiful iPhone 4 from Apple. These smartphones really stand out in the mobile market and deserve special attention. And this is due not only to their extraordinary functionality, but also to the special approach that this miracle requires from the user. It can be a little more difficult to handle the iPhone than with the more familiar devices on platforms. But after a short period of time, getting used to the device, any user becomes convinced of its extraordinary simplicity and practicality.
Getting Started IPhone
The first step in using a brand new smartphone is, of course, to turn it on. This must be done before inserting the SIM card into the device. On the iPhone 4, the on / off button is located at the top of the case, like any other device from this company. The key must be pressed and be sure to hold it for a few seconds until the company logo appears on the display. After that, you will see a message telling you that you need to make a special gesture to turn on the device. After following all instructions, your iPhone will activate.
Installing the card

If you have just purchased Apple device The first question that usually arises is how to insert a SIM card into the iPhone 4. These smartphones are arranged in a slightly more cunning way than the rest of their technical counterparts, more familiar to us. You have probably noticed that the communicator comes with a small metal key, a kind of paper clip. This is the key to installing a SIM card. Consider your new smartphone take a closer look. On the right side of the side, you will notice a small secret hole. To understand 4, you need to press the hole with this same metal key. After pressing, you will find the opened slot for the card. By the way, in case of losing the key, which happens quite often, a regular paper clip will do for you. When opening the SIM card tray, be careful to avoid damaging it, otherwise it will be very problematic to open it later. After installing the card, slide the cover back until it clicks. Search must appear on the display mobile network... This means that the SIM card for the iPhone 4 is installed correctly. If the device displays a message about the absence of a card, it is possible that its installation was still carried out incorrectly.
The usual solution won't work

If you have already figured out how to insert a SIM card into the iPhone 4, you probably realized that for this device you need to purchase not an ordinary classic-format card, but a special micro one. In any mobile store you can buy a "mini", which is suitable for iPhone 4. Some sellers offer to buy a "number" at the same time mobile device, which will undoubtedly be the most convenient option. The micro SIM card has dimensions of 15x12 millimeters, which is much smaller than the standard options.
Cut off the "number"
Sometimes, when changing the device, the user does not want to change the SIM card, therefore, to use it on a new device, it is necessary to adapt the format to micro. Of course, you can go to the salon of your operator and write an application to change the SIM card while maintaining the number, but this requires a certain amount of time, so most people prefer to simply shrink the card.
You can also cut a SIM card for iPhone 4 directly when buying a device. This service is provided by almost all sellers. You can do it yourself. In this case, you must be as careful as possible so as not to damage the chip. Otherwise, the card can be safely thrown away. Cropping is a very delicate matter, so the best solution would be to turn to professionals, as they have special templates that can be easily adjusted to the size of the card.
So, if you finally figured out how to insert a SIM card into the iPhone 4, turn on the new device and prepare a “number” in the micro-SIM format, you can accept congratulations on purchasing a wonderful smartphone. By the way, you probably have already noted a special plus with such an arrangement of the card in the phone: now, if you need to change the SIM card or remove it, you do not have to completely turn off the device and remove the battery, as is done in any other device. With the subsequent use of the iPhone, you will discover many more positive aspects of this mobile device.
Smartphones Apple iPhone have gained popularity among users around the world due to their convenience and a huge number of technical possibilities. However, the main iPhone function- this is cellular... With all the advantages of these devices, you cannot always immediately figure out how to insert a SIM card into an iPhone. Without access to the network, the gadget actually loses all its advantages: calls do not work, sending SMS, voice assistant... Incorrect installation of a SIM card can even damage your smartphone.
In different versions of iPhones, the SIM card is located on different parts of the device. In outdated models - with indexes 2G, 3G, 3GS - the connector is located on the upper end of the smartphone near the lock button.
The next generation iPhones - 4, 4S, 5, 5S - received a change that affected the location of the SIM card tray. He "migrated" to the side of the device, but remained as before next to the power and lock button.
On the new models - SE, 6, 6S, 7, 8, 10, X - the placement of the SIM card tray has remained the same, despite the increased dimensions. The slot is located on the same side end, just below the screen lock key.

SIM card size for iPhone
An important point is the size of the SIM card, which is individual for the iPhone lines. There are three types in total: standard, micro- and nano-sim. They all differ in the size of the plastic card and the size of the chip:

When you buy a new SIM card, the cut-outs are already applied to it, thanks to which it can be easily modified to the desired size. If it is planned that the old SIM card will remain, it is better to contact a specialist in a communication salon, where the card will be cut with a special knife.
Installing a SIM card in an iPhone
The procedure is very simple:

No further action is required after this. The device will register itself on the network, download the settings, and install them.
After the described steps for installing a SIM card, if everything is done correctly, cellular network services will be available on the iPhone: making calls, sending SMS and using 3G / LTE networks.
After you have purchased the long-awaited sixth iPhone, you need to start using it and first of all we figure out how to insert a sim card into a new product. What is the SIM card in the iPhone 6S? In the latest iPhone models, including the fifth and sixth versions, they use not a regular phone card, but a nano-sim card, specially released by Apple in 2012. Naturally, its size is much smaller than that of a standard card. In particular, the size of the nano-sim is 12.3x8.8x0.67 millimeters. That a standard SIM card, that a nano-sim perform the same functions. However, nano-sim is compact and has improved safety features.
Please note that replacement regular card the nano-sim will cost a tidy sum. In this regard, many users have resorted to trimming the SIM card to the desired nano-size. Is it possible to cut a standard phone card at home, turning it into nano-sim?
Indeed, it is possible and even necessary. After all, the old card is needed and stores a lot of contact numbers for the iPhone, and sometimes it is impossible to change this number, as this will cause great damage to work. Therefore, here you can find out how to do it on iPhone 6.
It's funny to say, but the procedure for trimming the card is carried out using the most ordinary kitchen scissors. If you decide to install a nano-SIM card on the iPhone 6S, remaking it from the most ordinary one, then choose the right one original size, mark the edges and lines for trimming, adjust carefully so that the edges coincide and the chip particles are not damaged. Then put the scissors at a right angle and cut the old SIM card. It's okay if it turns out to be a little wider, because the edges can be sanded with sanding or emery paper. Typically, the trimmed chip is centered and cannot be affected by trimming.
After finishing the straight trimming and sanding of the ends, sand the back of the sim card, as usually the thickness of the nano-sim is slightly less than that of the standard card. And the converted card must completely coincide with the original in size, since otherwise it will not fit into the slot for an iPhone SIM card, and if it does, then it may get stuck when you open the slot, and then you will have to disassemble the device, which is not at all for you need to. Therefore, when grinding the edges of the card, it is better not to be lazy and periodically try to insert a new SIM card into the tray to make sure that all the edges are perfectly seated and the thickness of the card does not protrude beyond the sides of the slot. When everything is ready, wipe the card, removing any remaining dust and burrs. Do-it-yourself nano-card for iPhone 6 is ready.
How to install a nano SIM card on an iPhone
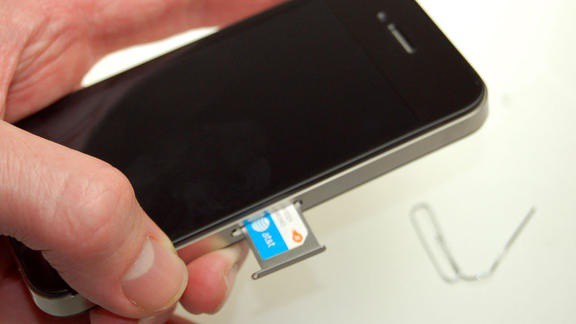
Using a special needle or just a paper clip, find a slot with a SIM card tray on the end of the iPhone. Insert a needle or paperclip at an angle into the thin hole and press down on it. The slot with the tray should snap off and protrude so that you can completely pull the tray out further by hand. sim cards... At the same time, do not use sharp or sewing needles, which not only do not open the tray, but can also break the needle, leaving the tip inside, which will be quite difficult to pull out.

What needs to be considered
Here we want to warn you against possible errors regarding the SIM card. It is certainly better to use the original sim card, so resort to cutting the old sim card for the nano-sim version in an extreme or hopeless case.
Take precautions when making a nano-SIM card yourself from a standard card by cutting, any inaccuracy can damage the port, make communication inaccessible and, finally, get stuck in the tray.
Under no circumstances cut off the metal contacts and do not rub the SIM card in these places, you can only erase the excess surface of the old and cut off SIM card from the plastic side. Do this very carefully without touching the metal side.
Do not leave jagged edges or burrs around the edges of the cut card. Still, keep in mind that cards issued for a very long time may stop working after cutting. If you follow all the precautions, then you can surely be proud of the work done and the good quality of the connection.
Here is finally the coveted white box with the long-awaited iPhone 6 in your hands. The only thing left to do is to set up and use it for your own pleasure. It is clear that first of all you need to insert a SIM card.
What card is in the sixes?
You ask "What should be the SIM card in the iPhone 6?" In the "sixes", as well as in their predecessor - the iPhone of the 5th series, instead of the usual card - nano - sim, developed at Apple support, and launched in 2012. They differ, first of all, in size - the nano is much more compact and thinner than the standard one. It has dimensions of 12.3 x 8.8 x 0.67 mm. In all other respects, the principles of their operation are identical, there are simply no plastic rims around the metal carrier with the chip, and the security parameters are slightly improved.
The best thing, of course, is to insert the original nano-sim into the iPhone, it looks like this.
Pruning
The cost of replacing a standard sim card with a nano, in the same MTS, for example, costs a lot - 24,300 rubles.
Therefore, many people prefer to cut it themselves to fit the desired format. It will take literally a few minutes, and does not require special skills or devices - the whole procedure is performed with ordinary kitchen scissors.
This is how "modifications" look like, which you can do on your own - just cut off the edges. For "sixes" the rightmost one will do.
 Many service companies offer to quickly and efficiently "fit the nano-size" under the sixth iPhone for little money.
If you decide to cut it yourself, do not forget to mark the characteristic beveled corner in advance - you can put a point with a marker on the back of the plastic side. We also recommend making a semblance of a pattern - for the above parameters of the nano-sim. This makes cutting it much easier and less likely to be mistaken.
And here is the original solution from K. Ropp, which helps to quickly cope with the task.

It is enough to select the desired size and mark along the intersection lines. The fit is almost perfect. And the likelihood of damaging important elements of the chip is minimized.
It is better to cut with a small allowance, and then sand off all excess with sandpaper. Even if you go a little on a metal canvas - it's okay. Usually the chip is centered and will not be damaged.
After trimming and grinding the ends, remove a little thickness from the reverse plastic panel, since the factory SIM card, and therefore the slot for it in the iPhone, is thinner by 0.09 mm - they need to be removed. If this is not done, then you will not be able to open the port and get the stuck card. We recommend that you insert it into the tray from time to time and adjust it so that it does not protrude over its metal rim, and you can then pull it out. After that, thoroughly wipe it from dust and that's it - the nano-sim can be used.
How do you put it?
So, the card is ready - all that remains is to install it. Schematically, you can pull out the nano-socket like this.

In order to open the receiving tray you need a special needle included in the kit.
 With its help, you can safely pull out the tray from the iPhone, into which you need to insert the SIM card. However, many do not find it in the package, but it is there, it is simply not immediately visible.

And all you need to do is get the instruction and pull it out of the paper mount in the center.
So, in order to open the nano-card receiving tray, you need to insert the pin into the hole located on the side, on the right side of the iPhone display, and press confidently.
 After a slight click, the outer cap will move slightly away from the case and can be easily removed.

If the original iPhone needle gets lost, you can do the same with a regular paper clip (sharp-edged needles cannot be used).
 Recommendations
Regarding the SIM card, there are several important points.
2.If you plan to trim the existing one yourself - follow the manipulations described by us. It should sit tightly in the tray, otherwise, at least, you will have problems with communication, and in the worst case, the port will be damaged.
3. Very carefully go around the places with metal contacts, do not forget to "brush off" the excess thickness only on the side where the plastic is. Walking through the metal, you will surely ruin the SIM card.
4. Be aware that long-issued cards may stop working after trimming.