There is a fairly wide range of programs that are still very actively used at the moment, but do not work correctly on modern versions of the operating system, or do not work at all. What to do if the computer has software that works well on Windows XP, but fails on the newer seven? The most rational way in such a situation is to use the virtual OS Windows XP, which can be installed on Windows 7. Sometimes this can even be called the only way out, because modern drivers sometimes do not support the operation of old equipment.
So what is virtual engine mode? In short, using this mode on a computer with seven installed, you can run an earlier version of the product. It is part of Microsoft Enterprise Desktop Virtualization Technology (MEDV for short) and is delivered in the form of the Microsoft Desktop Optimization Pack.
A distinctive feature of using such a virtual machine is full integration with the parent system - the user will be able to distinguish Windows XP from the installed main seven only by different window designs. Therefore, he will not get confused with the desktops of two OSes, switching from one system to another, which is very convenient. In addition, there will be no problems with launching applications written exclusively under Windows XP or earlier - they will run in an environment that is "familiar" to them. If you intend to actively use Windows XP, but are not going to install it as a guest OS, you just need to use a virtual machine. In this case, we are talking about a machine called Virtual PC.
Before installation
Before installing the Virtual PC virtual machine on your computer, you should make sure that your CPU supports rendering technology. Although the vast majority of modern microprocessors support this function, it will not be superfluous to check it again. Indeed, without the support of visualization instructions, the machine simply cannot be installed.
You should also be aware that only 32-bit systems can be installed on the machine (even if the main OS is 64-bit).
System updates may be required for the virtual machine to function correctly. Without some updates, the program will not work, and installing all the latest versions significantly increases the level of security.
Program installation
Installation of Virtual PC is carried out using the wizard to create the appropriate devices. Thanks to him, you can configure the basic parameters of Windows XP as you personally need it. For example, you can set a certain amount of RAM that will be available to your machine.
Let's go directly to the installation algorithm:
- Click on the "Start" menu button and open the Windows Virtual PC folder;
- A folder called "Virtual Machines" opens, which displays all the machines installed on the computer (if any). We select the item "Create a virtual machine";
- A wizard opens, where you can select the desired configuration, namely: determine the name and location of the system, determine the available amount of memory, create a virtual HDD device.


When the wizard completes, the newly created Virtual PC will be displayed in the above folder. If necessary, you can set access restrictions for specific users. This is done using the item "Sharing".
That's it, the Virtual PC virtual machine is installed. In order to start it, you need to select the required machine in the list of available ones and click "Open". The OS installer will open. Installing an operating system on a machine requires an XP installation disc. Virtual Windows XP is installed in the same way as a regular operating system.
As soon as the installation is completed, in the same folder you need to select the "Service / Install integration components" item. Integration components are also installed using the appropriate wizard. After it completes, the computer will need to reboot, and only then the machine with XP installed on it will be ready for use.
(Visited 1 402 times, 1 visits today)
How to install a virtual machine to your computer and most importantly, which virtual machine to choose? Before asking you this question, I surfed the Internet and realized that the easiest to install and configure are VirtualBox and Virtual PC, but there is also Hyper-V and VMWare. I understand that now you will ask me: "Why do I need a virtual machine?" My answer: "I want to install different operating systems and experiment with them, I am very interested in this: Windows XP, Windows 7, but especially Windows 8!" My Windows 7 installed works fine with all the applications installed in it, but the hype around the new Windows 8 is only growing and I don't want to stand aside, so you have already written two dozen articles about the eight on your website and continue to write. So I'm thinking of installing a virtual machine (just not choosing which one) to install Windows 8 into it and slowly study it, and then you look in October, when the final version of Windows 8.1 comes out, I'll install it with the second operating system. Mark.
Hello admin! on the Microsoft website and wanted to install it on the VirtualBox virtual machine, but the installation gets the error “ VT-x / AMD-V hardware virtualization features are enabled but not functional". What to do?
How to install a virtual machine
Friends, if you have never dealt with a virtual machine, then I will explain to you in a nutshell what it is. A virtual machine is a real computer created inside your main operating system and in this computer you can install other operating systems (several!) And not only Windows. You can, however you want to experiment with the operating system installed in the virtual machine, go online, install various software without fear of infecting your computer with a virus, in short, connect your imagination and you will find a use for it.
For example, one of my acquaintances learned to reinstall the operating system and divide the hard disk into several partitions only using a virtual machine.
As for the choice of a virtual machine, an article will be written about each of the existing ones on our website. I recommend you install a virtual machine VirtualBox, its capabilities will be enough not only for a beginner, but also for an experienced user, besides, it is free. Start with her. Simple and intuitive settings, stable operation, made it one of the most popular.
What virtual machines are there?
Virtual PC is free, very easy to install in Windows 7, follow the link to the Microsoft website, download and install.http://www.microsoft.com/ru-ru/download/details.aspx?id=3702
paid, costs 222.53 €, but there is a 30-day trial period. This virtual machine is needed primarily for system administrators and software developers.
So it is decided, install the VirtualBox virtual machine. We go to the site https://www.virtualbox.org/, click "Downloads", select
VirtualBox 4.2.16 for Windows hosts x86 / amd64.

The installer of the virtual machine is downloaded, we must run it on behalf of the administrator, otherwise in the future you will be haunted by various errors when working with the virtual machine. Right-click on the installer and select "Run as administrator"

The program is very easy to install on our computer.


We start the virtual machine as administrator.

Click on the "Create" button.

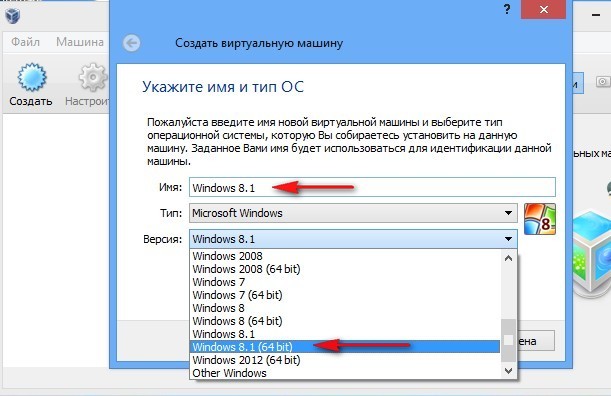
First of all, I would like to draw your attention to the fact that if you decide to install Windows 7 64-bit on a virtual machine, select Windows 7 64-bit from the list. If you decide to install another operating system, for example Windows 8.1 64-bit, then be sure to select Windows 8.1 64-bit in the drop-down list and enter the invented name of the virtual machine, for example Windows 8.1, then click Next.

In this window, you need to specify the amount of memory that you can allocate to the virtual machine. Friends, you should understand that the RAM allocated to the virtual machine will not be available to the operating system installed on your computer. If you have only 2 GB of your own RAM, then you cannot allocate more than 1024 MB to a virtual machine, your operating system, when working with a virtual machine, will be very slow. If you are installing Windows 8, the optimal size for it is just 1024 MB. As you can see, my computer has 8 GB of RAM, which means I can allocate more than 1 GB, for example 2 GB.

Create a new virtual hard disk.

Select file type VDI

At this stage, we need to specify the format of the virtual hard disk. If you check "Dynamic virtual hard disk" This means that the space on your hard disk allocated for the needs of the virtual machine will not be occupied immediately, but as files accumulate in your virtual machine. I recommend that you use this option.

We indicate the size of the virtual hard disk. If this is your first time creating a virtual machine, specify 50 GB, this will be enough to install Windows 8. But I will personally indicate a larger volume for myself. Why? In the process of working with the virtual machine, I will be installing many operating systems, so I will indicate the volume of 240 GB.
You can create a virtual disk on a different disk from the system disk, it's very simple, click on the yellow folder and the explorer will open, in it specify any partition on your hard drive to place the virtual hard disk.

We see the result. So, we have created a virtual machine, now you need to configure it and finally install Windows 8 in it.
Select our virtual machine and click "Configure".

System. Uncheck the box "Floppy". We leave the CD / DVD-ROM as the first boot device, since we will boot the virtual machine from the installation disk or Windows 8 image, leave the Hard disk as the second device.

Leave the "Processor" parameter as it is.

"Acceleration" Hardware virtualization must be enabled, most likely you will be installing a 64-bit operating system.

Display. Video. Enable 3D Acceleration and Enable 2D Acceleration
Video memory 128 MB

Carriers. A little of your attention!
Your physical drive will be available in the virtual machine, in my case, Drive "I" and if you have a disk with Windows, you can use it to install the operating system, check the Live CD / DVD box.
There is also a virtual floppy drive here, we will connect to it an image with the Windows 8 operating system, which we downloaded in yesterday's article. In the "Media" option, select "Drive" and "Choose an optical disc image"

an explorer will open, in which you can select the downloaded Windows 8 image, then click "Open".

The Windows 8 image will attach to the virtual disk drive.


What is a USB filter? Imagine this situation, all USB devices connected to your computer will be detected in the operating system that is installed on your virtual machine. Naturally, you don't need this. USB filters will determine which USB device should be detected in the virtual machine and which in your main system. To see how all this works in practice, you first need to install the Windows 8.1 operating system in our virtual machine, and then everything will become clear to you, read on.

For all connected USB-2.0 flash drives to work normally in your virtual machine, install yourself plugin VirtualBox 4.2.16 Oracle VM VirtualBox Extension Pack, download it at the office. website https://www.virtualbox.org/
More and more Windows 7 users want to try the capabilities of the eighth version of this operating system. For these purposes, the use of virtual machines is perfect, on which you can completely install the system without harming the native system.
At the moment there are several popular virtualization programs for Windows 7: WMWare, Virtual Box and Virtual PC. In this article, we will consider the latter program, since it, in comparison with other virtual machines, provides rich virtualization capabilities and is quite simple to configure and operate.

General algorithm of actions
- Download the application installation package. Virtual PC is a freeware program and was developed by Microsoft specialists, therefore it is fully compatible with both Windows 7 and earlier versions. You can download the installer from the official website of the corporation.

- Run the file and follow the instructions. Before installing the application, make sure that your current user has administrator rights. To avoid this situation, right-click and select the "Run as administrator" context menu item. If this is not done, then errors are possible at the installation stage (described below).

- After installation, a VirtualPC shortcut will appear on your desktop. Run it and select the "Create" item. After that, you may experience a slowdown in Windows 7 and the feeling that the program is frozen. At this time, data about the parameters of your system is collected and the optimal characteristics for the virtual machine are calculated.

- The following are the settings for the VirtualPC virtual machine. Leave the settings unchanged at the first start. With careless actions, it is possible to use more opportunities than can be allocated. This will lead to general failures in the local and virtual operating systems. We change only the version of the operating system to be installed and at the very end of the setup, select the source from which we will install (CD, disk image from the hard disk, bootable USB flash drive).

- Attention should be paid to the installation stage, at which you are required to specify shared network folders. These resources allow the system that we will install to use the resources of the local computer.

- After all the configuration steps in Virtual PC, the "Run" button will become active.
 When you press it, the first time you start, the Windows 7, Windows 8 or other OS you have chosen will be installed into the virtual machine system, and when you press it again, it will load the operating system that was previously installed. The installation steps are fully consistent with the standard installation on a local computer and do not require any additional actions from the user.
- Upon completion of the process, the system that you installed will start and will be fully available for testing. If there is a need to change the parameters of a virtual machine in the upper part of the interface window of Virtual PC, look for the menu item "Machine" - "Configure".
 In the window that appears, you can increase the available amount of RAM, free space, etc.
Typical mistakes
When performing the installation according to the above algorithm for Virtual PC at step 6, you may receive a Windows 7 error message related to the disabled virtualization function. 
To fix it, you need to enable system virtualization in the settings panel and make BIOS settings for some versions of motherboards. 
In addition, this problem occurs when running antivirus software in Windows 7 with its own firewall and firewall. Therefore, it is recommended to disable or suspend all anti-virus programs before installing the virtual machine.
Another common mistake is the lack of access to some of the components of the virtual machine. During the Virtual PC setup phase, after connecting the devices, a No Access message may appear. This is due to the access rights in the Windows 7 operating system. The standard Windows 7 security policy restricts the access of third-party users and processes to system devices. To resolve this error, check the rights of the current active user and the presence of permission to connect devices.
The Windows operating system allows you to create a virtual machine (VM), which is another computer with a separate virtual disk, OS, system data, and software. Simply put, you are connecting another system that can be opened in a separate window. We will tell you how to install a virtual machine in this article. Follow the instructions carefully, and after 20-30 minutes a VM will appear on the computer
Create a virtual machine on Windows 10
The top ten includes a standard service for creating virtual machines - Hyper-V. By default, the components of this service are disabled - we need to start them. To do this, go to Control Panel, then go to section Programs – Enabling or Disabling Components... In the menu that appears, activate the item Hyper-V and confirm your action with the key OK.After installation, the computer must be restarted. Now we go to the search service Windows and drive in there Hyper-V Manager... It itself is located in Administration tools... Now let's move on to creating a VM:

Done. Opening Hyper-V, you will see a VM.

Launching is done by double-clicking on the VM name in Hyper-V. In the connection window, you need to click on the button Enable... You just have to go through the standard procedure for installing the system.
Important! It may happen that you have configured and installed everything correctly, but the operating system on the virtual machine does not start. This can be explained by the fact that the technical characteristics are not suitable for playing a virtual system. Carefully read the system requirements for installing a particular OS version. For example, you cannot put Windows 10 on a weak PC with a processor with two cores and 1 GB of RAM.
Creating a virtual machine on Windows 7
The "seven" has a built-in service for creating a VM, but it allows you to create a virtual machine only for Windows XP. We believe that the lack of choice is bad, so we made instructions on using third-party software to create a VM. The program is called Virtual Box, and you can also use it to install VMs on Windows 10, 8 and even XP. You need to download Virtual Box from this link.
Install the program according to the standard scheme and run it:
- In the main menu, click on the button Create a.
- After that, the wizard for creating a new VM will open.
- We select the type of operating system and its version: if you want to install Windows 8, then select it from the list.
- In the next window, set the required amount of RAM for the new OS - 512 MB is enough for Windows XP, and the tenth version will not work correctly if you do not provide at least 4 GB for it.
Helpful advice! When specifying memory, set at least 515 MB and no more than 50% of all RAM that is in your computer.
We create a new hard disk for the VM by clicking on the corresponding item, and move on. We recommend choosing the fixed option so that the hard disk for the VM does not take all the space from the main Windows. After setting the size of the virtual HDD, you need to specify the path where it will be located.
Now we return to the VM creation menu and press the button Done... Now we need to configure the virtual machine and install the system itself on it - go to the section Properties... In chapter Display need to include 2D accelerator and 3D accelerator.
The next step is to select the media from which the new OS will be installed on the virtual machine:
- If you want to use the image with the installation, then go to the section Attributes and click on the icon with the image of the folder - the media manager will open - you need to add your image here.
- If the installation will be performed from a DVD or USB drive, then insert it into your computer and go to the section Attributes... After loading, the disk or flash drive you need will appear in the list of media.

Now press the button Install and go to the standard operating system installation wizard. We recommend that you study the Virtual Box program in order to customize the virtual machine completely for yourself.
Helpful advice! To create a Linux VM, it is better to use the Virtual Box program. You can also use the standard Windows 10 wizard, but user reviews indicate that Linux will be unstable.
Installing a Windows XP virtual machine
We have already looked at an example using Virtual Box, now we will study the VMaware Workstation program, with which we will install Windows XP on a virtual machine. You can download the VMaware Workstation application from here.After downloading, we launch the installation file and install the program according to the standard scheme. Now go to VMaware Workstation and proceed as follows:
- In the application dialog menu, select the section for installing the VM. In the English version, it is called New virtual machine.
- First of all, the program will ask us to specify a DVD, Flash drive or ISO image. We took a regular XP DVD as an example. Click on the button Further and go to the system activation mode - specify the path to the XP activation file.
- Now you need to set up a separate hard drive, where the files with Windows XP will be located, and the software will also be installed there. We indicate the size: usually 40 GB is enough, but for trial use of a VM, 8 GB is enough for you.
- VMaware Workstation will then run a check and final configuration. Here we can change the amount of RAM for the WindowsF version, login methods and other parameters. The Russian version is now available on the VMaware Workstation website, we recommend that you read the description of each setting in the Help. If you skip this section, the program will automatically expose the RAM.
- After completing the configuration, VMaware Workstation will proceed to the installation of XP system on the virtual machine.
Video installation of VM
The video is devoted to installing Windows XP on a VM and its subsequent configuration. A novice user can also install a VM according to this instruction. The video also explains in detail how to use an already installed XP as a virtual operating system.You now have a virtual machine to experiment with. If you have long wanted to use "unwanted" software, then it is best to install it on a VM. It is easier to use standard services for installing VMs, but third-party software provides more options. It all depends on your requirements - the instructions with Windows 7 are also suitable for other operating systems, there is also a link to download a convenient program.
With Microsoft Virtual PC, you can create an unlimited number of virtual operating systems (OS).
More precisely, their number is limited only by the volume of your hard drive.
Note: the program is useful for testing software, or for compatibility of old programs (then a virtual OS with Windows XP will come in handy).
For a complete understanding of the installation process, I offer you instructions on how to install two virtual OS on one computer. Take Windows XP and Windows 7 as examples.
1. Download and install Microsoft Virtual PC on your computer.
If during installation a message appears that this update is not applicable to this computer, then most likely it has already been installed by an automatic update of your Windows 7.
2. Go to "Start" - "All Programs", find a folder called Windows Virtual PC, open it and run the program with the same name.
3. A window with no content will open to us. Click on the "Create virtual machine" button in the top menu.
4. In the next window, enter the name of the virtual machine and, if desired, indicate the location of its future data (it is desirable that there is more free space on the disk on which we are going to install the virtual OS). Click "Next".
5. We indicate the allocated RAM to the virtual machine and leave the box on network connections checked, this will enable the virtual OS to access the Internet using the connection of the main operating system.
6. We choose to create a dynamic hard disk, since now the machine will take up less space on our hard disk. Click "Create".
7. Here we see that the virtual machine has been created. It is displayed in one image file with the "* .vmcx" extension. But it does not contain an operating system. So we take the Windows XP disc and insert it into our CD / DVD drive.
8. Double-clicking on the file will launch the virtual machine and begin installing Windows XP.
9. Having installed the OS, we can already work in it.
10. But we still need one more "operating system" - Windows 7. To install it, we repeat steps 2 to 8, after completing the work of the installed virtual OS. Accordingly, we give a different name and change the disk in the drive to Windows 7.
11. As you can see, the installation of another virtual OS has begun.
12. Having opened the virtual machines, we see two operating systems, each of which we can use.
13. Now we have 3 operating systems on our computer:
a) basic Windows 7;
b) virtual Windows XP;
c) virtual test Windows 7.
You can read about how to make shared folders in the main and virtual OS in the answer to the question "