Will be created when the gadget is activated. However, when setting up a smartphone for the first time, users often skip this stage for one reason - the device requires credit card data... Russian users, accustomed to suspecting fraud in everything, delay the creation of Apple IDtrying to find a way to do without the card.
There are several options for registering an iPhone account - among them there is one in which you do not need to enter credit card details.
Without Apple ID the user will not be able to:
Full use of the iPhone without Apple ID out of the question. The legendary multifunctionality of this smartphone is due to the huge amount of heterogeneous software available in the AppStore. iPhone without attachments - just a stylish and well-assembled gadget, but by no means not multitoolcapable of handling any task.
How do I create a new account via iTunes?
If you don't have iTunes, it is worth starting by downloading the latest version of this program from the official Apple website. Once you download and install the media combine, proceed as follows:
Step 1... Discover Aityuns and click on the " Account»In the horizontal menu at the top.
Step 2... Select " To come in…".

Step 3... In the window that appears, click " Create a new apple ID».

Step 4... You will find yourself on the welcome page iTunes Store - here you need to click on the blue button " Proceed».

Step 5... At this point, you need to read the document titled “ "And put a tick in front of" I have read ... ".

If you do not confirm the fact of acquaintance, the registration will not be completed.
If you can't read Apple's position immediately you should use the link "Print version". An HTML document will appear in the browser and should be printed to review as soon as time becomes available.

After confirming that you have read the terms, click “ To accept».
Step 6... Fill out the form - you must enter the following data:
- E-mail address... It is important that the address is valid and that you have access to it. Optionally, you can specify an additional postal address.
- Date of Birth... By date, you must be over 21 years old - otherwise, you will not be able to purchase content and software in the AppStore and iTunes Store.
- Invented password... The requirements for a password for an Apple account are very strict: it must contain numbers, uppercase and lowercase letters. Plus, one character cannot be repeated three times in a row.

Also, the user will have to answer three questions - for example, what was the name of his childhood best friend.This measure is necessary to ensure the security of your account.
Step 7.Unsubscribe from mailing if you do not want to receive information about the products of the "apple" company and releases of films and music to your mailbox. To do this, uncheck the boxes opposite the " Recommendations and information ...».

Then click " Proceed».
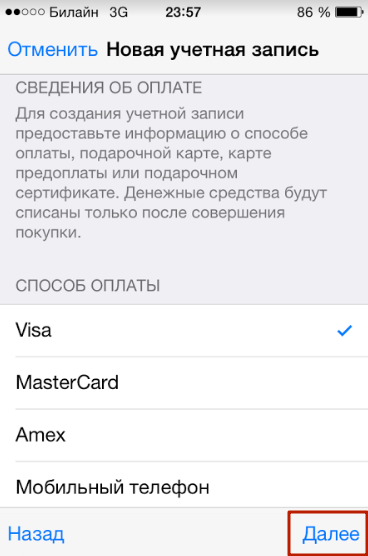
Step 8... Select a payment method for purchases and enter the required details. note that specifying credit card details in iTunes does not in any way threaten your welfare... Money will be debited only if you purchase content or software and only with your consent.

If you have chosen a plastic card as a payment method, you will have to enter its number, expiration date, and CVC2 - the security code on the back. If you prefer the option " Mobile phone ", It is enough to indicate cell number and confirm it via SMS.
Step 9... Fill in the fields of the block " Invoicing address". It is necessary to indicate:
- Surname and name.
- City code and name.
- Street of residence and zip code.
- Contact phone number.
- Application form (" mr" or " ms»).

Once you fill in the required fields, click Create Apple ID". You will see a window directing you to mail.

Step 10... You will find the following letter in your mailbox:

You should click " Confirm Address", After which you can assume that Apple ID successfully formed.
How to create an Apple ID without a PC?
You can create an Apple account without a computer, but in this case, you need the device to be connected to 3G or Wi-Fi. Having secured access to the Internet, proceed as follows:
Step 1... IN " Settings"IPhone find the section" iTunes Store, App Store"And go to it.

Step 2... Click on the " Create a new Apple ID».

Step 3... On the next screen, you will see a list of countries - Russia is selected by default. Without changing anything, press “ Further».

Step 4... You should read the document titled “ Apple Media Services Terms and Conditions". The document is quite capacious - on an iPhone, it turns out 29 pages in small print; that is why most users neglect to read it.

Either way, confirm that you have read " Provisions"And agree to the terms, you have to. To do this, click " To accept»In the lower right corner and then click on the button of the same name in the window that appears.

If you want to read the conditions, but not from the phone screen, but from a hard copy, use the "Send by e-mail" link. From e-mail you will be able to print the document.
Step 5... Fill in the form. You will have to enter the same data as when registering an account in iTunes - e-mail, password, date of birth, questions and answers necessary to ensure security.

If you don't want to subscribe to news about Apple services, apps and content, switch the sliders at the bottom to inactive.

Step 6... Select a payment method and enter your payment details. The same data is required as when registering via iTunes.
After providing the required information, click on “ Further».
Step 7... Go to emailthat was indicated during registration Apple ID, and press " Confirm Address».
Create an account Apple IDin the "Settings" of the device and registration through iTunes - similar procedures: in both cases, the same information is required.
You can also get into the service for creating an Apple account through the App Store. Go to the app store and scroll to the bottom of the home page. Click on " To come in».

Then click " Create Apple ID».

How to create an iPhone account without a credit card?
At least one way to create Apple ID without a "credit card" is. If you don't want to share your payment details with Apple, proceed as follows:
Step 1... Go to iTunes and in the drop-down menu select " Programs».

Step 2... Find free application (any) on the main page and click on its icon.
Step 3... After the description of the application opens, click " Download».
Step 4... In the window that appears, tap on the button " Create a new Apple ID"- this is how you start the procedure for creating an account.

Continue the registration as usual until the moment when you need to decide on the payment method.
Step 7... On the page " Specify a payment method"Instead of a bank card, choose the option" Not».

With this choice, you will be relieved of the need to enter payment details. However, the numerous fields of the " Invoicing address»You still have to fill in.
Conclusion
Create Apple ID can be done with or without a PC. However, if you use a computer for this task and iTunes, less time will be spent - you will have to type a lot, and it is more convenient to do it on the PC keyboard.
In addition, when registering from a computer, it will be possible to do without specifying the details of the selected payment method. This is important, because many domestic users of Apple technology are suspicious of the requirement to leave these cards.
Today we will be the first time turn on and activate our iPhone, in my case it's the iPhone 5S. I will tell you in detail how this is done, as well as point out the errors and problems that I encountered while activating my iPhone.
Preparing to activate iPhone
Before we start the first turn-on, we need to prepare in advance so that the process goes smoothly and without errors.
What we need:
- At least 20-30% charge.
- Internet access via Wi-Fi or via PC / Laptop with the latest version of iTunes and internet connected.
- Nano sim card.
If your device is completely discharged, take USB cable and connect it to a computer or electrical network through the adapter that comes with the kit.
if you have Wi-Fithen check that it is available and you have Internet access.
If not, then you will need your computer or laptop, which will be connected to the Internet. You need to download and install on it (your computer) latest version applications iTunes from the official site, link: http://itunes.apple.com/.
After the preparatory steps, you can begin activation.
IPhone Activation
We will activate the iPhone with a SIM card, and accordingly the activation will consist of the following steps:
- Turning on
- Basic settings
- Computer connection and activation
- First start
IMPORTANT! If your phone is locked, then for activation you need a SIM card of the operator to which it is locked!
Turning on the device
In order to turn on the device, you must press and hold the button for a few seconds "Inclusions"located on the top of the device. See the photo below.

If everything was done correctly, then on iPhone screen a silver apple will appear, which means you can proceed to the next stage.

Basic iPhone settings
After turning on the device, you will see a welcome message in various languages \u200b\u200bon the screen. Now, with a slight movement of your finger, from left to right, we swipe along the bottom of the screen.

Then we select the language we need, it can be any from the list.

In the next step, choose your country.


If you have Wi-Fi, then select it from the list and enter the password. For those who do not have it, you will need activation via iTunes on your PC.
Connecting the phone to the computer and continuing the activation
We will need our USB cable and computer / laptop (PC)... We connect the cable to the iPhone, and then to your PC.

After that, on the screen of your phone, you should see a picture as in the photo below:

The first thing to do after connecting is to enable or disable. They are required to use GPS, Google maps, etc. You can enable them now or later, after installation. I decided to turn them on right away.

In the next step, we select the item "Set the phone as new", since this is our first inclusion and we have nothing to restore yet.


For iPhone 5S owners, there is one item that can be completed immediately or postponed until later. I decided to do it right away, if you too, then click on "Set Up Now"

Now we need to press and release the button several times (about 10-20) "home"as shown on the screen of your smartphone. If you did everything correctly, you will see a picture and a message like mine in the photo below.

Since we have installed a fingerprint, it means you need to set a password. After all, we will not always have the opportunity to film it. For example, you may be wearing gloves or with a dirty finger you need, you never know. Therefore, for convenience, there is a digital combination, which must also be set and memorized.

The next and last step is "diagnostics", i.e. you need to decide whether or not to allow the phone to send data to Apple's servers. This can be both error data and some others. I decided not to do this, and accordingly I chose "Don't Send" (do not send).
After that, you will see the long-awaited greeting on your screen! This means that you have successfully installed and activated your iPhone! Congratulations!

If something did not work out for you, then I advise you to take a look at the problems that I encountered during my first launch, as well as watch a video where I told everything in detail.
IPhone activation problems and solutions
I will describe the problems that I encountered when activating my IPhone 5S, as well as their solutions.
- If you do not remove the factory film from the phone, then it is almost impossible to press the “Home” button (round, on the front, bottom of the phone). Therefore, when the phone was automatically locked, you had to press the power button (on top of the phone).
- Due to the lack of Wi-Fi, a computer was needed.
- Since I had old version iTunes, I couldn't connect my phone to my computer. I had to first download and update it to the latest version.
- To update iTunes, it must be closed, otherwise it will not update, but will give an update error.
- To remove a fingerprint, you need to remove the factory film, otherwise nothing will work, since the sensor does not recognize it from under the film.
These are the problems I encountered during the stage of my activation and the first launch, I hope my experience will allow you to avoid them.
I also advise you to look at the "Apple support" page, there are already many answers to problems with activation, link: http://support.apple.com/kb/ts3424?viewlocale\u003dru_GB&locale\u003dru_GB.
IPhone Activation Tutorial
You can leave your questions and comments in the comments below.
Hello everyone! We have already met with the identifier in the apple company system (). And at the end of the article, we came to the conclusion that we need to register an Apple ID to create our own, unique account... And if it is necessary, then we will do it! Moreover, if you follow these instructions exactly, the whole process will not take you much time, and efforts will generally be minimal.
By the way, the article will consider registering an Apple ID without any card (credit card). Why without her? In fact, you can think of a lot of reasons. I will not go deeply and will list only a few of them.
And here they are:
- The simplest thing is that not everyone has this very credit card.
- Many are afraid to enter their card details (although it is completely safe).
- For some, only free apps in the App Store are enough.
If all these three points have nothing to do with you, then at a certain stage (at what stage? All the details - below in the text), it will be necessary to enter the "plastic" data.
In general, you can register an Apple ID at any time, both when you turn on the device for the first time, and after it. The scheme is almost the same everywhere. Here we will consider the second option, namely, creating an account for an iPhone or iPad, which we have already used for some time.
That is, we need:
- Activated iPhone, iPod, iPad - here the instruction is universal, regardless of the gadget.
- Wi-Fi connection or an inserted SIM card (nothing will work without the Internet).
All is ready? Begin!
We take your device, unlock it and find the App Store icon in the menu, click.
We choose any free game or an application - install. Attention! The free application is required.

Then we need a menu item to create an Apple ID.

A window for creating a new account will appear. We see the choice of a country or region, leaving Russia.

"Terms and conditions ..." - just accept. It's hard for me to imagine a person who will read this - 60 pages after all :) Although, perhaps, I do not have a rich imagination :)


The data entry window opens.

Several important clarifications:
- Be sure to enter real email.
- The password must be composed of at least 8 characters: numbers, letters of the English alphabet, and at least one capital letter is required. Write down or remember the password!
- Age - you must indicate that you are at least 18 years old. If you have not yet reached the age of majority - blatantly lie.
Very important! The specified e-mail and password will be your Apple ID!Save, write on a piece of paper, and never show them to anyone.
Remember, this data is the only proof that the device belongs to you. To understand the seriousness of the situation, I advise you to read (especially pay attention to the last paragraph). Have you done everything? Move on…
Payment details - choose no (unless you intend to use a credit card). Or (if you want to use the App Store to its fullest), specify the payment system, then enter all the necessary information. The item “iTunes Gift Cards…” is optional. We fill in the rest of the data.


A letter was sent to the mailbox indicated above - we open it, and of course we follow the link to complete the process.


Congratulations, registration for an Apple ID (and, completely free) is complete! And now you can use the App Store by installing freely distributed (or by paying - paid) applications and games.
In my opinion, the instruction turned out to be quite detailed, but if you are tormented and haunted by various questions, then I always wait for them in the comments. Feel free to tell us about your problem - I will help, as they say, than I can :)
Updated! An article has appeared that summarizes all the errors that can interfere with the creation of an Apple ID. Therefore, if something does not work out,.
P.S. By the way, for a full and correct registration of Apple ID, you need to click on the social media buttons and "like" the article - try it, it really works!
Users often ask how to activate the iPhone 5 and 5S, because for the first time many different ones appeared on the iPhone. desired functions... What applications to install, how to set up service services, how to password-protect them or register in them, how to run diagnostics after purchase, what settings can be allowed, whether it is necessary to provide access to the iPhone, how to set up the iPhone - many questions arise for a beginner.
In this article we will tell you how to activate the purchased iPhone 5S, how to set up the iPhone 6, including remembering how to activate the iPhone 4 and 4S, and for some cases, we will describe how to activate iPhone 6. The purpose of this topic is to set up an iPhone and avoid installing unnecessary applications, follow the correct procedure and avoid mistakes after buying a new iPhone.
In order to run correctly new iphone the first time, you need to prepare and follow some activation rules for the setup procedure in order to avoid unnecessary mistakes.
Before you turn on your iPhone for the first time, you need to determine if there is sufficient charge in it. In particular, activation on iPhone 3GS, iPhone 4S should occur when there is a 20% charge, and activation of iPhone 6 or iPhone 7 - at a charge of at least 30%. Also make sure you have high-speed WI-FI Internet or iTunes installed on a laptop or computer. Oh, and don't forget the SIM card or Nano-sim. Please note that if the iPhone is locked, then activation will not work without the SIM card of the locked iPhone.
If you see that the iPhone is completely discharged, then you can first recharge it by connecting it via a USB cable to your computer or in the usual way. If iTunes is not installed on your PC, then download it from the official website iTunes.apple.com, and if available, update it to the latest version.
How to activate iPhone 4S and 5S from scratch
So, let's start the process of activating and configuring a new device, which consists of several stages: connection, initial settings, connection to a laptop and activation, as well as the first activation.
Connection
TOhow to turn on the new Athos? In order to turn on the iPhone, hold down the Power start button on the top end panel of the smartphone for a couple of seconds until the "apple" logo appears.
Initial settings
You will see a screen where you will see Apple's greetings in many different languages, then swipe from the bottom left to right to select your language, for example, Russian. Next, you need to select your country, for example, Russia.

Turn on Wi-Fi on your iPhone, after entering the connection password, or connect the device to a computer with iTunes and the Internet.
Activating iPhone 4S
In order for the activation of the iPhone to be performed correctly through a laptop or computer, you need to prepare a USB cable with which we connect the two devices. The iPhone display will show "location services" that must be turned on or off. They come in handy when connecting Google maps or GPS. What exactly to do and how to enable it?

First, you have to accept the license agreement, for which on the bottom right, activate the Agree button. You can also activate your iPhone 6 with this service, or deactivate the location service. You can activate and then disable it in unnecessary applications. The geolocation function is a decent drain on the iPhone battery and shortens the time accordingly autonomous work iPhone.
Activating iPhone 5 and 5S
Further, for owners of versions from iPhone 5S to iPhone 7, activating the "Set Up Fingerprint" function becomes the same mandatory procedure, for which you need to activate the "Set Up Now" key and make a fingerprint scanner. ... In this case, your finger should press the multifunctional button "Home" about 10 or 20 times. After that, a picture with your fingerprint will appear on the iPhone display. Setting up Siri on iPhone 5S or iPhone 7 is quite simple, just run this installed application on your iPhone and follow the sequential steps.

Now you need to diagnose the connections on the iPhone 7. To do this, you need to make a decision about allowing various services to access your iPhone 7 to send data to the Apple server. For example, data about program errors can be sent to the server. What to do? If you do not want to send any data, then click the Don’t Send button.

After successful setup, the iPhone 5 se will greet you: “Welcome to iPhone ! " Thus, the initial activation of the iPhone is completed. IPhone 6S and iPhone 7 are activated in a similar way.
Setting up Apple ID
One of the important steps in the initial setup of an iPhone is setting up and registering an Apple ID, with which you can register in various mega-important applications, such as the iCloud cloud storage.

To register your Apple ID, you can use different ways... We will show you how to register an ID for free using app program Store ... We launch this program and select any application that is free, for example, social networkwhich you usually use and upload the application to your iPhone. Next, a "Login" window will appear with the entries "With existing Apple ID" and "Create Apple ID". If you have a registered ID, then start the activated one by clicking on the first button. If you have not previously registered an Apple ID, then click on the item "create Apple ID".

Then choose your country and agree to the terms of service, which are set out on 66 pages. Now the most important thing is to create an eight-digit password or more, in which at least one letter must be capitalized, at least present 1 number, while it is forbidden to use several identical numbers or letters in a row, and the number should not just be guessed, and, of course, be unique.
When the system asks for payment information, click "No" and enter your address data, filling in all the lines, including select a greeting, a security question and your backup mailbox and the main activated mailbox, to which, after registration, an activation letter will be sent immediately ... By clicking on the link in the letter, confirm the activation of your Apple ID.
What mistakes can not be made when activating iPhone
One of the most common mistakes when activating - bought, but forgot to remove the special protective filmblocking the Home key, so I could not activate it correctly, the scanner was not read from my finger due to the presence of a film on the button.
Another common and more serious mistake is the lack of wI-FI connections logged in for the first time with a computer, but was in a hurry and forgot to update iTunes, so the activation went wrong. And some users fail to update iTunes and receive an error message, since this program was open during the update, and it must be closed.

Still far from a minor mistake is the quick consent of the iPhone buyer so that the seller sets up your iPhone himself and creates an Apple ID for a small fee. He, of course, is always happy and it is clear why. But you are in vain falling into the euphoria of a relatively cheap service. What will you do then when the seller does not tell you the control words of the question during registration or completes the registration with some mistakes? It will not show up immediately, but then you will run into it when the ID will not turn on. Therefore, activate the purchased iPhone only by yourself, writing down all passwords and keywords to remember.
Be sure to keep the purchase receipt and the box itself, which you will definitely need in case of theft or loss of your iPhone.
Since the days iOS 5 activation process iPhone became extremely simple and understandable to any user of technology Applebut what if iPhone 5 your first device with a bitten apple at the end? Then you cannot do without our instructions for activating a new iPhone. If you have one of the previous iPhones on iOS 5 or higher, this instruction it will also help you to take the first step towards using your new gadget.
After the iPhone 5 is unpacked, inserted, we apply from your operator (or made by hand, according to ours), turn on the iPhone by long pressing the button on the top end and proceed directly to the activation process. All screenshots, unfortunately, are in English, but the process is the same for the Russian language, you can't get lost.
1) First of all, we are offered to choose the country of residence and language. We choose accordingly Russia-Russian. 
2) Next, we will be asked whether to enable geolocation services, they are necessary for the operation of many applications (geotags in photos, maps, navigator and even Siri), but if you work as a spy, you can not activate them :) After the iPhone 5 will ask us to connect to wireless network (Wi-fi), the Internet is required to complete the activation process and configure a number of Apple services. Accordingly, we connect if there is an active network nearby, if not, we choose to use mobile Internet from your mobile operator. 

3) Then comes the stage of activation in the network of your operator, you may have to wait a little until all the settings "arrive". The next step is to restore from a backup, in the event that your iPhone is not the first. Recovery options from iTunes and iCloud are available. If iPhone 5 is your first phone from Apple, choose "Set Up an New iPhone" 

Note: All further steps are optional, in fact, the phone can already be used by simply skipping them, but we still strongly recommend that you complete the setup to experience the full power of the new iPhone 5, paired with the equally fresh and wonderful iOS 6.
4) At this step, we need to connect to a wireless network (Wi-fi) and log in with our Apple ID (a personal identifier in the Apple ecosystem, without which you cannot use the 10th part of all services), or register a new one (for free), in in his absence. 

5) Next, we need to accept the agreement on "rights and obligations", click "Agree", or "Accept" in the Russian version of the interface, and activate voice assistant - Siri. In Russian, Siri still does not understand anything, so it's up to you to turn it on or not. 

6) We got to the finals! At this stage, we will be asked whether to send diagnostic data to Apple and will show the cherished button "Start using iPhone." That's it, your iPhone 5 is ready for battle :) 
