Hello friends. In this lesson I will show you how to clean your computer from debris and unnecessary files. It’s no secret that all the junk that is on our computers does not bring any benefit to our system, and in some cases, on the contrary, can be the reason for computer slowdown and various glitches.
Let me show you how you can clean your computer of junk and unnecessary files in a few simple steps.
Cleaning the Registry and deleting unnecessary files
Using free program CCLEANER, we can delete huge amount trash. Download latest version from the official website: https://piriform.com.
Install CCleaner and run it. Go to the Registry tab, make sure all the checkboxes in the section Registry integrity installed and then click Search for problems.

After a few seconds, all unnecessary entries will be found. To clear them, click Fix and in the window that opens Correct marked.


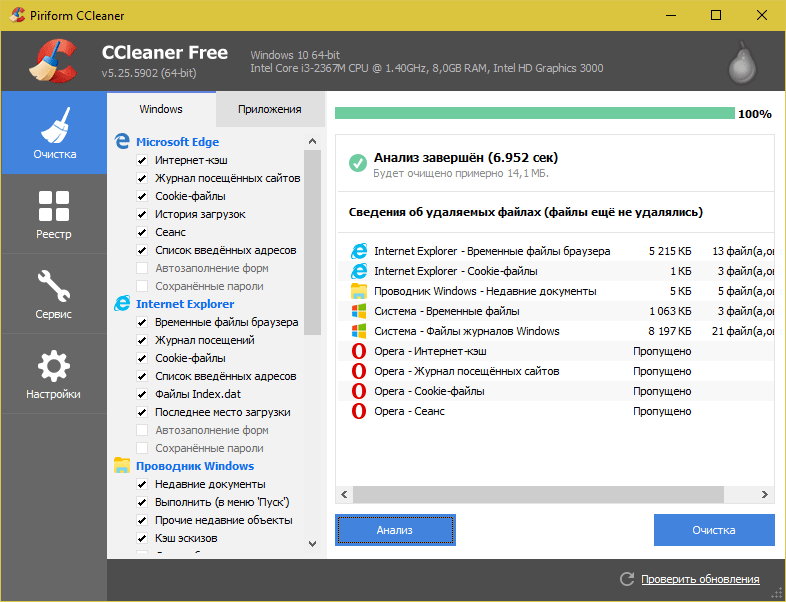
Now open the first tab - Cleaning. Here you can see what checkboxes are in the section Windows and Applications. I usually leave everything by default and click Analysis.

Upon completion, we see a list of all files ( trash), which can be deleted. Their size is also indicated (almost 1 gigabyte). Click Cleanup to delete this whole thing.

System disk cleaning: TEMP folders, Disk Cleanup
On the way to the next step we need clear TEMP folders, in which temporary files are stored, and perform “Disk Cleanup,” which allows you to clean your computer of unnecessary files using standard system tools. Some functions have already been performed by the CCLEANER program, but I assure you that manual checking will not be superfluous!
Open the Computer section, then the system drive (C:) and the following folders: Windows – TEMP.

The contents of the TEMP folder can be completely deleted. Temporary files are stored here and are of no use. If errors appear, for example, " These files are used", then we just click " Skip all". Usually it is not possible to delete the minimum number of files!
There is another temporary folder in Windows, and the easiest way to get to it is in the following way. Click Start and type %TEMP% into the search bar. The Temp folder will appear as found.

In Windows 8 and 10, the search can be launched using a keyboard shortcut WIN+Q.
The found folder needs to be opened and the contents cleared!

After cleaning the TEMP folders, don't forget to perform a "disk cleanup" standard means systems. To do this, click on the system drive right click mouse and select "Properties".

On the "General" tab there is a "Disk Cleanup" button. Click it to analyze unnecessary files.

After a couple of minutes, the program will offer to delete a certain number of files. Check all the boxes and click "OK".

If you have recently updated the system, then in this window you will see an additional “” button.

Click it to delete temporary files that were downloaded to update Windows.
Important! If you have little space on your system partition, then I advise you to read my lesson: . There I told you 10 cool tricks for cleaning the system disk
Scan your computer for viruses: Dr.Web CureIt
One of the important steps when cleaning your computer from unnecessary files– this is of course the same. To do this, you will not need a utility from Doctor Web! Download the latest version from the official website.

Launch Dr.Web CureIt ( does not require installation) and after accepting the agreement, click “Continue” and “Start verification”.


Within approximately 15 minutes the system will be checked for malware. If viruses are found, the program will offer to neutralize them.
To clean your computer of junk, it is not enough to simply delete old and unnecessary files. You should not forget about autoloading, which can also become clogged with various rubbish!
Let's go back to earlier installed program CCleaner and go to the "" section. Here we will see all the programs that run with the computer. I advise you to select unnecessary software and click the "Turn off" button.

I consider unnecessary software to include all programs that are not used immediately after turning on the computer. They can be started manually when needed.
Removing unnecessary programs. 2 ways
If you decide clean your computer of junk, then many programs  can become unnecessary if you just take it and think about how often we use them? Some users install everything into their system without a second thought. It's time to analyze the software and clean your computer from unnecessary programs
.
can become unnecessary if you just take it and think about how often we use them? Some users install everything into their system without a second thought. It's time to analyze the software and clean your computer from unnecessary programs
.
This can be done, for example, using standard system tools by going to Start – Control Panel – Uninstall a program.
After launching Revo Uninstaller, you will also see a list of all programs and clicking on any of them calls the “Uninstall” function.

But here, immediately after deleting the program, we are asked to search for remaining traces. Select "Moderate search" and click "Next".

First, the remaining items in the registry will be found. Select what is indicated in bold and click “Delete”.

And on next step the program will find the remaining files and folders. They also need to be selected and click “Delete”.

Removing duplicates
From time to time, duplicate files may appear on your hard drive. Today you downloaded a movie, and six months later you forgot about it and downloaded it again, you download music and then lose it, you download photos from your phone to your computer several times. All this leads to an accumulation of duplicates on the computer.
It is very difficult to manually search for identical files, so let's use special programs.
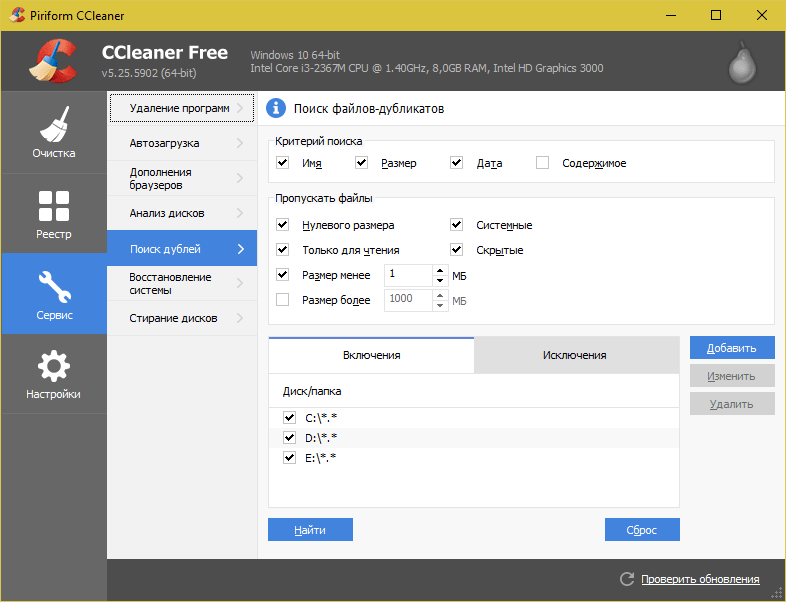
We return to the CCleaner program we are already familiar with and open the Service section, tab Search for duplicates. There are many different parameters that you can customize to suit your needs. For example, I don’t configure anything, I just click “Find”.

After a few minutes, the search for duplicate files will be completed. After carefully studying, I see that I have a couple of identical videos on my computer that can be safely deleted.

I don’t go into detail here, because the program found a lot of files and to remove all the junk you need to spend a lot of time on analysis. But I think the essence of this function is clear!
 Up to this point, we have figured out how to clean your computer from garbage in Windows itself, using standard and third party programs. But don't forget that Computers and laptops also need to be cleaned from the inside..
Don't forget to look inside at least once a year system unit and clean it from dust, and also apply new thermal paste to the processor. Monitoring the temperature of components will also not be superfluous. On this topic, I advise you to read my lesson:. Using the knowledge gained, you will know whether your device is overheating or not!
Now you know how to clean your computer from unnecessary files, junk and programs. That's all, thank you for your attention, I wish you good luck!
When you surf the Internet, the history of all your visits to different browsers is saved on the drive on which the browsers are installed; by default, this is drive “C”. Gradually, these folders “swell” and clog up our disk space. Particularly clogs up the computer Mozilla browser, when I changed it, there was less garbage, although webmasters really love it))
I work in Chrome, Opera and am currently testing the Yandex browser, I really like it so far, but I can’t find yet where to install it and whether they are even available for the Yandex browser. If you know any convenient ones, write in the comments, I will be grateful.
2. Watch videos, music, images online
Fans of social networks who watch videos, “like” or “dislike”, and listen to music through VKontakte players and similar services suffer greatly from this. Understand that to watch or listen to a video or audio file, your computer first downloads it from online services and only then reproduces it. And all these files are temporarily stored on your computer and require deletion.
3. When you remove programs from your computer, a lot of garbage remains in the registry
I gave a link to the official website, but you can find a free copy on the Internet quite easily, just type it into a search engine and find it. This program along with the program being deleted, it deletes a bunch of garbage that remains in the register and history. Learn how to properly remove unnecessary programs, this is very necessary, especially for those who often test new programs and remove unnecessary ones manually.
To remove using the Your Uninstaller program, select the desired program and click “Uninstall”, then everything in order will be clear.
4. When downloading various files to your computer
Quite often, we need to temporarily transfer a file to our computer for printing or viewing (a document, a video file, photos, wallpaper, etc.) and then we forget about it, it lies like a dead weight, and we don’t even remember where it was saved, does this happen to you?
So, to store such files, create a “temporary” folder or something similar and clean it regularly. Just create it not on drive “C”!
5. Empty the Recycle Bin on your PC regularly!
How often do you throw out trash at home? So on your computer, clean your trash can every few days. Remember that just by deleting a file, you do not delete it from your computer, you just move it to the trash and it still clogs up the disk on your computer, with the exception of large files.
We've sorted out those who clog up your PC, let's decide how to clean your computer of junk for Windows 7
What program to clean your computer from junk?
There are several most common programs, but they all have the same principle - cleaning junk files.
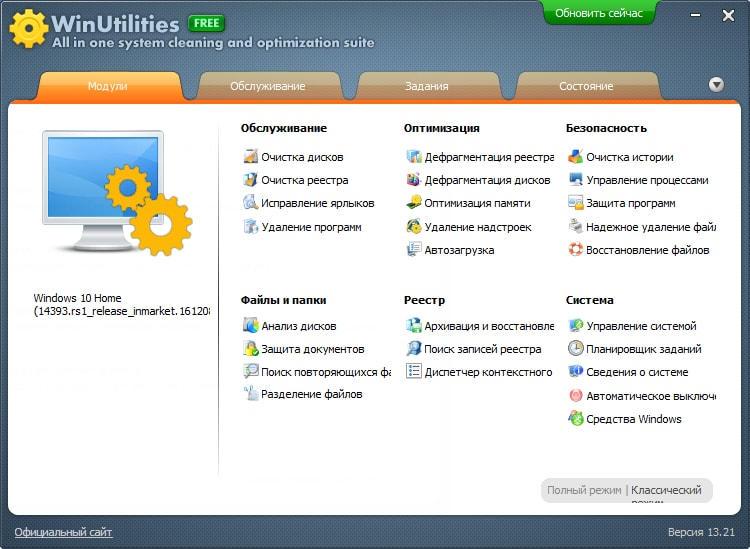
I will tell you everything using the example of a program that I use myself - this is Win Optimizer, the screenshots show version 10 of the program.
It’s very easy to find it on the Internet, if you want a paid version, download it, or if you want a free version, it’s your choice. What can she do? Let's figure it out.

Clearing your browsing history
If you click on the “Favorites” button, you can see in my case that in this program I most often use:

I'm deleting unnecessary programs from startup (StartUp Tuner), clean the browsing history (Drive Cleaner), clear the registry of unnecessary files (Registry Optimizer) and carry out defragmentation (Defrag 3).
Clearing history is very easy. After installing the program, a very convenient shortcut will appear on your desktop:
By clicking on it, you will immediately begin cleaning your computer of debris. Here's what you'll see in a minute when the program analyzes the contamination on your PC:

The numbers circled in green in the screenshot show the number of files that require cleaning. By clicking on the icons pointed to by red arrows, you can view all files in detail.

After checking, go back with the “Back” button at the top left and click “Delete”
After cleaning you should see the following window:

Now your computer will breathe a sigh of relief and will work more quickly, especially if you do not have the newest build, but an old one, like my PC))
What else do I use to clean my computer?
1. Separate drive “C” for the operating system and we don’t load anything extra!
The most important thing when installing an operating system is to create a separate system drive, usually “C” and a drive for all other files “D” or other Latin letters. So you must make sure that all the files that you download to your computer are loaded onto any drive, just not “C”.
There must always be free space for the computer to operate normally. Check availability free space on drive "C" is very simple. Click "Start" and click "Computer":

On my work computer, I have as many as 100 Gigabits allocated for the “C” drive, and 56.6 of them are still free, there is no reason to worry. And on my home computer I could afford to allocate only 40 Gigabits for the system and recently I cleaned it manually this disk, since it was lit red, this is a signal for mandatory cleaning. If you have Windows 7 or 8, then leave at least 50 GB for the system, since hard drives are now large, 1 TB or more.
If you have less than 10% free space left on drive “C”, be sure to clean the drive of unnecessary files! To do this, you can go to the “START” menu => “Programs” =>” Standard programs»=>Utilities and select Disk Cleanup, then select the desired disk to clean.
These could be sections “temporary files”, “recycle bin”, game statistics, various videos, photos that you accidentally downloaded to drive “C”.
This is important!
Never download photos, videos, movies, and other large files to system drive “C”. This disk should contain only the operating system and programs necessary for the computer to operate.
2. Clean the autorun menu
After installing the operating system, you begin to constantly install more and more new programs. Many of them obsessively interfere with startup, that is, when you turn on the computer, this program automatically starts running.
Such programs include Skype, download master, all kinds of torrent clients, updates for all sorts of browsers, search engines, translators, cleaners, readers, acrobats and many others. Gradually, your computer begins to boot not in 20 seconds, but the loading continues for 3-5 minutes and over time more and more.
To change this disgrace, I go to the startup or StartUp Tuner section in winoptimizer or CCleaner
 Next, go to the autorun menu:

Now uncheck the boxes if these programs should not be loaded when the computer starts. Just, Attention! You must be firmly convinced that this is a program or application that can be removed from startup; do not remove all kinds of software applications or files.
Now you will need to run programs that you disable in startup manually, but you will significantly speed up your PC.
I was once on vacation at the seaside, renting an apartment, and the owners allowed me to use their computer; when I started it up, I was horrified. Going to the panel of running processes at the bottom right, I saw a huge pile of shortcuts for all kinds of mail ru games, Skype, programs for playing files and downloading, mail ru cloud, and from them the system performance was zero, the browser opened bookmarks slowly, files were not played.
After cleaning the startup and computer, everything started working much faster. After this story, I realized that not everyone is okay with the cleanliness of their computer disks and decided to write a note about it.
3. Be sure to use an antivirus
It's like brushing your teeth in the mornings and evenings; antivirus on Windows is a must. Some people love Kaspersky, please load the system to its fullest, others prefer nod-32, but I like it free antivirus Avast , it doesn't matter as long as it is effective and updated regularly.
I chose free version for a home PC and I’m happy with it, I’ve been using it for 4 years, it’s updated regularly, viruses don’t bother me or infect my hard drive.
Remember that going online without running an antivirus is very dangerous; it should always start when your computer starts and work constantly.
4. Use the task manager when your PC freezes
It often happens that during operation the computer freezes and does not respond to anything. To solve this problem, the key combination “Ctrl” + “Alt” + “Delete” often helps and then you can see which process is crashing the system (click on “memory”) and terminate it.

Select the process and click on “End Process”.
5. Be sure to defragment your disks once a month
Defragmentation- ordering the distribution of memory on the hard drive (hard drive) of a computer, can be carried out by date, name, frequency of accessing files, and so on.
Defragmentation can be done with win Optimizer, with the native defragmenter on your computer, everyone has one, with the O&O Defrag program, with anything, just make sure it’s once a month. In simple words These are arranging files in a certain order so that access to them is faster and allows information to be evenly distributed on the hard drive.
Here are all the necessary actions that I perform and advise you, friends, on my PC. I am sure that the speed of your personal computer will increase if you carry out such cleaning, but do not forget to do it regularly.
Now you know what program you can use to clean your computer from debris and what actions you can use to increase the speed of your PC. There are many similar programs, but they have the same principle, the main thing is to create a system restore point before deleting files and programs in order to avoid glitches and system crashes.
How do you clean your computer, when was the last time you installed it? operating system, please share, mine has been working for 4 years already, it’s time to re-upload it))
Now, according to tradition, there is a new crossword puzzle and the topic corresponds to the title of today's post.
Crossword No. 5 of the Erudite-4 marathon on the topic “My Computer”
To solve the crossword puzzle, click on the picture with the image of the rebus. A puzzle will open in a new window, which you need to solve. Then make up keyword from the numbers in the picture.

To start solving, click on the picture!
>> Submit keyword<<
I hope everyone has a personal computer at home and the crossword words did not cause any difficulties. There are only 2 crossword puzzles left until the end of the marathon, we will sum up the results soon.
I look forward to your answers and feedback on the topic of the post and the new crossword puzzle.
During its operation, the Windows 7 operating system accumulates a lot of garbage and unnecessary files. This is usually a consequence of system updates, unpacking archives and browsing the Internet. The system itself has standard utilities for removing junk, but they do not start automatically and periodically you need to clean it manually.
Manually deleting temporary files via the command line
Removing unnecessary files and directories from the hard drive is done using the internal “DELete” command. This can be done both from the operating system and when starting the computer when Windows 7 is not yet loaded.
To delete an individual file, enter the “DEL” command and the file name. To delete a group of files (for example, all temporary files that have the TMP extension), you can use the wildcard character: “DEL *.TMP”.
To delete temporary files via the command line, do the following:
- Click on the "Start" button, enter "cmd" in the search and launch the command line.
Launch Command Prompt via Windows Search
- In the window that appears, navigate to the root system of the disk using the “CD..” command. Two dots indicate a higher-level directory, and one dot indicates the current one.
Navigate to the root system of the disk using the "CD.." command
- Enter the command “DEL C:\WINDOWS\TEMP\*.TMP” or “DEL C:\WINDOWS\*.TXT” and then confirm the deletion.
Enter the command “DEL C:\WINDOWS\TEMP\*.TMP”
In the same way, you can delete unnecessary directories, but instead of the “DEL” command, you enter “DELTREE”.
Using DOS wildcards - simple, but powerful and dangerous. This method requires precise knowledge of the location of files and directories - it is not entirely suitable for untrained users.
If you are not using any of the file shells in which directory files are visible, it is recommended that you view their listing with the “DIR” command before deleting files. For example, if you intend to delete all files with the TXT extension, before entering the “DEL *.TXT” command, you should play it safe and view them with the “DIR *.TXT” command.
Manually clearing the Temp folder
In the Windows 7 operating system, there is a separate folder for storing temporary files. It contains files and directories that remain after installing programs, unpacking various archives, and surfing the Internet. To remove them, do the following:

You can also get to this folder as follows:

Removing unnecessary files using the Disk Cleanup utility
Disk Cleanup is a program built into the operating system that removes unnecessary junk from your computer. With its help, you can find many files that have not been used for a long time. Removing them will increase the efficiency of your computer. All temporary and unused system files will be deleted and the Recycle Bin will be emptied.
To start cleaning, do the following:
- Open the Start menu and click on All Programs.
Expand "All Programs"
- Go to the "Accessories" folder, then "System" and run the "Disk Cleanup" utility.
Run the Disk Cleanup utility
- Select the disk to clean and click OK.
Select the disk to clean
- Mark the items you are interested in and click OK.
Check the items you are interested in and click OK
You can also access this utility in the following way:

Removing unnecessary programs using a standard utility
In addition to system garbage, long-forgotten programs or virus software may be installed on your computer. To remove them, do the following:
- Open the Start menu and go to Control Panel.
Open Control Panel
- Click "Uninstall a program."
Click "Uninstall a program" when categorized
- Right-click on the program you don’t need and select “Uninstall.”
Remove all unnecessary programs
- After regular uninstallation, go to the Program Files park on drive C and erase the folder belonging to the deleted application, if it is there.
Overwrite the remaining folders
How to clean a disk of junk on Windows 7 using third-party programs
Using specialized programs, you can clean your hard drive most effectively, maximizing the performance of your computer.
- Wise Care 365;
- Glary Utilities;
- 360 Total Security;
- Your Uninstaller.
You can easily find all the above software on the Internet.
Wise Care 365
Wise Care 365 comes in free and paid versions. It cleans the registry, local disk, allows you to edit startup, optimizes the operation of many applications and the operating system itself. If you use it constantly, you can avoid various crashes and freezes on your computer.
- Launch the program and click the "Check" button.
Immediately after starting the program, run a system scan
- After completing the check, proceed to correct all errors found.
After receiving the scan results, correct any errors found
- Go to the “Cleaning” tab and click on the big green button in the “Registry Cleaner” section.
Click on the "Cleanup" button to heal registry errors
- Now open the “Deep Cleaning” section and run a scan.
Click "Scan" under "Deep Cleaning"
- Then click “Cleanup” to fix any errors found.
Once the deep scan is complete, click "Cleanup"
- Go to the “Optimization” tab and run defragmentation of the hard drive.
Run hard drive defragmentation
- Now disable autorun programs in the appropriate section.
Disable startup programs
Glary Utilities
Glary Utilities comes in free and paid versions. This program cleans and restores the registry, analyzes disk space, deletes temporary files, defragments the disk, and also has many other functions.
- Launch the program, go to the “1-Click” tab and click “Find problems”.
Go to the 1-Click tab and click Find Issues
- Wait until the scan is completed, go to the “Modules” tab and click “Erase traces”.
Click on "Erase traces"
- Wait until the analysis is completed and click “Erase traces.”
Click "Erase Traces"
- Check the required items in the left panel and close the window. Then restart your computer.
Mark the items that interest you and close the window
360 Total Security
360 Total Security is a free antivirus program based on the Avira and Defender engines. This program does not conflict with other antiviruses and has a number of additional advantages. It allows you to clean the system of unnecessary files, optimize startup applications, search for vulnerabilities, compress the disk, and can generally speed up your computer.
- Immediately after starting the program, run a system scan.
Run a system check
- Once errors are found, click "Fix".

The accumulation of remnants of uninstalled applications, unnecessary registry entries, temporary files, logs that remain after updating Windows and programs, and other garbage reduces the performance of the computer. If all this is not removed, over time the PC becomes so slow and annoying that the user cannot stand it and reinstalls the system. However, after a couple of months everything returns to normal - the brakes, low FPS, and all sorts of glitches. Meanwhile, the problem can be solved simply - it is enough to do preventive maintenance 1-2 times a month using a computer cleaning program. We will talk about them today.
We have prepared a brief overview of the capabilities of the best Windows utilities that can speed up your system by up to 50-70% relative to the original level. All of them are free and designed for new users.
CCleaner is one of the most popular Windows cleaning utilities in user ratings. And one of the safest. Cleaning the registry and applications in CCleaner is configured in such a way that, even if you try, you will not be able to delete something important, thereby disrupting the performance of the system. In this part, the program can be used by novice users without fear. However, it also has functions that it is better not to touch without proper knowledge. One of them is erasing disks. If you accidentally confuse it with Disk Cleanup (Windows' built-in optimization tool), you may permanently lose some important data, as the program destroys it permanently.
Proper use of CCleaner can speed up your computer by 5-50%. The result depends on the initial clutter of the system and the amount of information on the disks.
CCleaner functionality
All application functions are divided into 4 groups, and groups into subgroups. The first group is “Cleaning”, includes sections:
- Windows (Edge and Internet Explorer web browsers, Explorer, system components, etc.).
- Applications (third-party browsers, multimedia, Internet applications, system applications, etc.).
Clearing both removes only temporary and unnecessary data, without affecting the main one.
The second group - “Register”, has no subgroups. Here is a tool for fixing registry errors and cleaning it from garbage.
The third group - “Service”, contains the following sections:
- Managing startup programs.
- Browser add-on management.
- Analysis of disk space distribution.
- Search for duplicate files.
- System Restore.
- Erasing disks.
The fourth group is “Settings”. It includes:
- Basic settings of CCleaner.
- Browser cookies (setting exceptions).
- Inclusions (objects that are always subject to removal).
- Exception (objects that the program should not process).
- Monitoring applications (setting up auto-cleaning).
- Trusted users.
- Additional parameters (for experienced ones).
CCleaner supports many languages, including Russian, Ukrainian, Kazakh. You can download it in both installation and portable versions. The latter can be launched, for example, from a flash drive.
Wise Care 365

Wise Care 365 is an impressive package of utilities for optimizing your computer, most of which are available for free (the application is available in two versions - free and premium, in the free version some items are blocked). Like CCleaner, Wise Care 365 scans the system for garbage, errors, incorrect (from the developers’ point of view) settings and makes it possible to fix them - both individually and “in bulk”.
With this program, the user can clean and optimize Windows without thinking about the purpose of a particular function. Just run the scan and click the “Fix” button after it.
Wise Care 365 functionality

Wise Care 365 features are also divided into groups. The first tab, “Check,” is intended for a comprehensive search and elimination of problems throughout the entire system. The following parameters are checked:
- Safety.
- Unnecessary files (temporary, cache, logs, etc.).
- Invalid registry entries.
- System optimization (presence of factors affecting performance).
- Computer history (opening documents and visiting web resources through Internet Explorer).
After scanning, the program determines the PC’s “health” index and offers to correct errors with the click of one button.
On the same first tab there is a panel of additional utilities. Available in the free version:
- Deleting files that cannot be deleted using Windows.
- PC shutdown timer.
- Recovering deleted files.
- Memory optimization.
- Uninstalling programs.
The second tab, “Cleaning”, contains several subsections:
- Cleaning the registry.
- Quick disk cleanup.
- Deep cleaning.
- Cleaning the system (unnecessary Windows components).
The third tab – “Optimization” – contains:
- Subsection “Optimization” (here you can change registry settings to stabilize and speed up Windows, increase network performance, and shorten the time it takes to turn your computer on and off).
- Disk defragmentation.
- Registry compression and defragmentation.
- Startup management.
The “Privacy” tab contains the following subsections:
- Wiping the disc.
- Overwriting files.
- Password generator.
On the last tab - “System”, the application shows running processes and a list of PC equipment.
Wise Care 365, like Ccleaner, has been translated into Russian and is available in installation and portable versions.
Windows Cleaner

The Windows Cleaner utility includes tools for freeing the system from unnecessary files, registry entries and unused programs that can be launched manually and on a schedule. Among the optimization tools, only startup management is present here. There are no options here aimed at increasing computer performance (not counting cleaning tools).
Windows Cleaner saves a history of previously performed cleanings. If you accidentally delete an important registry entry or file, the program allows you to undo the last operations - perform a system restore to a checkpoint.
Windows Cleaner functionality

The Cleaning section of Windows Cleaner contains two tabs: Files and Registry. The first one contains a list of unnecessary file system objects, the second one contains registry entries. The program supports 4 cleaning modes:
- Fast.
- Optimal.
- Deep.
- Custom.
After scanning, Windows Cleaner displays a list of objects to be removed. Strange, but the user does not have the ability to remove any file or entry from it. You can only exclude an entire group of objects from scanning (temporary files, memory dumps, report logs, etc.).
The “Service” section contains the “Startup” and “Uninstall programs” tabs.
“History” stores records of previously performed operations.
In “Settings” you set the cleaning parameters according to the schedule: interval, time, mode.
Windows Cleaner was developed in Russia. The official website contains reference information on working with the program in Russian, as well as a feedback form with the developer.
Glary Utilities Free

Glary Utilities Free is a free harvester application for optimizing your computer. Its set includes more than thirty utilities for all occasions, some of which are unique for products of this class or are found only in paid versions. For example, searching for and removing spyware (spyware), checking for updates to programs installed on your computer, encrypting files, optimizing memory, cutting and merging files, etc. A list of frequently used utilities is shown in the screenshot above.
Features of Glary Utilities Free

Glary Utilities Free functions are divided into 3 groups:
- Brief overview.
- "1-click".
- Modules
The "At a Glance" section contains general program settings and Windows startup controls.
“1-click” contains tools for quick system optimization:
- Cleaning the registry.
- Correction of shortcuts.
- Removing spyware.
- Recovering (checking) the disk.
- Privacy.
- Deleting temporary files.
- Autorun manager.
In the list of problems, next to each item there is an explanation. In addition, the user has the opportunity to prohibit the correction of any element by unchecking the checkbox next to it.
The “Modules” section contains all the components (utilities) of the program that the user can run separately - as needed. This includes tools for cleaning, managing disk space, files, etc. In the bottom panel of all tabs of the main window there are shortcut buttons for some of them.
Glary Utilities Free has another interesting feature - creating a portable version of itself. The option is located in the "Menu".

WinUtilities Free
The functionality of the free version of WinUtilities Free, like Glary Utilities, is very diverse for applications of this class. It includes 26 system maintenance and cleaning modules. There is also a one-click Windows optimization function and its own task scheduler for performing scheduled operations.
Features of WinUtilities Free

The “Modules” tab of WinUtilities Free contains a list of all application components, divided into groups:
- Maintenance (cleaning disks, registry, shortcuts, etc.).
- Optimization (disk defragmentation, registry defragmentation, startup management, etc.).
- Security (cleaning history, managing running processes, deleting and restoring files).
- Files and folders (document protection, disk space analysis, duplicate search).
- Registry (backup, search for partitions and keys, context menu manager).
- System (launching Windows utilities, system management, task scheduler, setting automatic computer shutdown).
The “Maintenance” tab contains settings for quick scanning and system optimization with one click.
The “Tasks” section includes 4 scheduled PC maintenance options:
- Disk cleaning.
- Clearing history.
- Cleaning the registry.
- Disk defragmentation.
The Status section shows information about the product.
InfoMan

InfoMan is an easy-to-use information management manager on your PC. Consists of five modules that are launched separately. The cleaning module is used to search and delete temporary files according to the list of a program or user.
Other InfoMan modules are for:
- Synchronize data in two specified directories.
- Password storage.
- Event reminders.
- Application settings.
After launch, the program icon is placed in the system tray. Modules are launched from its context menu.

Advanced System Care

Advanced System Care is the last program in our review for comprehensive computer maintenance from the famous developer IObit. In addition to cleaning and optimization tools, it contains tools to improve performance and protect various system components.
Advanced System Care Features

As with the other apps reviewed, Advanced System Care features are divided into categories:
- Acceleration.
- Protection.
- Cleaning and optimization.
- Tools.
- Center of action.
The “Acceleration” tab contains tools to improve computer performance: turbo acceleration, hardware acceleration, etc.
“Protection” contains tools to improve security - video identification of the user’s face, anti-spying tools in the browser, safe web surfing, etc.
“Cleaning and Optimization” contains utilities for removing garbage from the file system and registry.
“Tools” lists all application modules plus other IObit products.
The Action Center provides tools to automatically update programs installed on your PC and download other IObit products.
In addition, Advanced System Care installs a widget on the system that is constantly on the screen and displays the loading percentage RAM and processor.
The applications included in today's review support all editions of Windows, from XP to Windows 10. We decided not to talk about programs whose authors limited themselves to supporting systems up to Windows 7, since they are not relevant today.
During its operation, the operating system creates a lot of temporary data that is stored on disk (usually drive C) in the form of files and registry entries. These can be files from update packages, archivers, shadow copies, content downloaded from the Internet, etc. Third-party programs behave in a similar way, for example, browsers that store website data in a cache. Some temporary files are deleted automatically after a certain time, others remain on the disk until they are forcibly deleted.
If the user does not regularly maintain and clean up the C drive, the free space on it becomes less and less, to the point that the disk eventually ends up filled to capacity with temporary files, which precludes further writing of any data to it and reduces its performance. There are two ways out of this situation - either increase the size of the system partition at the expense of the user volume, or perform a comprehensive cleanup of it, which is more preferable. Let's see how to free up space on your local C drive in Windows 7/10.
What can you delete if the disk is full?
The system volume contains many important files that ensure the normal operation of Windows, so deep cleaning it should be approached with the utmost care. What can be removed from the C drive to free up space and not disrupt the system? All its contents can be divided into three groups. The first includes files that can be deleted without any fear. The second consists of files, the deletion of which, although it will not harm the system, can still cause certain problems under some circumstances. The third group includes files that cannot be deleted, as this can make programs and the system inoperable. You can clean up drive C without negative consequences by deleting:
- Cart Contents.
- Library catalogues.
- Folders and Downloaded Program Files in the Windows directory.
- Cache of browsers and some third-party programs.
- Icon sketches.
- Logs and memory dumps for system errors.
- Old Chkdsk utility files.
- Bug reports.
- Files created by the Windows debugger.
With some caution, you can delete shadow copies () created during the installation of updates and stored in backup copies, files from previous system installations (Windows.old folder), unnecessary components and applications, folders of uninstalled programs in the ProgramData, Program Files and Roaming directories, MSOCache folder Microsoft Office. If you do not use Quick Start, you can delete the file hiberfil.sys in the root of drive C, having previously disabled these functions in the settings. It is acceptable, but not recommended, to delete the swap file pagefile.sys. Other files and folders on drive C cannot be deleted so as not to disrupt the operation of the system.
Cleaning junk and temporary files using Windows
First, let's look at how to clear drive C of unnecessary files in Windows 7/10 using the operating system itself. Windows has a built-in utility for these purposes. cleanmgr.exe, which can be launched either through the properties of the partition being cleaned or through the “Run” dialog box. After the utility scans the disk for outdated files, check the boxes on the “Disk Cleanup” tab and click “OK.”
If you click the “Clean up system files” button, reports, device driver packages, error dumps and, additionally, restore points, with the exception of the most recent one, will become available for deletion.

For a deeper and more thorough cleaning of drive C from garbage, you can use the built-in console utilities Dism And vssadmin. The first allows you to delete temporary data from the WinSxS folder, including backups created before installing Windows updates. To do this, use the following commands executed in the CMD console running as administrator:
- DISM.exe /online /Cleanup-Image /StartComponentCleanup
- DISM.exe /online /Cleanup-Image /SPSuperseded
- vssadmin delete shadows /all /quiet
The first command does the same thing as the cleanmgr.exe utility, only more thoroughly.

The second deletes all backup update packages from the WinSxS folder.

The third command can delete all restore points, including the last one.

However, you should use these tools with caution, since after executing the indicated commands, you will no longer be able to roll back the system to a working state or a previous version.
Note: Before cleaning the WinSxS folder, it is recommended to set its true size, thereby making sure that it really needs cleaning. To do this, you need to run the command on the command line Dism.exe /Online /Cleanup-Image /AnalyzeComponentStore and compare the actual size of the component store with the size indicator in the Explorer properties.

After updating Windows to a newer version, a folder appears in the root of drive C Windows.old, which can take up significant disk space.

The contents of this directory are represented by copies system files installing a previous version of Windows. If you are determined not to return to the old version of the system, you can delete the Windows.old folder. This is done again either using cleanmgr.exe or using the command line. In the first case, you need to find and select the “Previous Windows installations” item on the “Advanced” tab; in the second case, run the command in the CMD console running as administrator rd /s /q c:/windows.old.

You can get a little extra space on the C drive by removing unused components, the same ones that the classic Add/Remove Programs applet provides access to.

The standard Dism utility is also used here. To select and uninstall an unused Windows component, run the following two commands in the CMD console running with elevated rights:
- DISM.exe /Online /English /Get-Features /Format:Table
- DISM.exe /Online /Disable-Feature /featurename:NAME /Remove
The first command displays a list of all components in the system, the second deletes the selected element. In this example, its name must be substituted for the NAME line element.


Manual removal of programs and files
With the exception of Windows 8.1 and 10 universal apps, almost all desktop programs are installed in the folder Program Files. If a program is no longer needed, it should be deleted so that it does not take up disk space, but this must be done either using a standard uninstaller or using special third-party programs. However, after uninstalling applications, folders with configuration files may remain on the disk, the weight of which can reach several hundred megabytes. Such data must be deleted manually.
Let's say you have removed Microsoft Office or Skype from your computer and you also want to get rid of all their “tails” remaining on the C drive. To do this, carefully check the Program Files and ProgramData directories in the root of drive C, as well as the folders C:/Users/Username/AppData. If the folder name matches the name of the deleted application, it can be deleted.

The AppData folder is a little more complicated. This hidden directory contains three subfolders: Local, LocalLow and Roaming. The first stores files created during the operation of various programs. You cannot clear it entirely, as this will most likely lead to the loss of saved application settings, however, half-empty folders of uninstalled programs can be completely safely deleted. You can also safely clear the contents of the folder located in it Temp.


The same applies to the LocalLow and Roaming folders; it is permissible to delete from them only those directories that belonged to previously uninstalled applications.

Note: By clearing the contents of the Local, LocalLow and Roaming folders, you lose user settings and data saved in their cache. For example, after deleting its folders in your user profile, you will lose your current messenger settings and part of your message history.
As for removing universal applications, they are uninstalled using the standard tools of the system itself or the CCleaner program, which will be discussed below. You can also move some universal applications from drive C to drive D, if they support this feature.

Transferring desktop programs to another volume is also possible; there is a special utility for this purpose SteamMover, which you can download from the developer’s website www.traynier.com/software/steammover.
Using CCleaner
Many novice users are interested in how to delete unnecessary files from drive C using third-party programs, as well as which of these programs are more effective and safe in this regard. These can be recommended CCleaner– a simple, fast, convenient, and most importantly safe Windows disk and registry cleaner. This program allows you to delete temporary data from the Internet and Windows itself, the contents of the thumbnail cache and DNS, Index.dat files, memory dumps, fragments of chkdsk files, various system logs, outdated prefetch files and a lot of other non-essential data.

Using CCleaner, you can clear the system registry of incorrect entries, optimize, enable, disable or remove browser extensions, analyze the contents of hard drives, search for duplicates and, of course, uninstall unnecessary applications, including universal ones.


CCleaner's interface is very simple, so understanding its simple functionality will not be difficult even for a novice user.
Considering, however, that the main purpose of CCleaner is still cleaning, all its additional tools have limited functionality. If your C drive is full of unknown things, and you want to find out what exactly it is, then for these purposes it is better to use specific utilities, for example, Scanner, JdiskReport or their analogues, showing more accurate information about the file structure of the media with the ability to navigate through subdirectories.

Other ways to free up space on drive C
Clearing the Driver Store
The steps described above are usually enough to free up enough space on the system volume, but what if drive C is still full? What else can you do to get additional space? One option is to clear the contents of the folder FileRepository located at C:/Windows/System32/DriverStore.

This directory contains copies of device drivers that were ever connected to the computer, and may also contain outdated versions of drivers. Before deleting driver packages from the FileRepository folder, it is highly advisable to create a complete list of them and find only outdated versions in it, leaving the rest untouched. It also wouldn't hurt to create a complete copy of all drivers installed on the system. To list the DriverStore drivers in a file, run the following command in an elevated command prompt:
pnputil.exe /e > C:/drivers.log

Compare the driver versions in the list and remove only the outdated ones.

To remove the selected driver, immediately run the command in the console pnputil.exe /d oem№.inf, where № is the name of the driver in the list.

If an error appears in the console when uninstalling a driver, it means the driver is being used by the system. There is no need to touch such a component.
As an alternative to the command line, you can use free utility Driver Store Explorer, just designed to remove old unused device drivers.

Disabling hibernation
Thanks to the hibernation mode, the user can quickly return to work in running applications, on the other hand, its use requires the allocation of significant space on the system disk, slightly less than or equal to the amount of RAM. If having free space on your hard drive is a priority for you, you can disable hibernation mode by deleting the hiberfil.sys container file.

Launch the CMD console as an administrator and run the command in it powercfg -h off. Hibernation will be disabled and the bulky hiberfil.sys file will be removed.
Note: The hibernation file can be compressed by a maximum of two times with the command powercfg hibernate size 50.
Disabling the page file
In addition to other hidden system objects, there is also a file in the root of drive C that, when certain conditions may be deleted. This is the swap file pagefile.sys. This file plays the role of a RAM buffer, and if an application does not have enough RAM to operate, its data is temporarily written to . Accordingly, if there is no swap file, a heavy application will slow down greatly or simply freeze while waiting for faster RAM to become available. Therefore, disabling and deleting the paging file is not recommended unless the computer has a very large amount of RAM.
If your PC has more than 10 GB of memory or you do not intend to run resource-intensive applications, you can try carefully disabling swap. To do this, open Advanced system settings and on the “Advanced” tab in the “Performance” block, click the “Options” button.

This will open another window. Switch to the “Advanced” tab, and then click the Change button in the “Virtual Memory” block.

Uncheck the “Automatically select paging file size” checkbox, turn on the “No paging file” radio button, save the settings and reboot. The pagefile.sys file will be deleted.

Removing the MSOcache folder
Users who have installed Microsoft Office have a hidden folder in the root of the system volume MSOcache, the weight of which can reach several gigabytes.

This folder is a cache office suite and contains files that may be needed for recovery Microsoft work Office in case of damage. Neither in Microsoft launch Office, the MSOCache folder is not involved in working with documents, so it can be deleted in the standard way. Just keep in mind that if Microsoft Office is damaged for some reason, you will have to restore the package installation disk with its distribution.
Compressing the contents of a system volume
You can free up some free space on drive C without deleting anything from it at all. Instead, all system files can be compressed. To do this, just open the properties of drive C, on the “General” tab, check the “Shrink this drive to save space” checkbox and click “OK”.

To compress system files in Windows 10, you can use the function CompactOS by running one of two commands in the CMD console running as administrator:
- compact /CompactOs:query
- compact /CompactOs:always

The second command performs the same actions as the first, but in forced mode. It is used if you really want to shrink the system volume, and the first command rejects the operation, considering it inappropriate. The compression is completely reversible and to return file system to normal state, just execute the reverse command compact /CompactOs:never.
In addition to NTFS compression, LZX compression is available in Windows 10, but it has a number of disadvantages, which is why it is not widely used. LZX compression is applicable to read-only files and directories, but an entire system volume cannot be compressed with its help due to the risk of an unbootable system.