If the chipset and the LGA 775 motherboard can theoretically support the XEON 771, but the native BIOS does not support it, and the modified one does not, then you can modify the BIOS yourself.
IMPORTANT
1. All changes in the BIOS firmware (.ROM file usually) you make at your own peril and risk. On error from motherboard it turns out a guaranteed "brick"
2. The file size of the original firmware and the modified version must match up to a byte.
3. Firmware of the modified BIOS file back into the microcircuit is performed only using a proprietary utility from the motherboard developer (you must download it from the manufacturer's website).
4. Top motherboards in the BIOS itself have a built-in firmware update module (for example, EZ Flash 2 utility for ASUS P5Q in the Tools section) - the best option.
How to do it better:
1. Still looking for a ready-made version with XEON support on the Internet?
2. Download the latest firmware from the official website and add microcodes?
As you can see, the second option is safer, in any case you download the original firmware from the motherboard manufacturer's website, i.e. the latest version and the absence of errors are guaranteed (more precisely, the correction of all previously found errors). When downloading a ready-made version from third-party resources (for obvious reasons, it will not be on the original site) - you can get a crooked version and kill the BIOS.
Preliminary, you can evaluate the presence of XEON microcodes in the BIOS firmware.
- get the current AMI BIOS image via Universal BIOS Backup ToolKit 2.0
- look at the contents of the received ROM file through AMIBCP V 3.37

BIOS option AMI (American Megatrends Inc).
1. Download the latest version BIOS from the website of your motherboard manufacturer
3. Download microcodes for XEON 771 processors: lga771_microcodes
4. Find out the CPUID of your processor using AIDA64 or a similar program (it looks like cpu0001067Ah). If a BIOS will be sewn up before installing the processor, then we skip this item.

5. Unpack the archives MMTool and lga771_microcodes and leave from files with the extension .bin only those files beginning with the same CPUID of your computer (for example, cpu0001067a_plat00000044_ver00000a0b_date20100928.bin)
If we don't know what code, then we sew everything up.

A. Launch MMTool... Press the button (1) Load ROM and load the latest BIOS for your motherboard into the program. If you have the newest BIOS, then you can also merge the BIOS backup utility from the PC and edit it.
B. Go to the tab (2) CPU Patch, then with the button (3) Browse, open the file .bin corresponding to your CPUID.
C. Leave the default in options "Insert a Patch data" and press the button (4) Apply.
After updating with modified bios you need to do a factory reset via the reset button or jumpers, if the motherboard supports such a reset, or by pulling out the BIOS battery for a couple of minutes. Further, the processor is already correctly perceived by the computer and works as it should.
Basic Input Output System - basic input-output system, abbreviated BIOS. A small microcircuit on the motherboard that gets control first when the PC is turned on. Provided: basic PC settings check PC components at startup ...
Hello dear friends, Artyom is with you.
Back in January of this year, there were reports of new hardware vulnerabilities in Intel and AMD processors.
Recently there were microcode updates for Intel processors(revision 84), and I decided to check how things are in practice.
Although the information has long been known to everyone, I will still tell you a short background story.
The hardware vulnerabilities of the processors were named Meltdown and Specter, and they were identified by researchers from the Google Project Zero group.
Specter has two attack options, codenamed CVE-2017-5753 and CVE-2017-5715.
Meltdown has one variant of the attack, codenamed CVE-2017-5754.
P. S. CVE is short for English " Common Vulnerabilities and Exposures»- a database of well-known information security vulnerabilities.
Seeing these designations for patch descriptions, you will immediately understand what's what and why.
Moreover, it is easiest in practice to operate precisely Meltdown, to which all modern Intel processors are exposed.
In order to get rid of Meltdown, you need to update the processor microcode or patch the kernel operating system.
Specter, on the other hand, is more difficult to implement, but fixing a vulnerability requires patching each program you use separately.
Chips from AMD are less susceptible to vulnerabilities like Meltdown (although it was initially claimed that they were not affected at all).
This type of malicious code works extremely slowly on them, but it still works.
Both AMD and Intel processors are vulnerable to Specter-type vulnerabilities, there are no options here.
Processors with ARM architecture are also susceptible to the same vulnerabilities, but now we will only talk about computers with processors of the x86-64 family.
P. S. Security research never stops and more could always appear, including in AMD and Intel processors.

Important note! While the video was in the editing and the clock material was written on the site, new research in the field of processor security appeared.
New variants of the Specter vulnerability were identified, which were codenamed CVE-2018-3640 (the so-called attack variant 3a) and CVE-2018-3639 (attack variant 4).
Let me remind you that Specter is being fixed by updating the used software, such as browsers and so on.
However, the latest attack option CVE-2018-3639 will also need to update the processor microcode on Intel chips, which may slightly reduce performance.
AMD claims that the company's chips will not need new microcode from these attacks, and everything will cost with the usual patches of Windows and other software.
These vulnerabilities are of low priority for common home computers.
Since there are no new updates yet, I will focus on the original theme of my video.
We will talk about the microcode of Intel processors, but the microcode is still different and does not fix the Specter 4 attack variant.
If you are using operating systems of the Windows family, then these links will be useful to you:
Here you can find all the current patches (and their names) that fix the vulnerabilities of this group.
For example, the very first patch for Windows 10 was released on January 3, 2018 under the name KB4056892.
However, there was an issue where the Meltdown software patches were degrading the performance of Intel-based systems.
Somehow I didn't have free time to do my little tests.
However, now with the release of new versions of firmware for motherboards, I wondered how things are in this area.
I am using ASRock Z370 Gaming K6 motherboard and accordingly refer to the official website of the manufacturer to download the latest BIOS.
The updated microcode for Intel processors appeared in BIOS version 1.60, which was released on March 2, 2018.
I will install an even more recent BIOS version 1.80, which was released on March 26, 2018.

To begin with, I'm interested in testing the fixes for the processor microcode without additional software patches.
The operating system is Windows 10 version 16299.371 without additional installed patches from the hardware vulnerabilities Meltdown and Specter.
P. S. All conclusions drawn will concern only new Intel processors, because new BIOS versions are unlikely to appear for old motherboards.
If you are interested, you can do tests with software patches on older Intel processors.
Complete configuration of my computer:
CPU: Intel Core i5 8600K.
Cooler processor: Arctic Cooling Liquid Freezer 240.
Maternal pay: ASRock Fatal1ty Z370 Gaming K6.
Operational memory: GoodRam Iridium DDR4 2400 MHz (2 × 8 GB IR-2400D464L15S / 8G).
Video card: Asus Dual GTX 1060 6GB (DUAL-GTX1060-O6G).
Storage devices: Sata-3 SSD Plextor M5S and Sata-3 HDD Seagate 1 TB (ST1000DM003).
Housing: Fractal Design Define R5.
Block nutrition: Fractal Design Edison M 750 Watt.
The first test is the performance of the CPU caches and random access memory inAida 64 Cache & Memory Benchmark.

As you can see, there are no significant differences in the operation of the RAM subsystem and processor caches.
The next test will concern the operation of the disk subsystem.
Unfortunately, I do not have a high-speed M.2 SSD, so I will be testing my Plextor M5S on a regular SATA-3.
As a result, the ATTO Disk Benchmark gives almost identical results.

The same applies to the results in the CrystalDiskMark 5.2.1 test.

CrystalDiskMark benchmark and new Intel processor microcode. Specter and Meltdown
At least for SATA-3, performance drops during read and write operations are not observed.
The next test is 7zip, which will show the performance when packing and unpacking archives.

The picture is still the same here, there is no difference in performance when installing a new patched BIOS.
Since I create content, I could not leave aside the editing of video clips.
I use Vegas Pro 13 as an editing program and regardless of the BIOS version used, the render time has not changed.

The video sources have a resolution of 1080p, a bit rate of 50 Megabits / s and a frequency of 50 frames per second.
Sony AVC / MVC with a bitrate of 16 Megabits / s was chosen as a profile for rendering, all other profile settings you can see on your screens.

Now let's talk a little about games.
The tests involved those projects that I had installed on my computer in this moment time (Assassin's Creed Origins, FarCry 4 and Crysis 3).
All frame rates were captured using MSI Afterburner 4.4.2.
In general, the results do not need commentary.
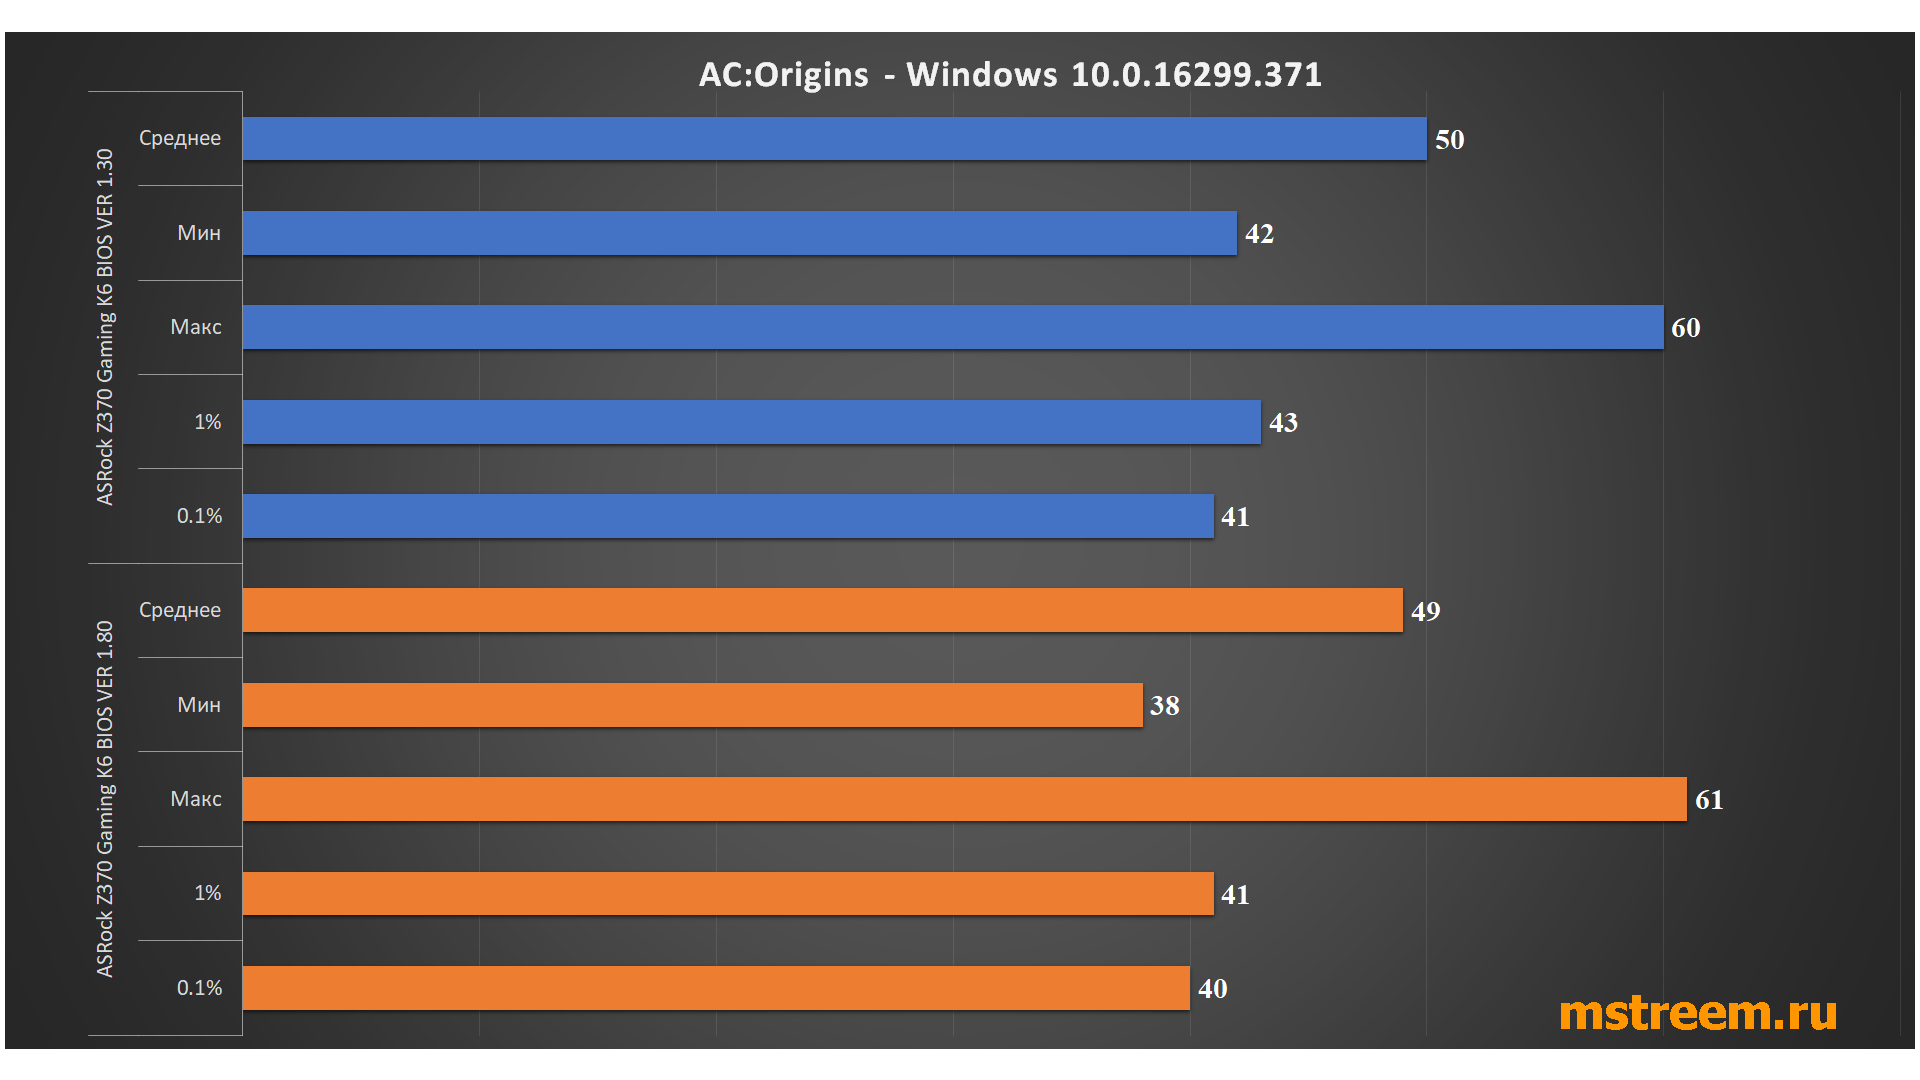
Performance tests in Assassin's Creed Origins games. Specter and Meltdown


If you use the new version of the processor microcode after revision 84, then the difference in performance cannot be noticed - everything works just as fast and smart.
The only interesting thing would be to look at the work of M.2 SSD drives with an NVMe interface.
Perhaps in the future I will carry out more tests with software patches for Windows 10 and with the corrected CPU microcode installed at the same time.
I hope you were interested. If so, please share my note in social networks with your friends.
Thus, there will be much more such notes :)
Also, do not forget to join the Vkontakte group and subscribe to the YouTube channel.
Modern processors are complex devices that can have bugs. Furthermore, instead of executing x86 instructions directly, modern x86 processors contain internal code that implements support for the x86 instruction set. The internal code is called microcode. Microcode can be updated to fix or mitigate CPU bugs.
Some CPU bugs can make Firefox crash. For example, Firefox 57 and later is known to occasionally crash on Broadwell-U CPUs with old microcode in a manner not seen with newer Broadwell-U microcode versions.
Microcode updates can be loaded onto the CPU by firmware (usually called BIOS even on computers that technically have UEFI firmware instead of old-style BIOS) or by the operating system. Microcode updates do not persist across reboot, so in the case of a dual-boot system, if the microcode update isn "t delivered via BIOS, both operating systems have to provide the update.
On Mac, to have an up-to-date system, apply all OS X system updates and Apple firmware updates offered in the Updates pane of the App Store app.
To allow Windows to load updated microcode onto the CPU, make sure Windows Update is enabled and set to install updates.
To see the processor microarchitecture and which microcode revision is in use, run the command reg query HKEY_LOCAL_MACHINE \ HARDWARE \ DESCRIPTION \ System \ CentralProcessor \ 0 in the Windows command prompt. ( You can open the command prompt by pressing Windows + R, typing cmd and pressing Return.) The line labeled "VendorIdentifier" shows the CPU vendor (GenuineIntel for Intel or AuthenticAMD for AMD). The line labeled "Identifier" gives the microarchitecture as three numbers: "Family", "Model" and "Stepping". These are relevant in identifying if a particular CPU bug may be relevant to the CPU in your computer. The line labeled "Update Revision" shows the current microcode revision (for the particular microarchitecture) with zeros on both sides. For example, Update Revision REG_BINARY 000000001E000000 means that the revision is 1E (hexadecimal). The line labeled "Previous Update Revision" shows the microcode revision loaded from BIOS.
If the vendor is GenuineIntel, family is 6, model is 61 and stepping is 4, to avoid crashes with Firefox 57 or later, the microcode revision needs to be 1A or higher.
Whether microcode updates are in use by default depends on the Linux distribution and can differ for Intel and AMD CPUs.
- On Debian-based distributions, including Ubuntu, microcode updates for Intel processors are provided by the intel-microcode package and microcode updates for AMD processors are provided by the amd64-microcode package.
- On Arch, AMD microcode updates are installed by default, but Intel microcode updates require special steps.
- On Fedora, microcode updates are installed by default.
To see the processor microarchitecture and which microcode revision is in use, run the command less / proc / cpuinfo in terminal. The line labeled "vendor_id" shows the CPU vendor (GenuineIntel for Intel or AuthenticAMD for AMD). The microarchitecture is given as three numbers on lines labeled "cpu family", "model" and "stepping". These are relevant in identifying if a particular CPU bug may be relevant to the CPU in your computer. The line labeled "microcode" shows the microcode revision number (for the particular microarchitecture) in hexadecimal.
You can optimize the performance of your computer's Intel or AMD CPU by installing the latest version of its microcode. Optimization is achieved mainly by fixing errors in the standard microcode obtained from the motherboard firmware.
Your motherboard's BIOS / UEFI firmware updates usually contain new microcode versions for the CPUs supported by the motherboard. For this reason, you should first make sure that you are using the latest BIOS / UEFI version.
This guide will only optimize the performance of CPUs that have been developed by Intel and AMD.
Notes:
- Installing a microcode software package may cause your computer to become unstable. For this reason, you should install this package only when there are any problems related to the functioning of the central processor of your computer!
- Do not install the CPU microcode software package if it was released earlier than the BIOS / UEFI firmware of your computer's motherboard!
1. Central processors manufactured by Intel
If you are using an Intel CPU, you can proceed as follows.
Note: Do you need an Intel CPU microcode package newer than the one in the official distribution repository? In this case, you can download the software package file with the extension .deb of
Synaptic Package Manager Software
Synaptic Package ManagerComputer Search), enter query Synaptic "Synaptic Package Manager" Synaptic Package Manager "Search" "Microcode" and press the button "Search" next to him.
3.201501106.1 (in this case, version 3 of the package was created on November 6, 2015).
« intel-microcode " and press the button Apply
dmesg | grep microcode
Enter
2. Central processing units manufactured by AMD
If you are using AMD processors, this guide will only apply to those released after 2006 (AMD K10 and newer). If your computer has one of these central processing units, you can proceed as described below.
Note: Do you need an AMD CPU microcode package that is newer than the one in the official distribution repository? In this case, you can download the software package file with the extension .deb from the repository of the Debian distribution where the packages are placed newest versions... After finishing downloading the package file, you should find it using the file manager and use a double click to install the microcodes into the system. After the installation is complete, you must restart your computer.
A. If using Ubuntu distribution, you will have to install Synaptic Package Manager(this can be done using the app Software). In Linux Mint this manager packages are present immediately after installation.
B. First of all, you should run Synaptic Package Manager... On an Ubuntu distribution, for this purpose, click on the white Ubuntu logo at the top of the sidebar ( Computer Search), enter query Synaptic and choose the first of the proposed application options "Synaptic Package Manager"... No need to use the field quick search main window software packages Synaptic Package Manager, since the corresponding mechanism is unreliable; instead, press the button "Search" on the toolbar, in the search field of the dialog box that opens, enter the query "Amd64-microcode" and press the button "Search" next to him.
C. Now check the creation date of the CPU microcode software package: this package must be created later than the BIOS / UEFI firmware of your computer's motherboard! The creation date of the package in question is reflected in its version number, for example 2.20160316.1 (in this case, version 2 of the package was created on March 2, 2016).
D. It's time to check the box next to the name of the software package "Amd64-microcode" and press the button Apply on the application toolbar.
E. After completing the installation of the software package, you must restart your computer.
F. After rebooting, it is worth checking the correctness of loading one of the installed microcodes by entering the following command in the terminal window (use the copy / paste functions in order to avoid errors):
dmesg | grep microcode
After finishing entering the command, press the key Enter for its execution. If the microcode was loaded successfully, you will see several messages about it.
Would you like to learn about other settings and tricks for working with Linux systems? A large number of such materials are posted on this website.
Actually, the original method, equipment and microcodes can be found (directly the AMI instruction), and in most cases the use of this method does not pose any problems and does not have pitfalls, but in my practice I regularly encountered this problem:
Those. there was a banal shortage free space inside the image. When you modify the BIOS for yourself for a specific processor, you can ignore this, because You can always load just one microcode specifically for your processor, or delete some old microcode to free up space, but when you modify it with a stream, you need to look for another compromise solution.
As a compromise, I chose the following solution - we take latest versions microcodes for all processors of the CORE generation in all constructions (Celeron E, Pentium E, Core 2 Duo, Core 2 Quad, Xeon * 3xxx / * 5xxx) and replace everything that came before. The set of microcodes turned out as follows:
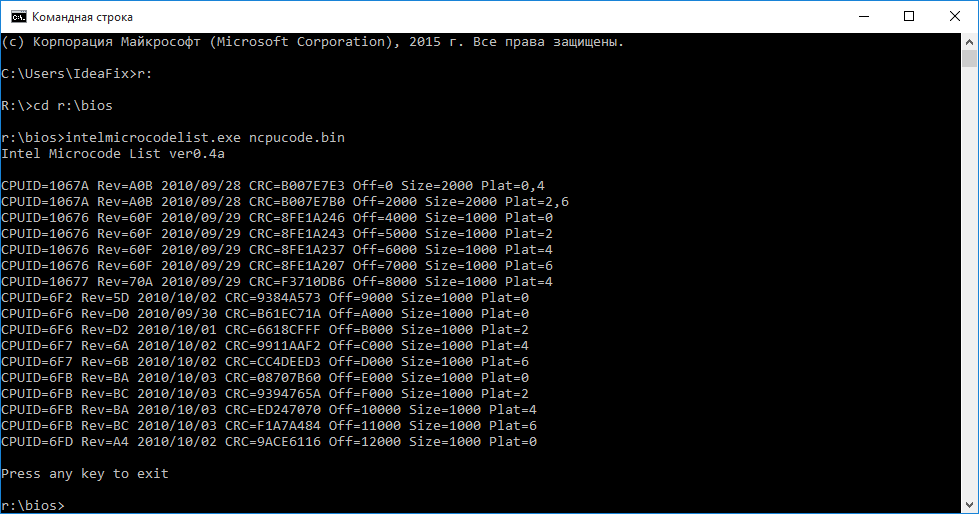
The volume of this set is only 76 kilobytes. This file was obtained by combining these files:
cpu00010676_plat00000001_ver0000060f_date20100929.bin
cpu00010676_plat00000004_ver0000060f_date20100929.bin
cpu00010676_plat00000010_ver0000060f_date20100929.bin
cpu00010676_plat00000040_ver0000060f_date20100929.bin
cpu00010677_plat00000010_ver0000070a_date20100929.bin
cpu0001067a_plat00000011_ver00000a0b_date20100928.bin
cpu0001067a_plat00000044_ver00000a0b_date20100928.bin
cpu000006f2_plat00000001_ver0000005d_date20101002.bin
cpu000006f6_plat00000001_ver000000d0_date20100930.bin
cpu000006f6_plat00000004_ver000000d2_date20101001.bin
cpu000006f7_plat00000010_ver0000006a_date20101002.bin
cpu000006f7_plat00000040_ver0000006b_date20101002.bin
cpu000006fb_plat00000001_ver000000ba_date20101003.bin
cpu000006fb_plat00000004_ver000000bc_date20101003.bin
cpu000006fb_plat00000010_ver000000ba_date20101003.bin
cpu000006fb_plat00000040_ver000000bc_date20101003.bin
cpu000006fd_plat00000001_ver000000a4_date20101002.bin
The modification procedure itself has also changed slightly and has become, if not simpler, then faster:
Step 1- open the BIOS image in the MMTool program: 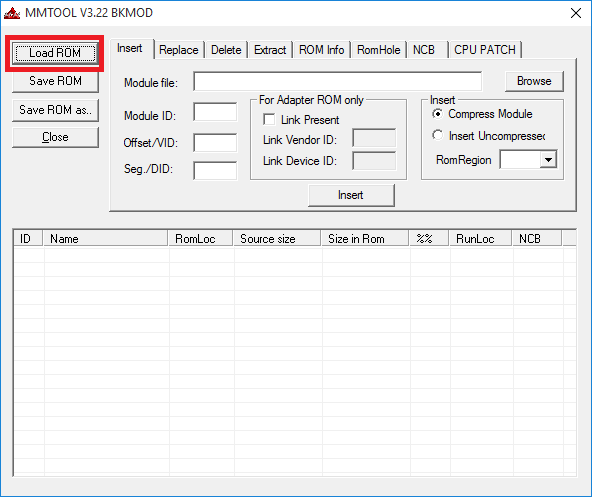

Step 2- to check, go to the last tab (CPU PATCH) and look at the number of microcodes. Here, for example, there are 31 of them: 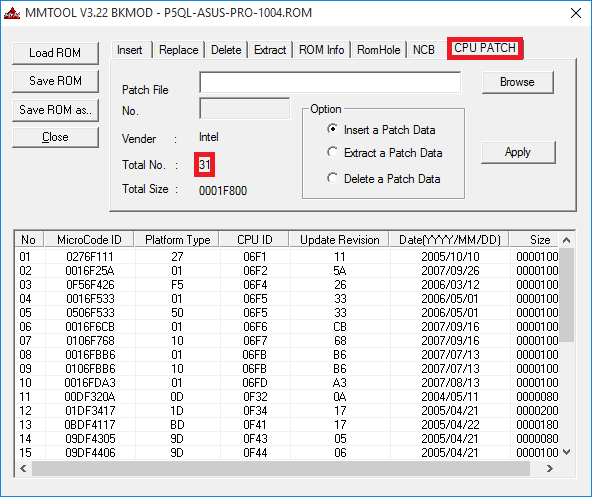
Step 3- go to the Replace tab and look for the item "P6 Micro Code" on it: 
Step 4- by selecting the "P6 Micro Code" item, press the Ikschtsyu button, select the ncpucode.bin file described above and replace it with the Replace button: 


Step 5- to check, go to the last tab (CPU PATCH) and see the number of microcodes. After the replacement of microcodes, there are 17 left, the latest version: 
There is no fundamental difference with the modification order described on delidded.com. In most cases, the output is of course not the same, but the processor receives the required microcode. Of the subjective positive aspects, I would like to draw your attention only to the fact that the microcodes are guaranteed to be updated for all current processors, be they "civil" or "server" ones, and there is practically no risk of receiving a message about a lack of space. Although, in my practice, even for such a set of microcodes, there was not enough space a couple of times, it was with the BIOS for the ECS P4M900T-M and ECS P4M900T-M2 boards, which are generally compatible with the Xeon E5450.
By tradition, I publish a link to the archive with tools - (zip, 234KB). The archive contains executable file MMTOL.exe(version 3.22 BKMOD), microcode file for all 45 / 65nm processors of the core / xeon generation ncpucode.bin, as well as two files 45nm.bin and 65nm.bin with microcodes only on 45nm processors and only on 65nm. The use of these files can be useful in cases where it is necessary to free up additional space in the BIOS, for example, for new firmware of some controller, network, disk, etc.
! NB: Neither ncpucode.bin file nor 45nm.bin / 65nm.bin files support Pentium 4, Celeron (without letter indices), Pentium D, Celeron D and Xeon W processors (Xeon 5080 for example). These are NetBrust generation processors.